

.svg)
CS2 (CSGO) Inferno [Map Guide & Callouts]


Inferno is full of large open spaces making it hard to master. With this guide you can learn the best strats, callouts, smokes and nades for the job.
![CS2 (CSGO) Inferno [Map Guide & Callouts]](https://theglobalgaming.com/assets/images/_generated/thumbnails/61396/61a89b30073b9c6b52811f76_Inferno-Map-Guide-CSGO_94948129f3d674eb46f0eebb5e6b8018.jpeg)
About Inferno
Created by Chris "Barney" Auty, the Inferno map was originally an abandoned residence set during the evening. During Counter-Strike 1.6, Valved edited the map to change it to a village setting and when CS: Source came around the map changed forever. The theme has changed from the abandoned residence it once was.
The first CS2 (CSGO) version of the map hasn't had any major changes except for a few visual modifications to limit camping. However, the Bombsites have swapped positions since the original version.
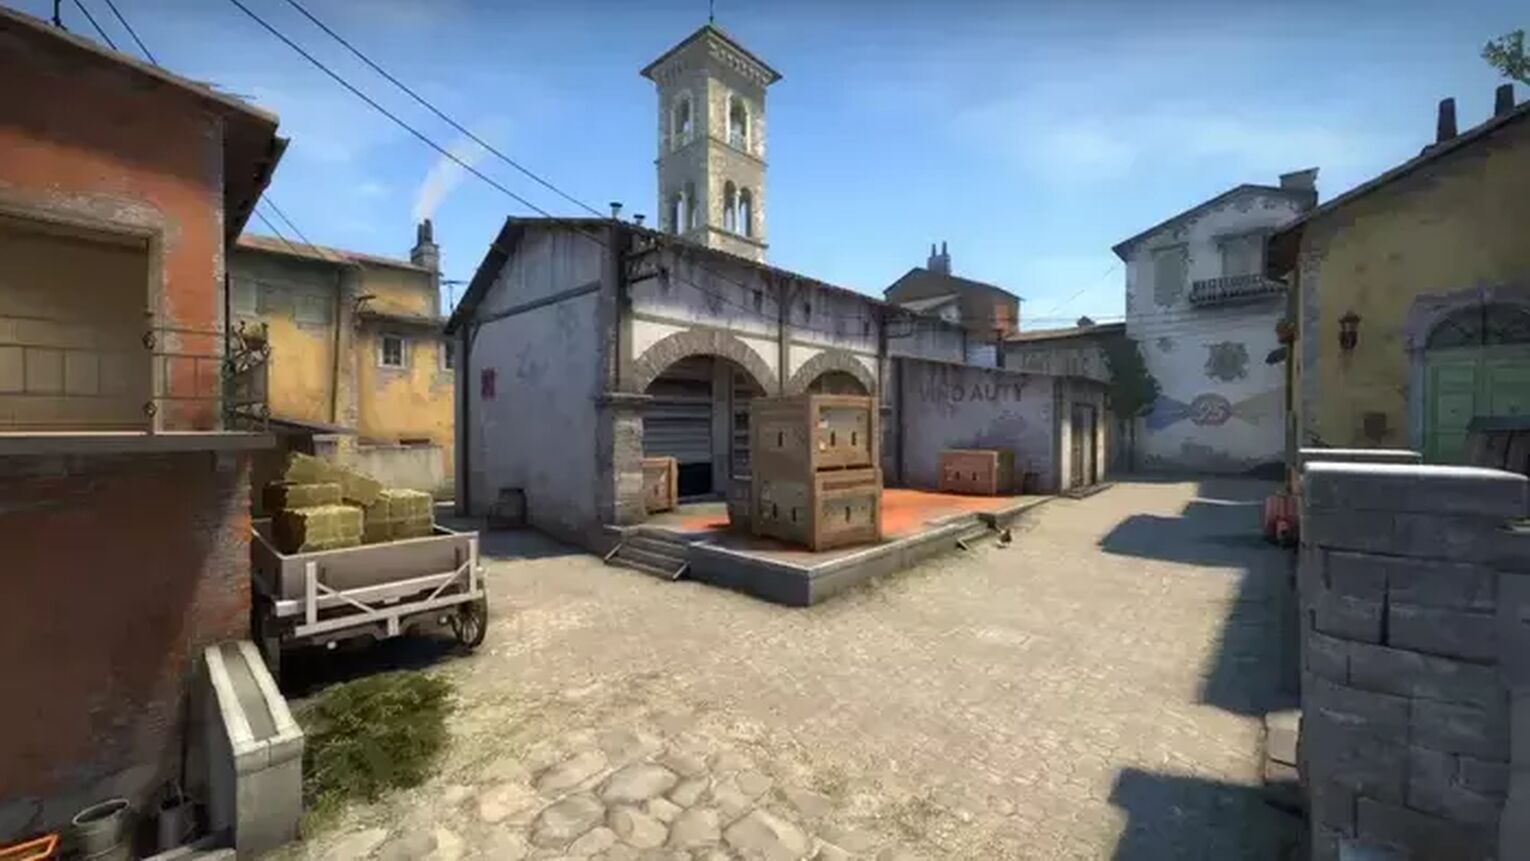
In 2016, they gave Inferno a total revamp. The overall layout of this map hasn't changed, but the revamp had widened some of the pathways, increased the brightness levels, increased the size of the windows in The Window Room and overall visibility. The map setting has now become an Italian town that has some distinctive architecture from that region of Europe. Inferno's Bombsite A is also featured CS2 (CSGO)'s in newest addition : the Wingman mode.
Inferno Callouts
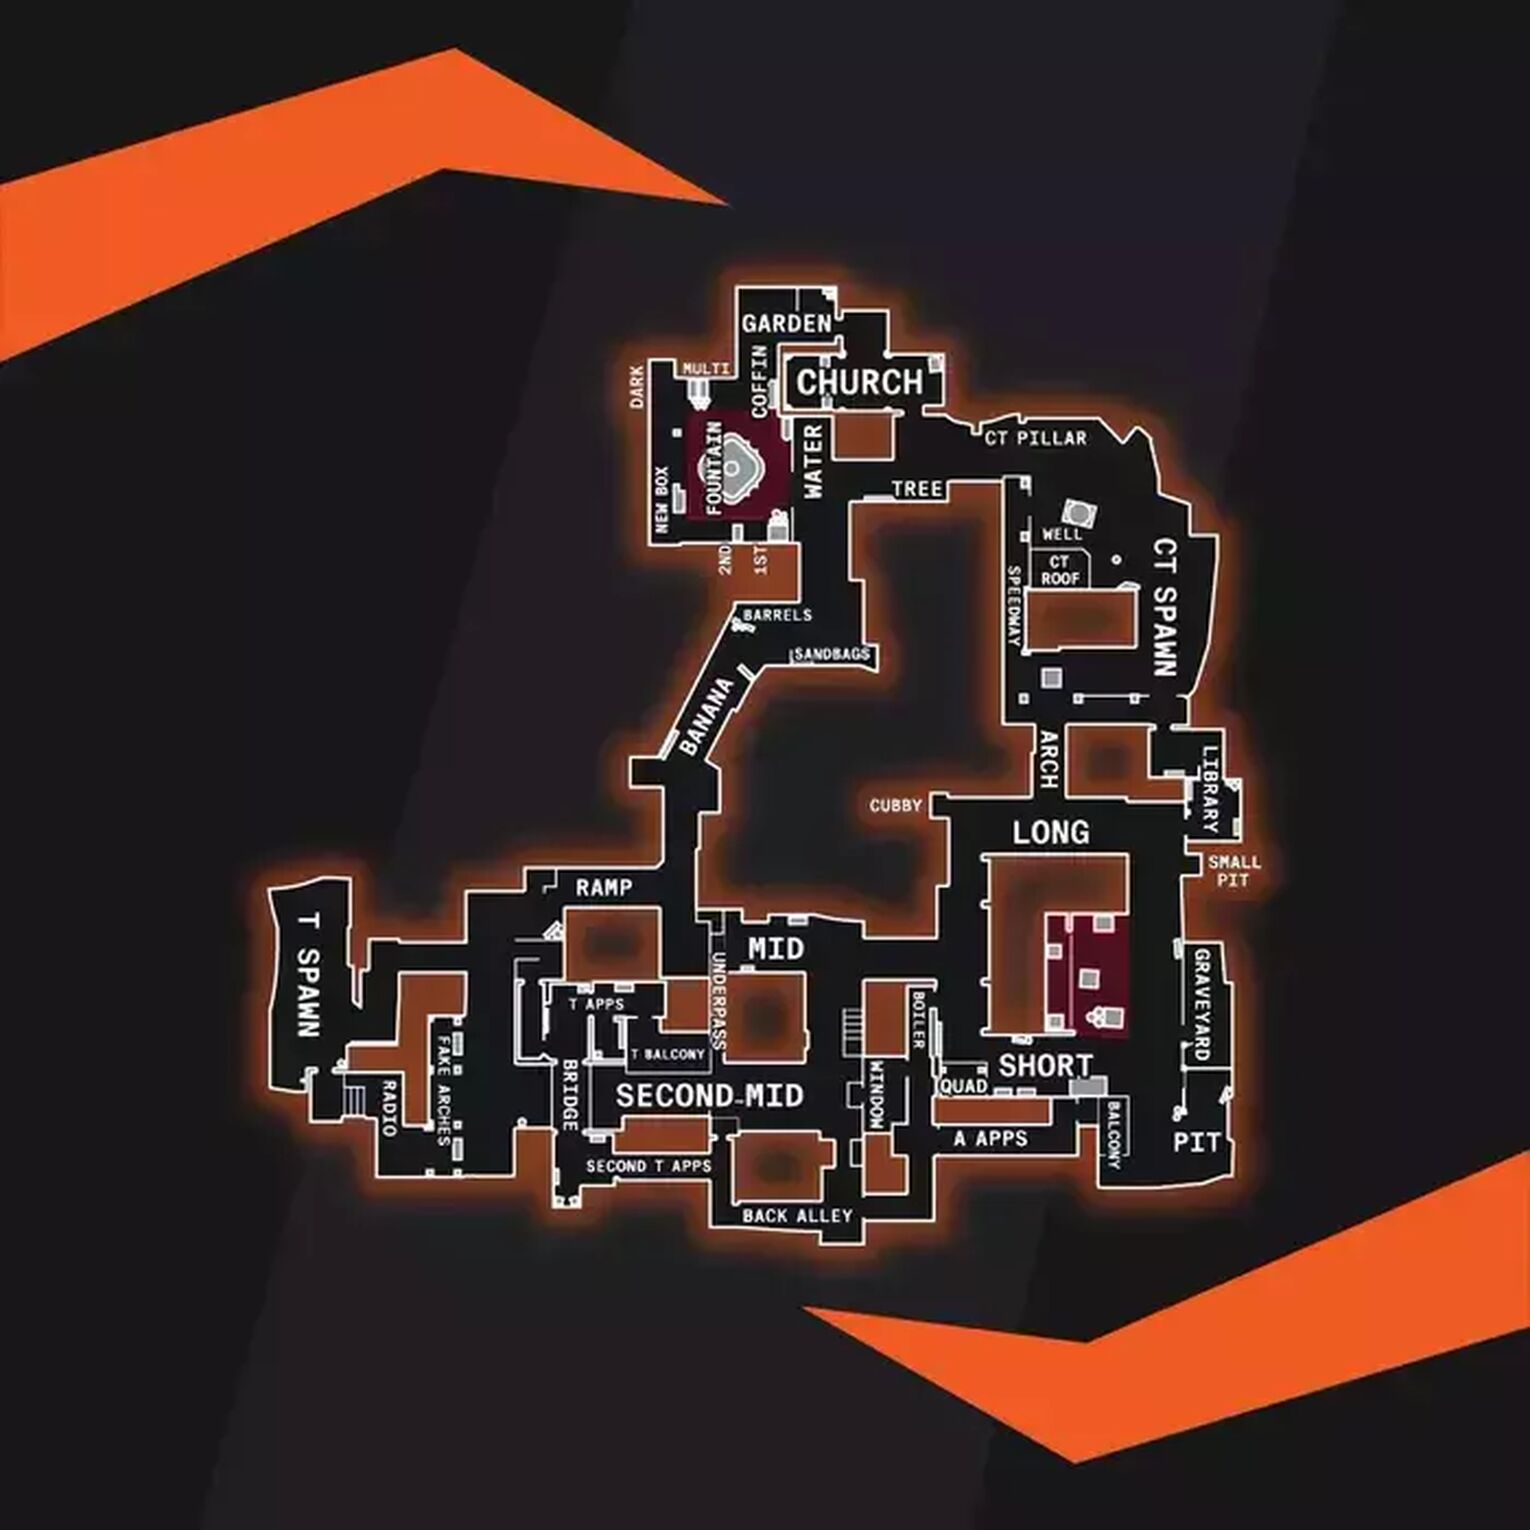
Inferno is a large sprawling map with open areas, wide corridors, narrow pathways and also a small tunnel. It allows for a lot of freedom as there are many options here, but because of the distance between the bombsites, it forces even higher ranked players to be very strategic.
The two bombsites are essentially on the opposite sides of the map to each other and while Site A has a lot of routes to approach from, Site B is more limited to fewer approach options.
Here is an overview of other CS2 (CSGO) Map Callouts:
- All Overpass Callouts
- All Cache Callouts
- All Vertigo Callouts
- All Mirage Callouts
- All Dust 2 Callouts
- All Nuke Callouts
- All Train Callouts
While several areas are more open, Inferno is full of corridors making them perfect for ambushes and setting up blockades to hold the Terrorists back.
The Terrorists spawn at the furthest point from both Site A and Site B, while the Counter-Terrorists spawn on the opposite side of the map but between the two Bombsites.
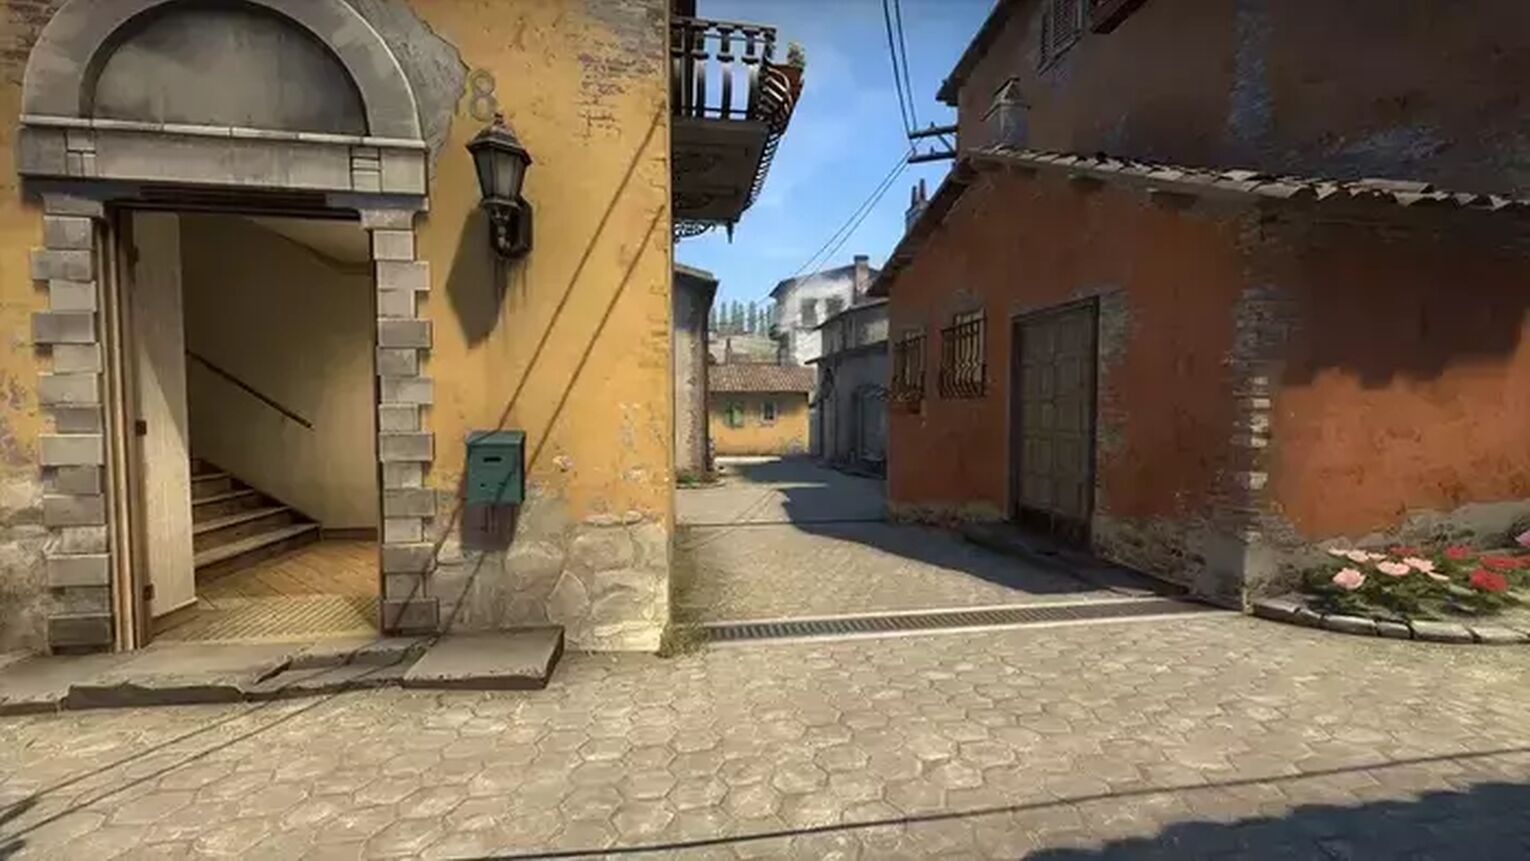
The narrow streets and tight corners with hiding spots can make Terrorists approaches very difficult for both of the Bombsites.
The middle area (Mid) of the map provides access to Site A while to reach Site B, Terrorists would need to push up from Bottom Mid and through the dangerous area known as Banana or try to work around the CT Spawn near the Well.

There are 61 callouts on this map to identify the unique areas which is the highest number of any map in CS2 (CSGO). This means it takes longer to learn, but doing so is worth it. Being a CT-sided map, you must learn the hotspots and key areas at least.
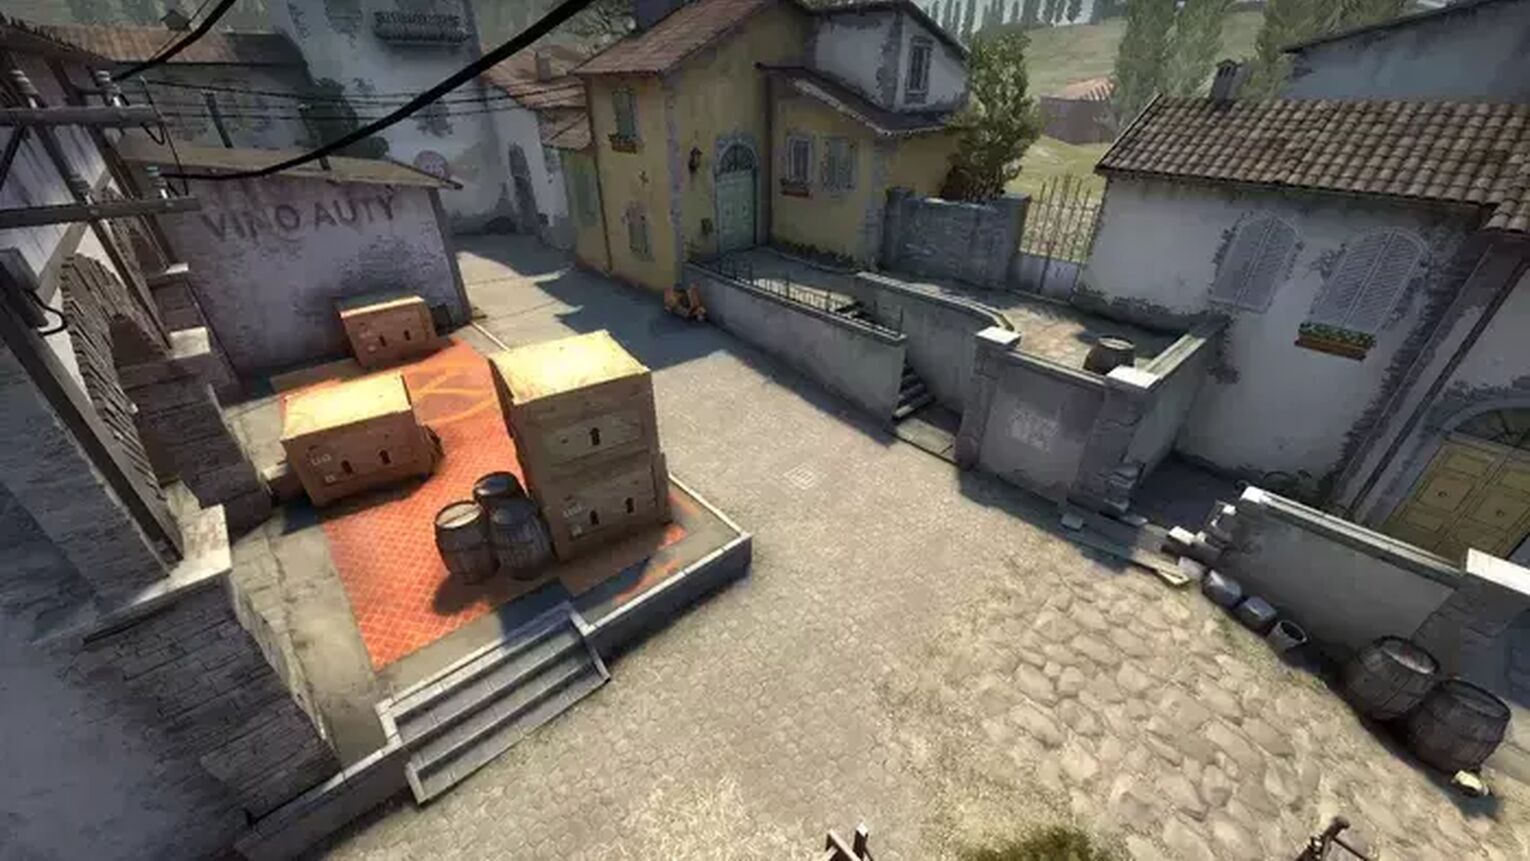
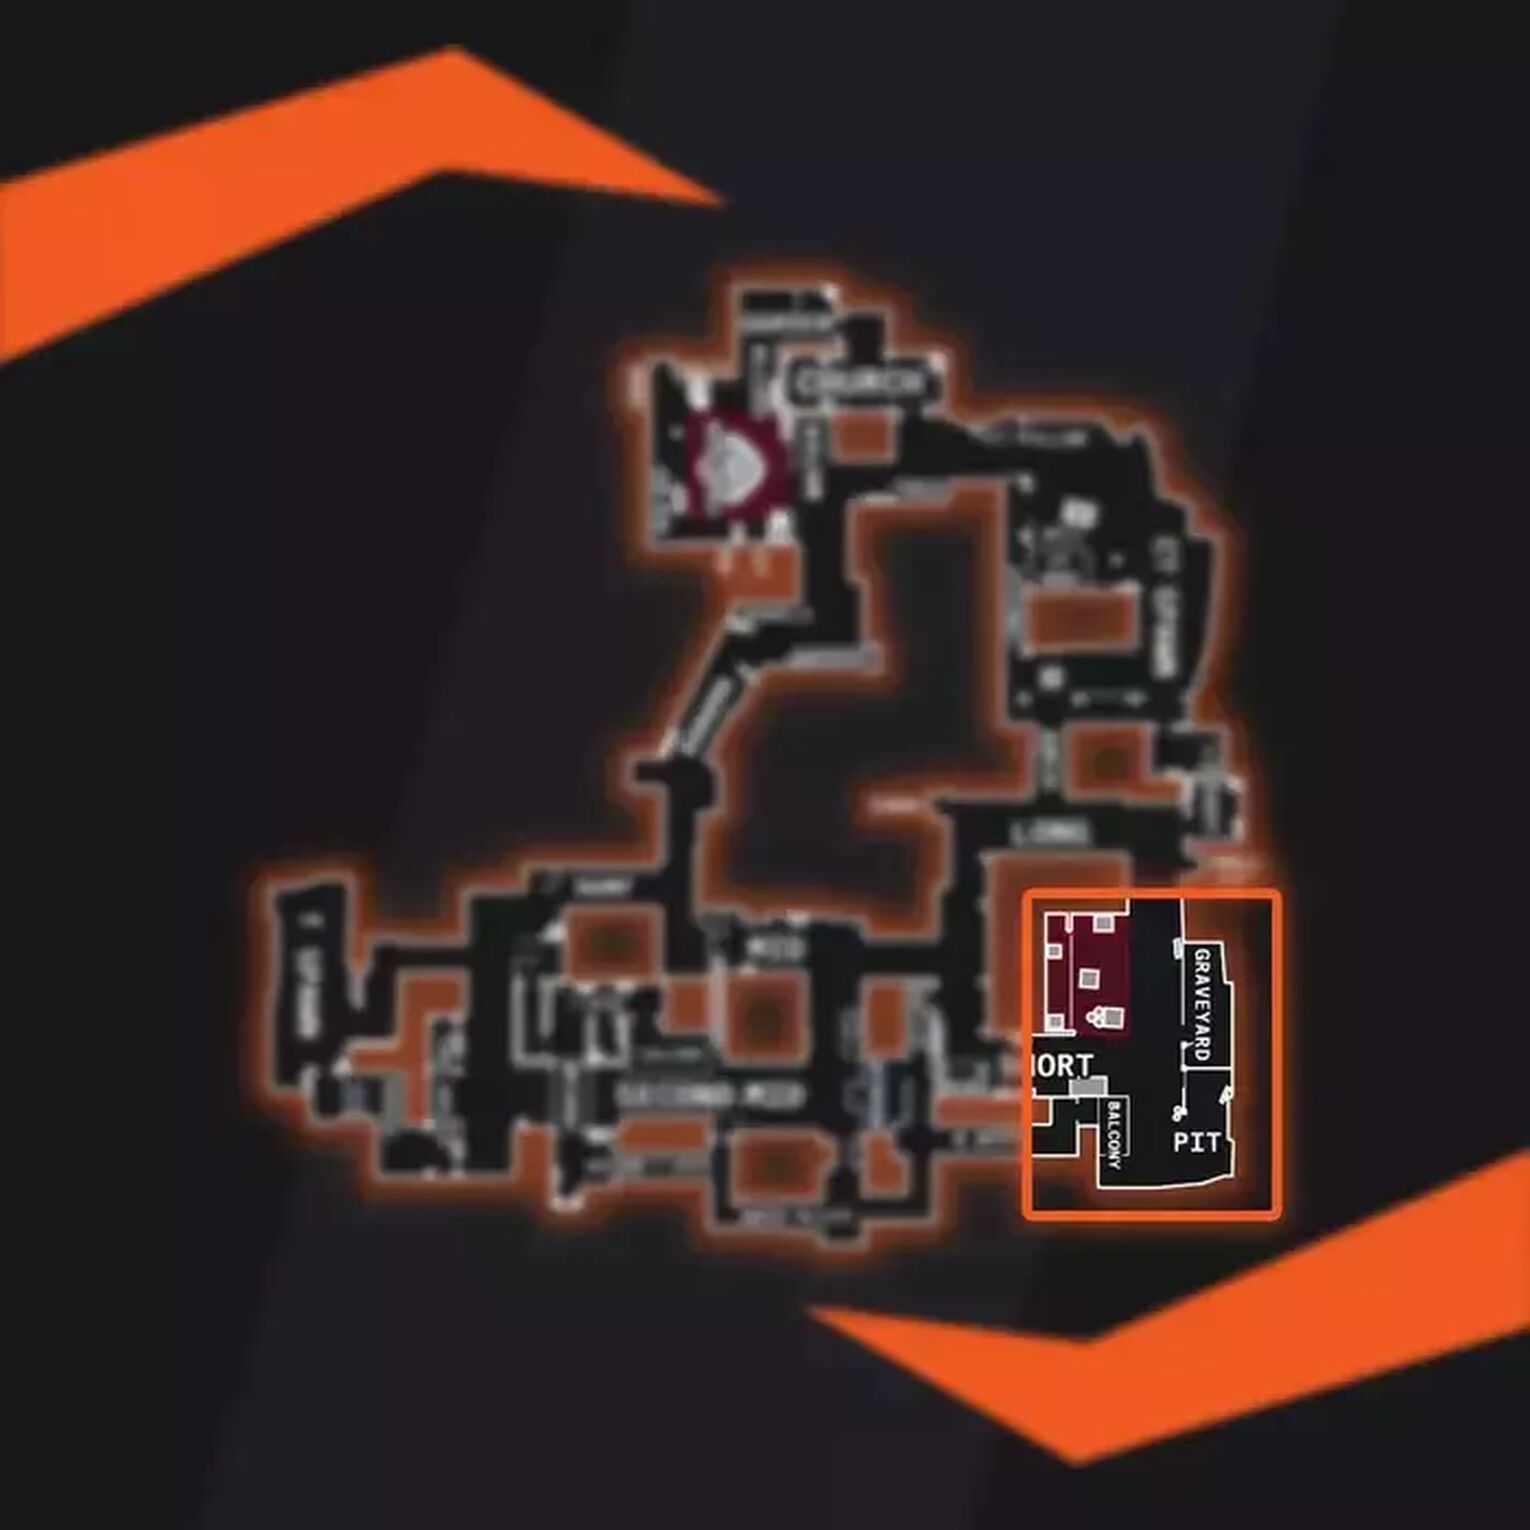
Bombsite A
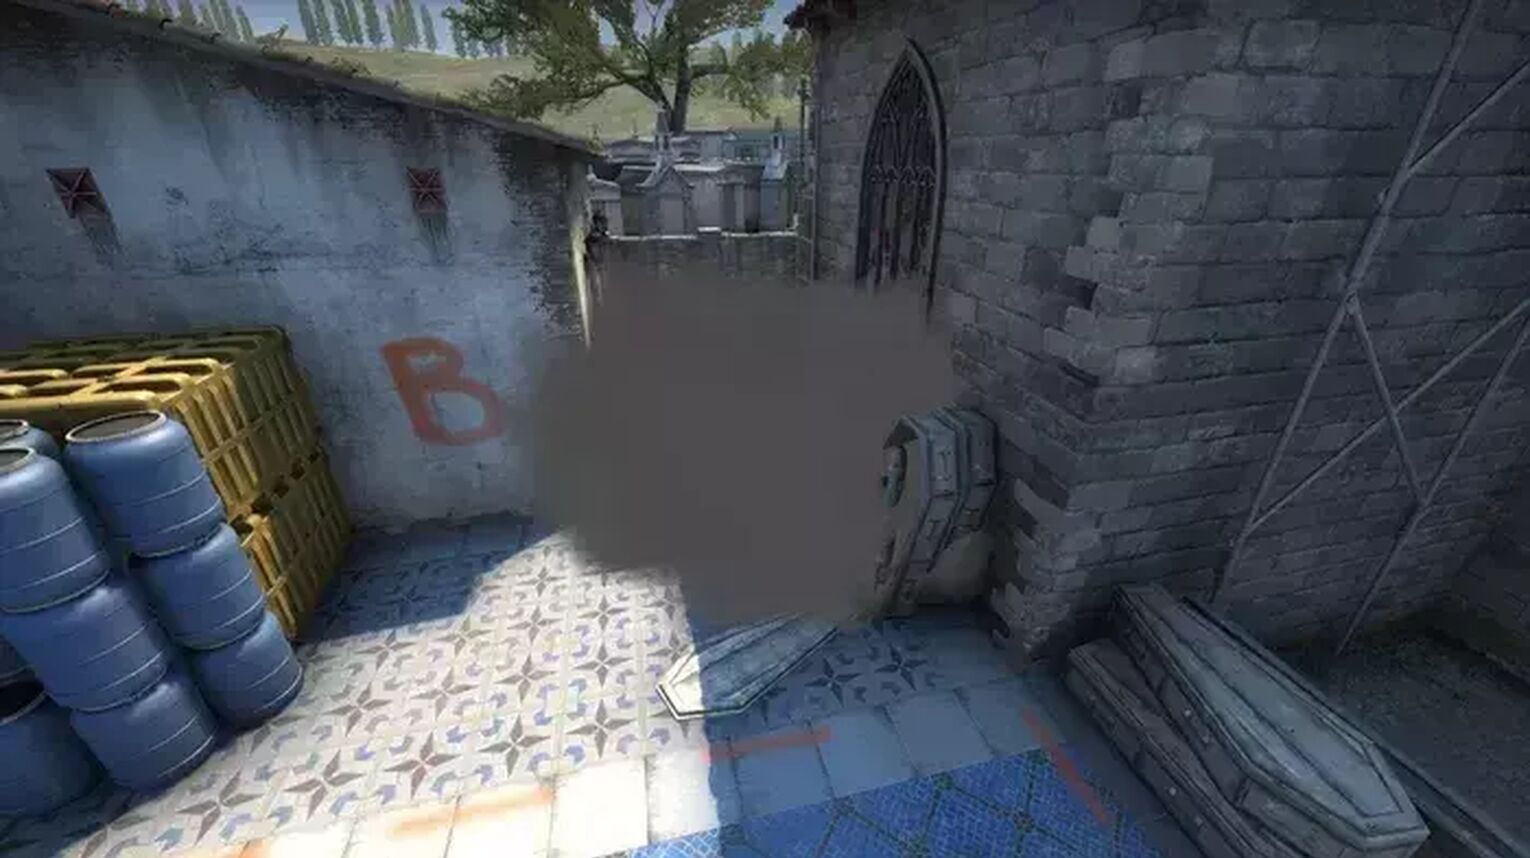
Located on the right side of Inferno, Bombsite A is surrounded by wide corridors and is a highly visible area. There are good hiding spots all around it with the Graveyard opposite it, the Truck and Balcony proving as excellent vantage points along with the Close Left box on the site itself and the hiding spot by Library.
Approaching it can be tricky as CT's can also push slightly further out to use the Window Room so that Terrorists have trouble using Second Mid to reach Site A and closing off one of their approach points.

As one of the Bomb planting spots, this is a regular fighting area along with Pit next to it where the CT usually try to hold back the Terrorists. There are a lot of attack and defending options here.
How to defend Bombsite A on Inferno
Defending from A Site is not a great option unless you're the only one left alive on your team as you will be more vulnerable there. Graveyard and Pit are more powerful positions as you can throw some smoke or a Molotov in the enemies path, move into a better position and fire at them.
This is a suitable spot to hold an enemy until you can either get the kill or until your team can come and support you.There is also the option of using the Truck to get onto the Balcony but keep in mind that Terrorists might come from behind you there.
Coming through the CT Apps brings them to the Balcony which can work if you were looking to block this area off to them and force them to go another way round. This is very risky and you would better off heading towards the Arch so you can monitor where the Terrorists will attack Site A from to relay that information to your team.

Due to Site A being surrounded by corridors, ledges, boxes, walls and other hiding spots, this area gives you a lot of creative freedom. A lot of corridors lead towards this area which gives you various defensive options. Just remember that this also means there are a lot of attack options too!
How to attack bombsite A
With Inferno, your team must attack from two sides at all times. With the layout of the map, the CTs will use smoke grenades and flashbangs to force you back or into dangerous positions so they can make quick work of you. Pushing through the Banana and the Mid areas will mean the CTs use their grenades to hold you back but they will run out eventually as they also don't want to push into the dangerous corridors.
To take Site A, you will want to split up to clean out the Apartments so that two players work together to make sure it's safe so they can get a vantage point from that area. This means the two players making their way to Site A from the ground will need to throw a smoke grenade at the Truck and approach Site A.
Remember there are most likely CT at the Graveyard, Cemetery and Pit areas. The fifth player should aim to hold the Banana to prevent the team from being flanked, but once the fighting starts, they need to rejoin their team.
Aim to win the pistol round if you can, if you win it then the enemy team won't be able to buy any automatic weapons for the next round. This is a tremendous bonus and can completely change the fate of the round.
The player who intends to keep the CTs in the Banana should purchase a Flak Jacket to help them with their job. For the first half of the game, they're just trying to survive and keep them busy. Once the team wins Site A, that player has given the rest of the team more freedom to roam.
T Spawn
The T Spawn for this map is in the far bottom left corner with little of interest around it. While uninteresting, it leads to different areas that can reach Site A.
The left route from T Spawn leads to the Mid and has a Ledge that provides a line of sight to Top Mid which is critical since the Counter-Terrorists can hold Top Mid.
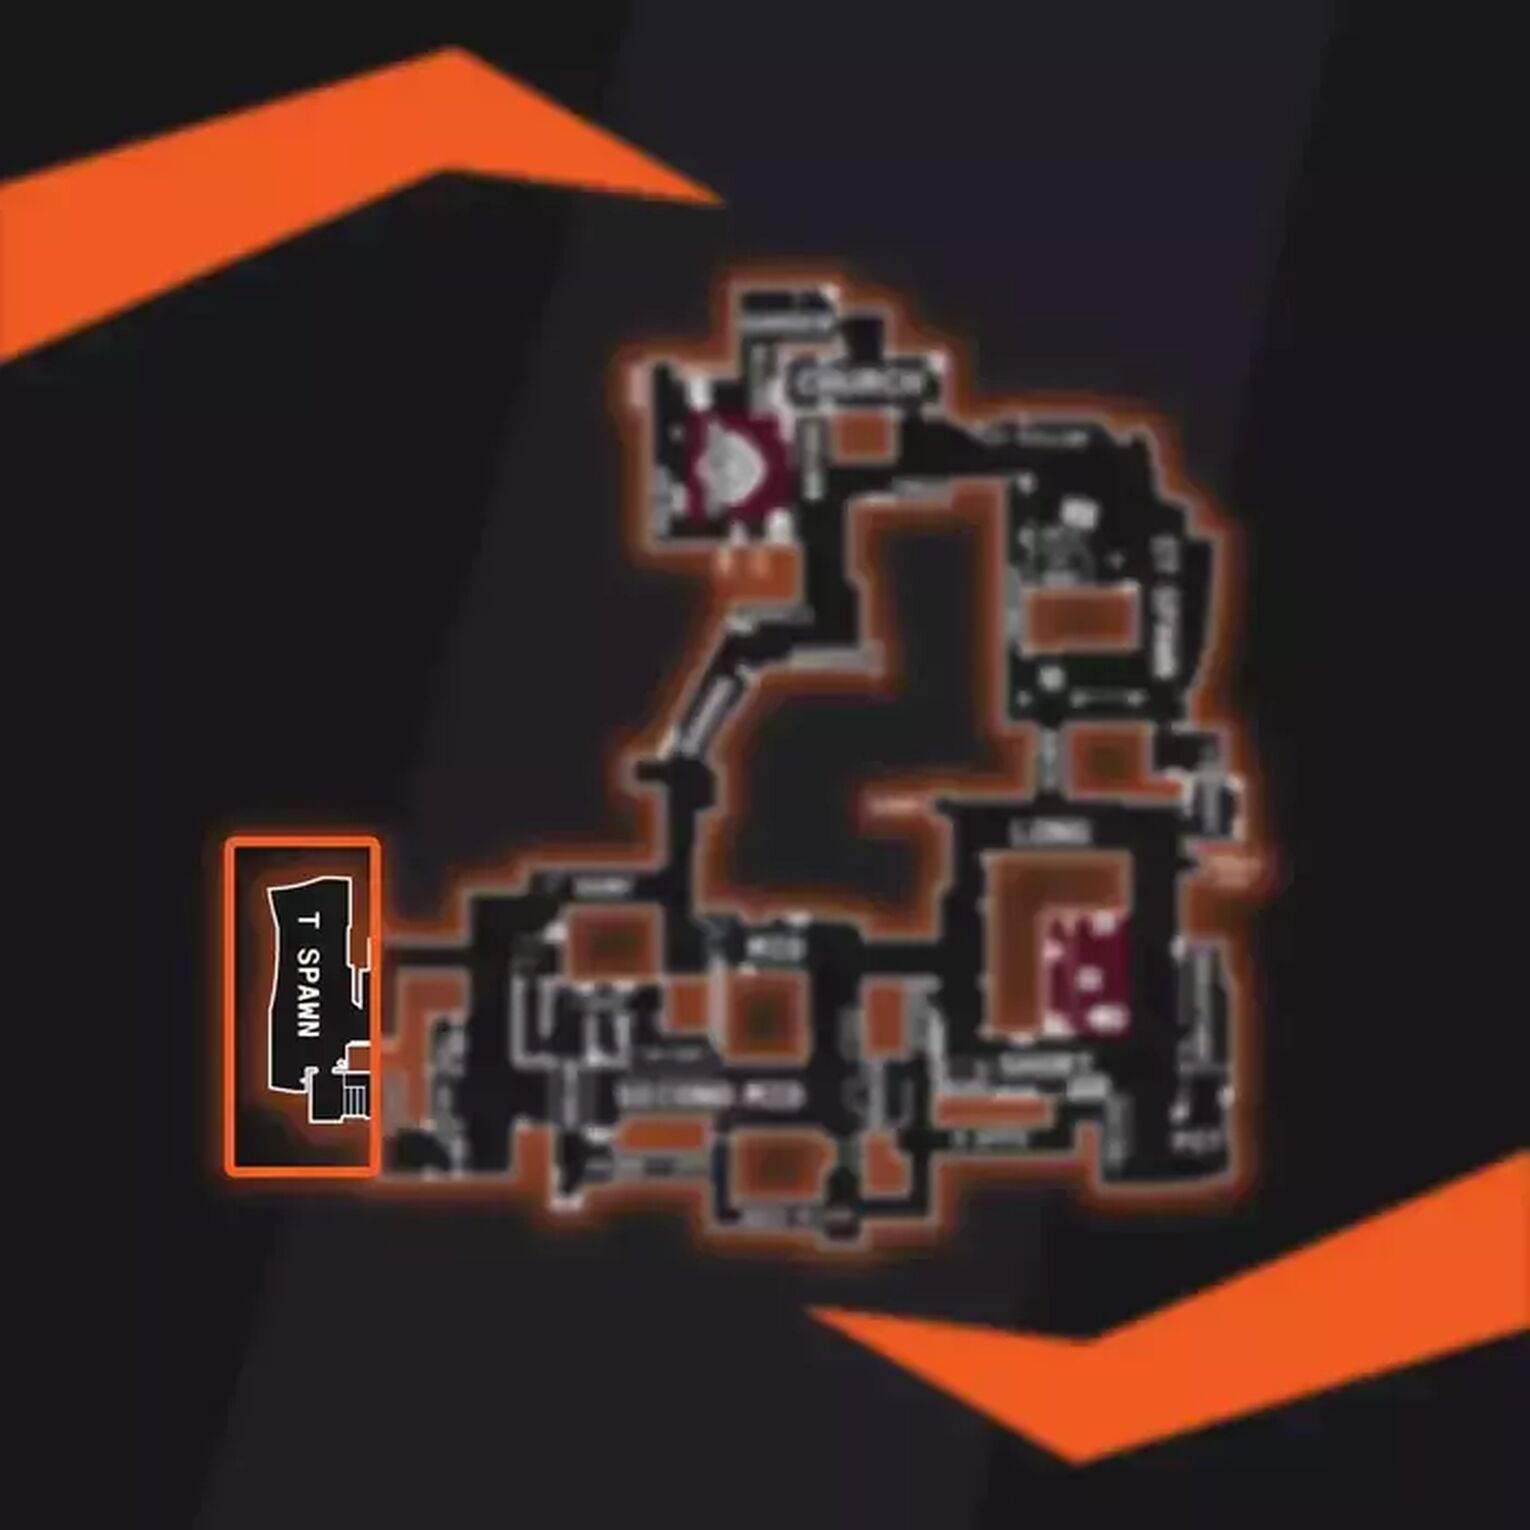
On the right side, players can go under the Bridge and into Second Mid. Support from the Balcony above means they can safely navigate towards the Window Room, CT Apartments or into Top Mid.
That side also allows players into the house to clear the Living Room and to the Second Mid Balcony for an unobstructed view of Second Mid. Players can go to the left once they reach Bottom Mid to go towards Banana instead.
CT Spawn
On Inferno, the CT Spawn is near the top right on the map and equally positioned between Site A and Site B. The spawn itself is next to the Well which is a large open area but also leads into some corridors and the tight walkway called Speedway.
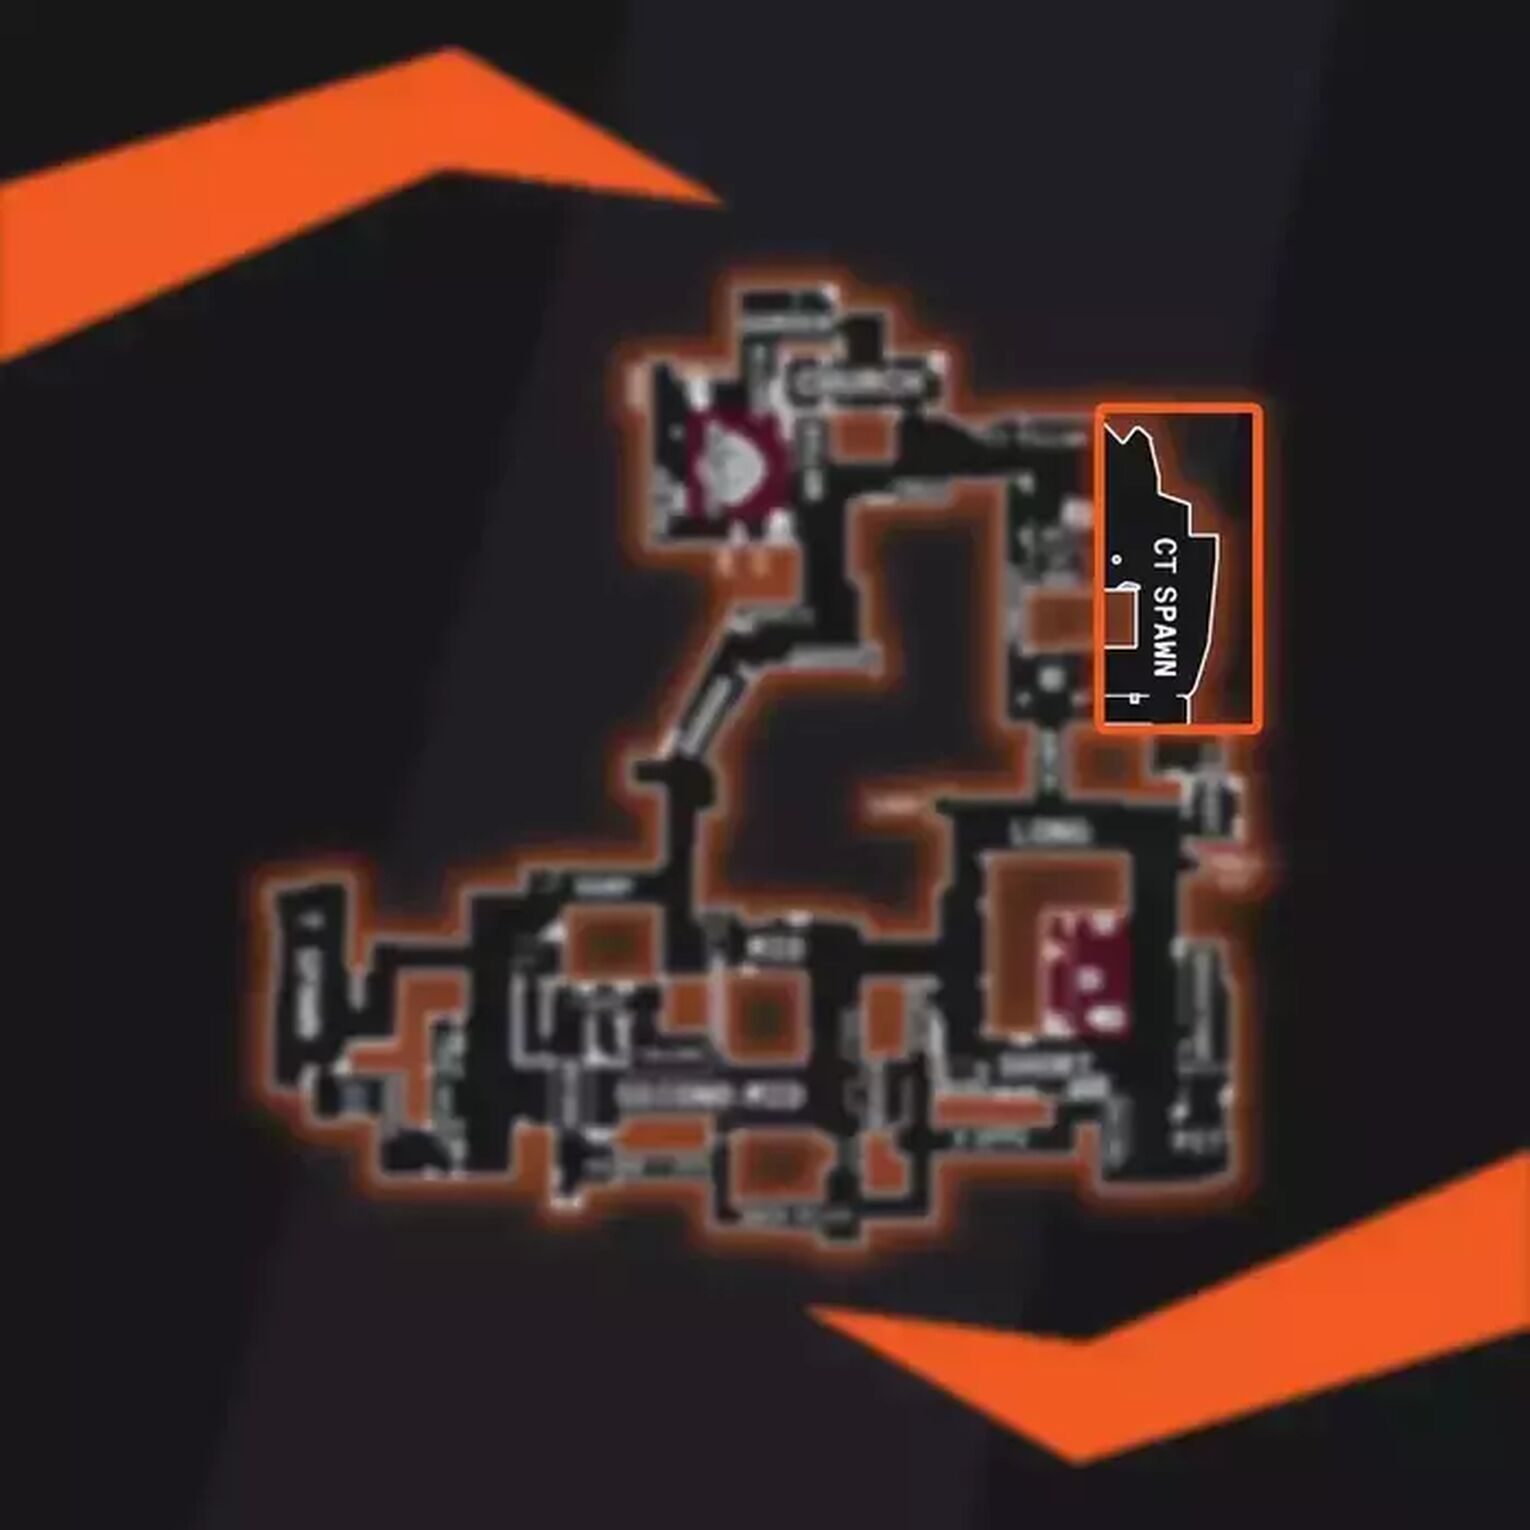
When moving to Site A, there are two potential routes: through the Kitchen and Library or the Arch which leads into A Long. Walking down from Library leads to Site A, the graveyard and Pit as well with the latter two being great defensive spots. Following the square around leads to the rear of Site A is the Top Mid where a lot of combat happens.
To reach Site B, players much move through the Well and into the CT or Construction zone to follow it round to the site. From there, someone will get to the Boosted spot at Site B while someone else could take a position at Sand Bags or the powerful CT Boost spot.
Banana
The Banana is the narrow pathway leading towards Site B from Bottom Mid and T Ramp close to the T spawn.
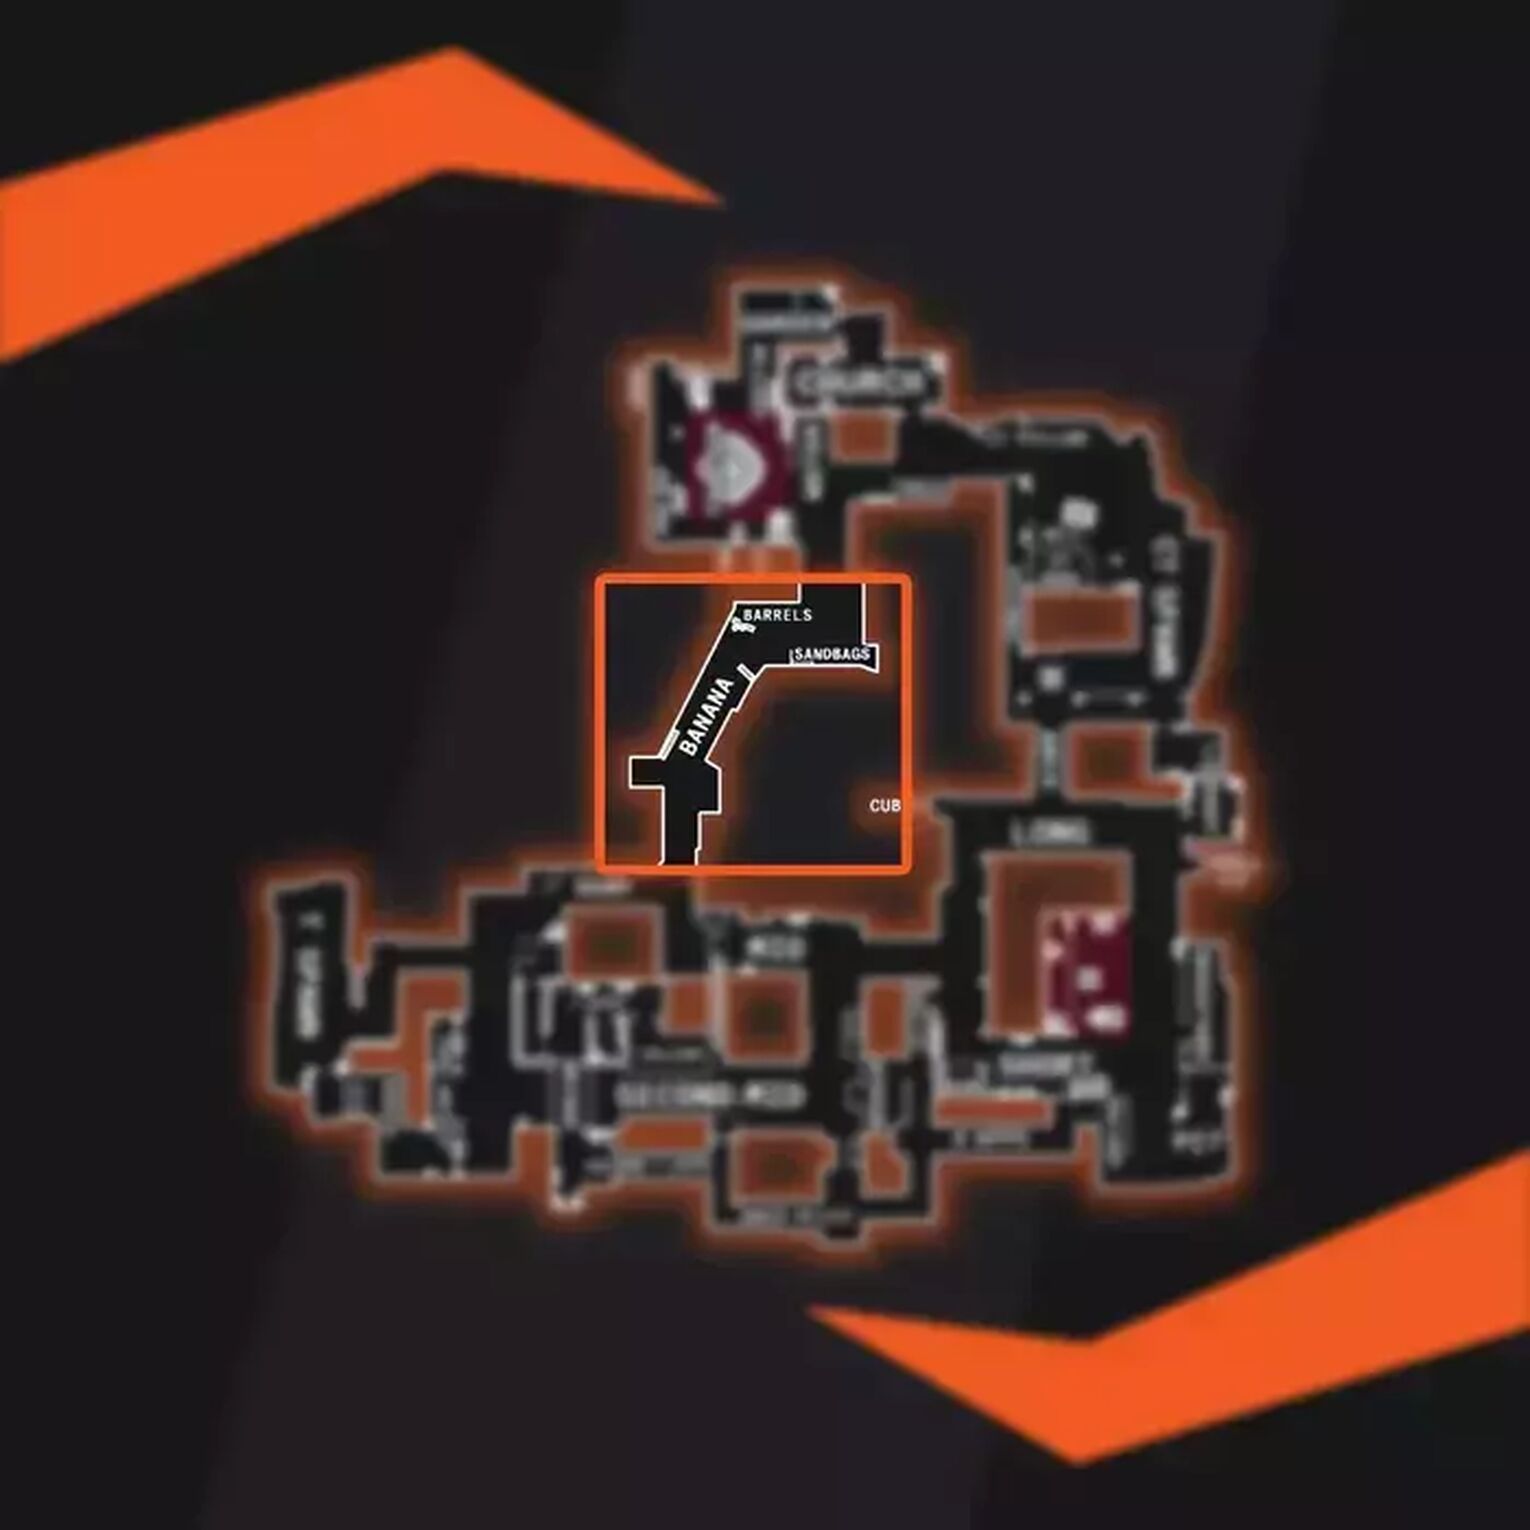
There is one cubby hole nearest the T Spawn side and a smaller more awkward one opposite is as well where the attacking team would wait before moving up towards the corner.

At the corner, the Car is positioned before the Sandbags and that wall can bounce a Molotov off to hit the sandbags area. From there, it leads into CT and Site B where the main fight for that site will happen.
Bombsite B
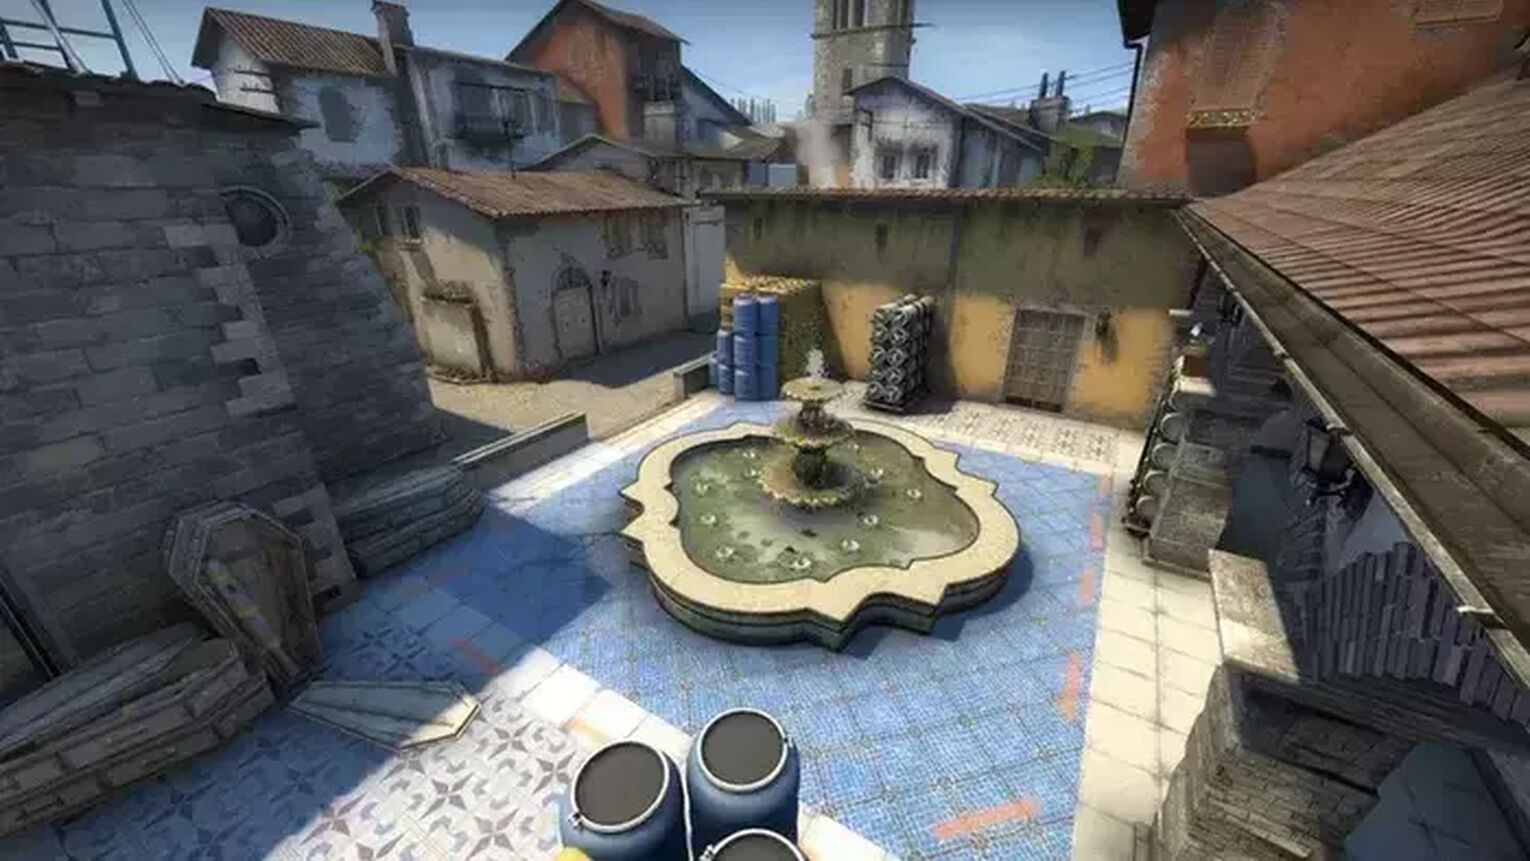
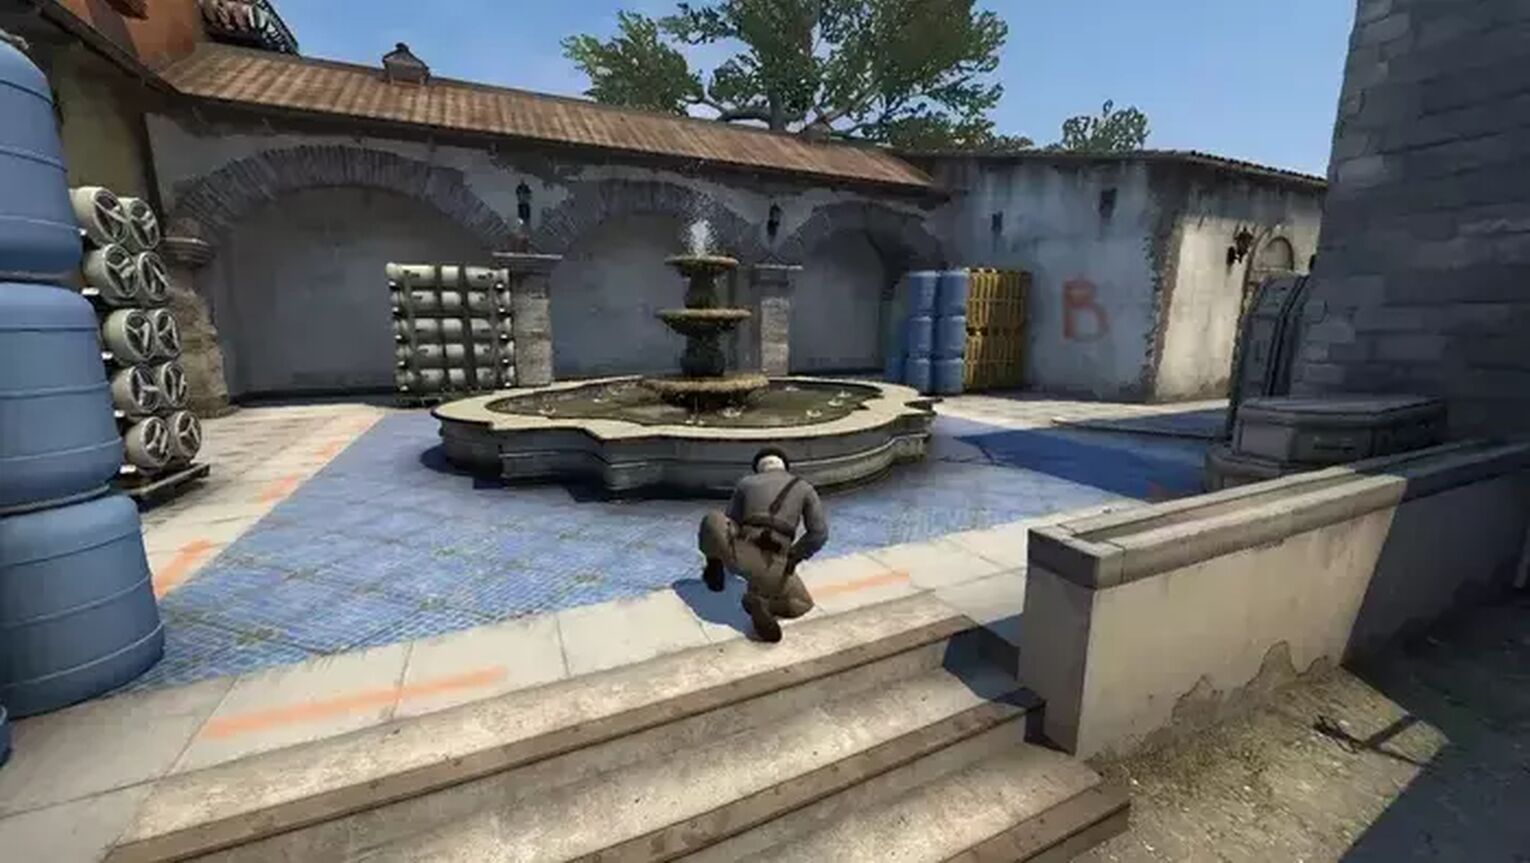
This Bombsite has no shortage of interesting things around it, there are plenty of hiding options surrounding B Site. The Bombsite itself is next to a Fountain which has various potential defensive positions around it such as a small dark corner in the back right corner, a stack of boxes towards the back left, two cubby spots on the left and a boosted spot on the left as well that gives a clear vision of players pushing in from Banana.
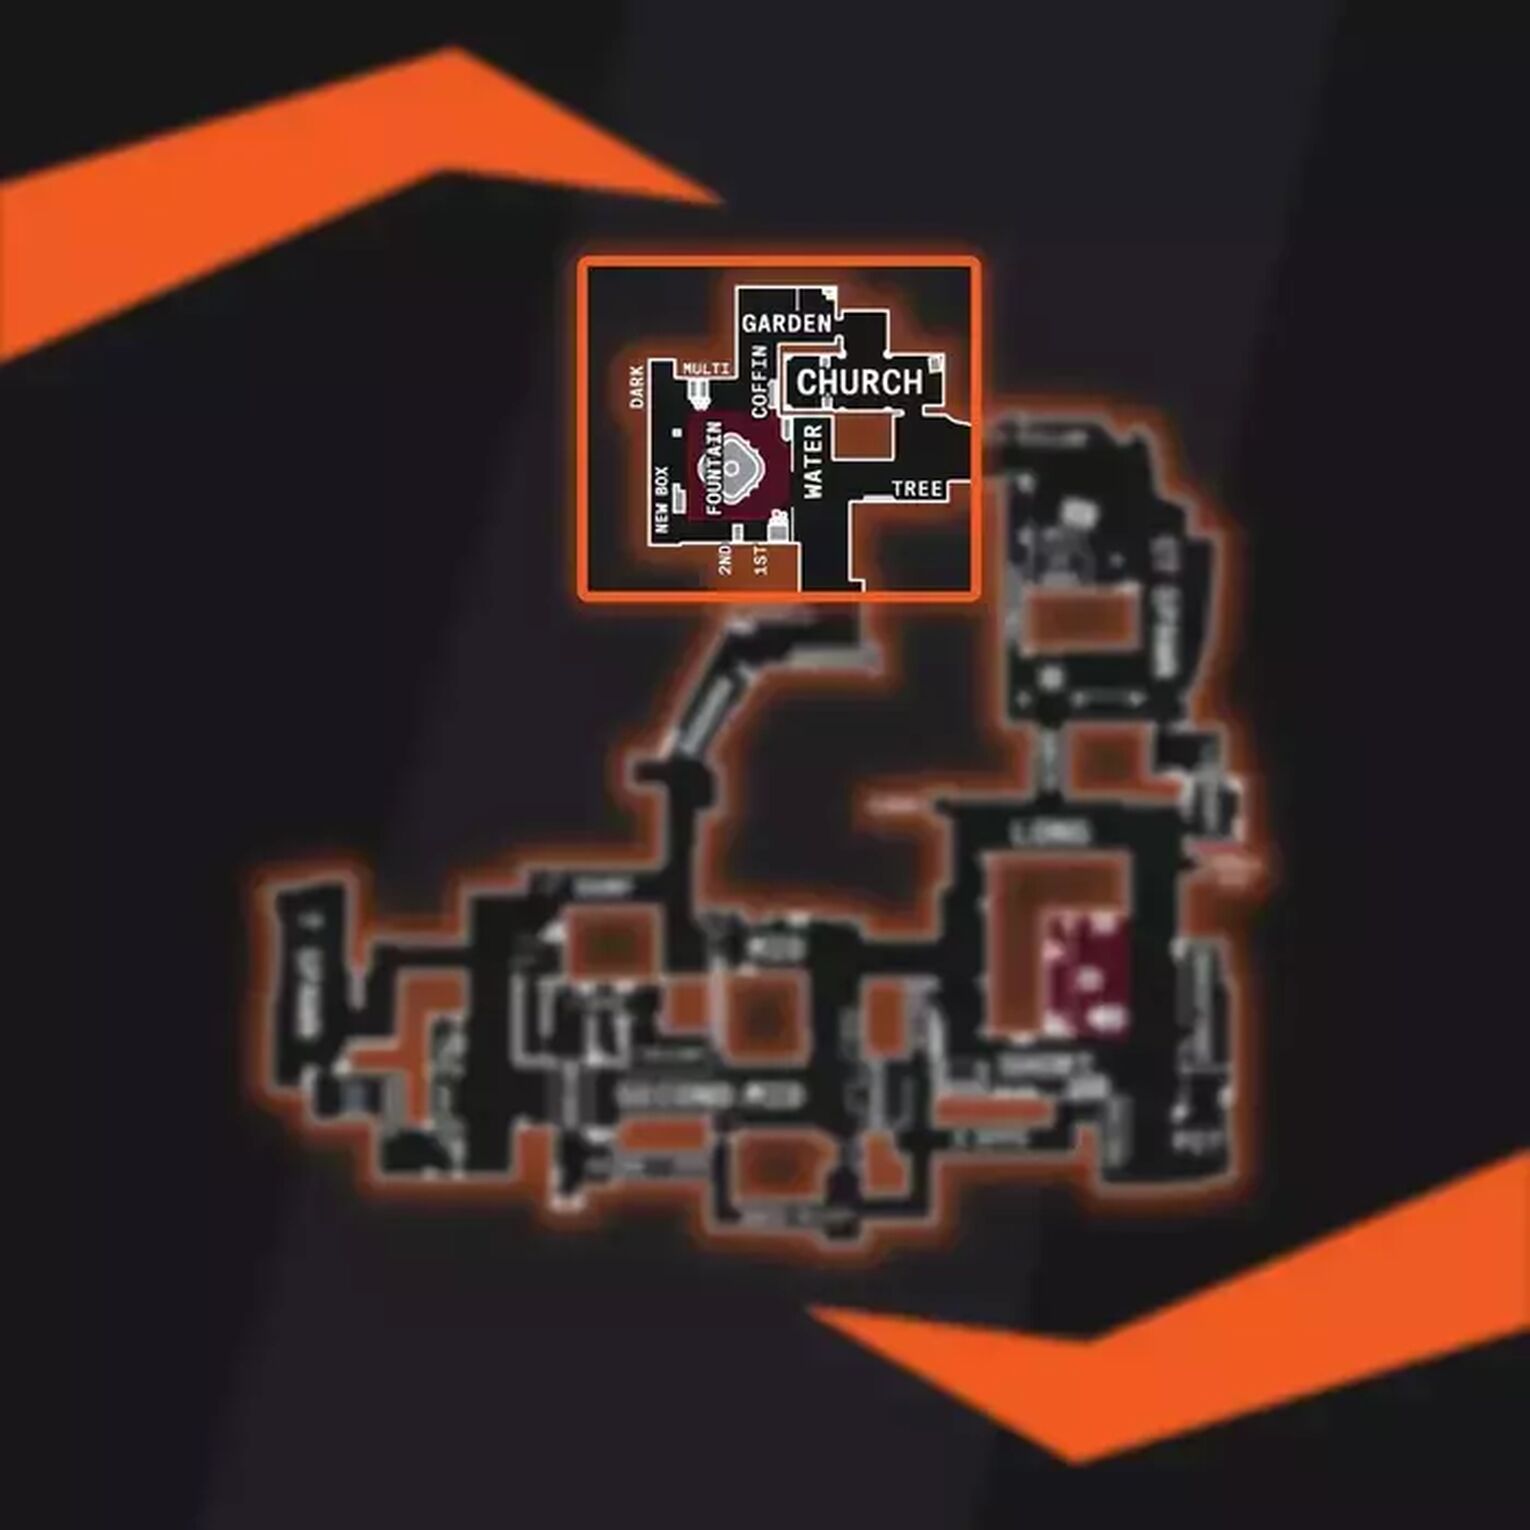
Found on the top left of the map, Bombsite B has three attack routes: from Banana into CT, though the Garden and Construction area onto the site itself along with coming through the Well (past the CT Spawn) into the exposed CT area. On Inferno, CT and CT Spawn are two unique areas. What CT refers to is the open area in front of B Site where the Terrorists must smoke this area to avoid being instantly killed by the Counter-Terrorists.

As the CT Spawn is next to the Well, attacking from that direction and trying to come through the Garden and Construction areas can be risky. Most of the action for this site will take place in CT where the terrorists must fight through if they want to reach B Site.
How to defend bombsite B on Inferno
There are various defence options for this site, as the attacking team will need to come through CT this gives you some room on the positioning. The aim is to flashbang and grenade that area so much the other team are severely slowed down and cannot progress quickly. It's an excellent idea to split the team between Site A and Site B with one player on recon to see where the enemy team is moving and planning to attack first so your team can rotate as needed.
You'll want to have someone on the boosted section at the B Site so they can look over into Banana to try to spot the other team as they push. They'll be able to hear is the enemies are making a fast push or a slow one and can feed this information to their team. If the Terrorists move quickly then they can be caught with smokes or flashbanged if they're rushing it.Should the Terrorists try to take Site B first, they will probably try to smoke out the CT Spawn so the people at Site A have a hard time reaching you.
This is where the other player at Site B comes in, they would be more aggressive but if you're both smoked in then they can rotate through the Construction site while the person on Boost can toss some flashbangs and smokes to keep the enemies busy. Once the other person is ready, it's time to kill the attackers or force them back until help arrives.
How to attack Bombsite B
Site B seems tricky but the most effective way to take this is to take at least two smokes, a few flashbangs and a Molotov can be helpful too. You need to take control of Banana and a Molotov is helpful for this as you can bounce it off a wall to reach behind the sandbags there which can be a popular hiding spot for some players. This will clear out that area if there was a player there so you can get a quick kill or confirm it's safe to push further. After this, your teams need to throw smoke grenades to block off the route to and from CT Spawn (so you need to smoke CT).
From that point, two attackers should try to stop the defenders from getting through the smokes so the bomb carrier can plant the bomb at the Grill. Any Counter-Terrorist trying to defuse the bomb there will be open to attack from your team who has control of Banana.Remember to watch out for anyone on the boosted point and throw a flashbang if you think someone is there. This works best with two people so one person can deal with the potential threat who could watch over the wall and someone to deal with the sandbags spot.
Middle
Mid is split into three areas: Bottom Mid, Mid and Top Mid. Attackers from T Ramp will find themselves at Bottom Mid where there is an Underpass leading to Second Mid which can be be a travel path if they crouch. Bottom Mid can also be used to push up into Mid, which is the open middle ground of the map.
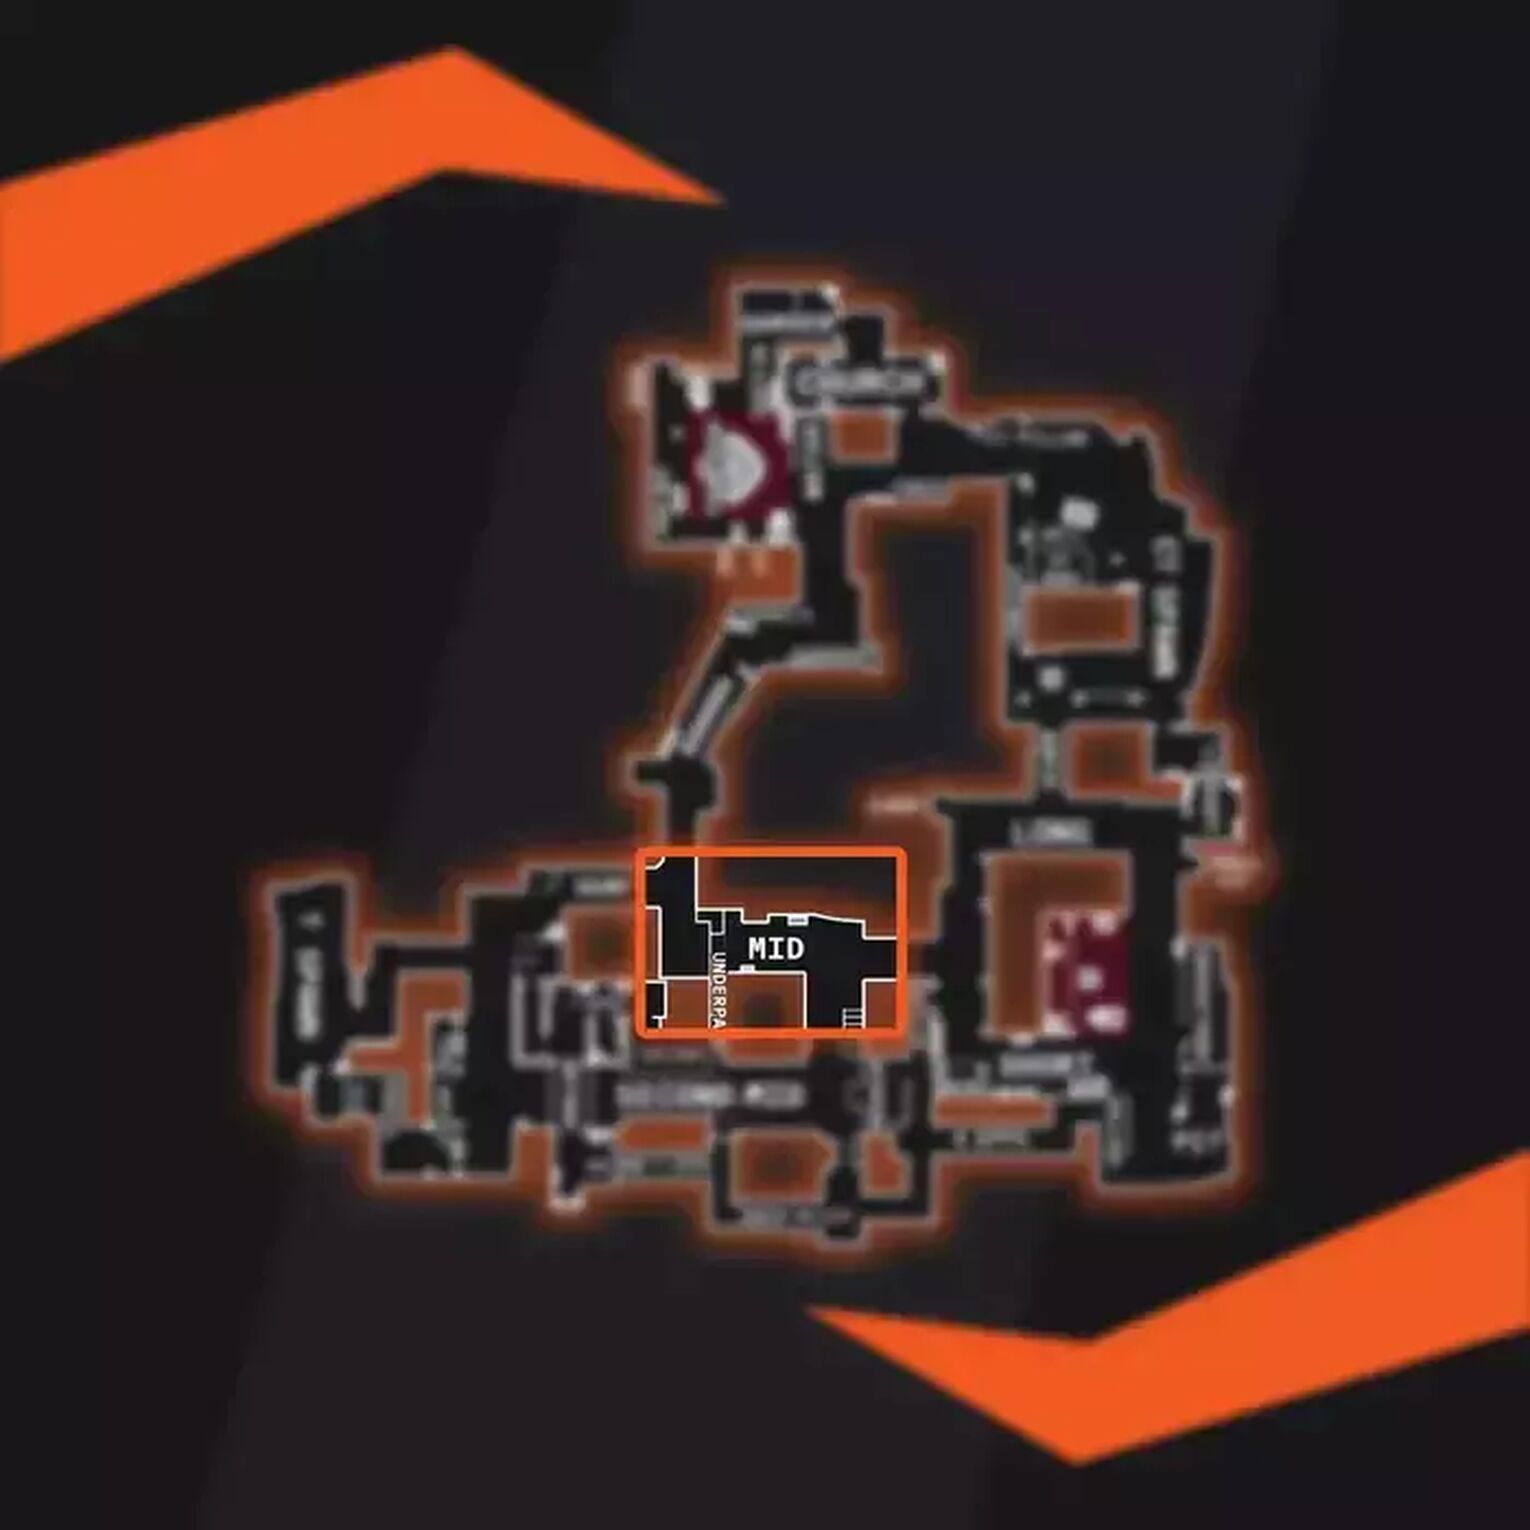
There are few hiding spots at Mid, but players can take some refuges behind a few corners. The right turn will take players into Second Mid and also allows players to crossover between the two areas. However, to move around this way means that they are doing so in front of Top Mid where defenders are usually waiting to attack.
Top Mid is a chokepoint which separates the Arch side and the Short side which both follow the square round to reach Site A. This is a commonly held zone by defenders. Attackers can also use Second Mid to access the Apartments and other areas for a better line of sight.
Apartments
While T Apps are where you can cross over into from the Living Room using the Bridge, the most important apartments are the CT Apps. The Apartments are the ones with the Window Room that faces into Second Mid and the ones that can be accessed with the Truck at A Site.
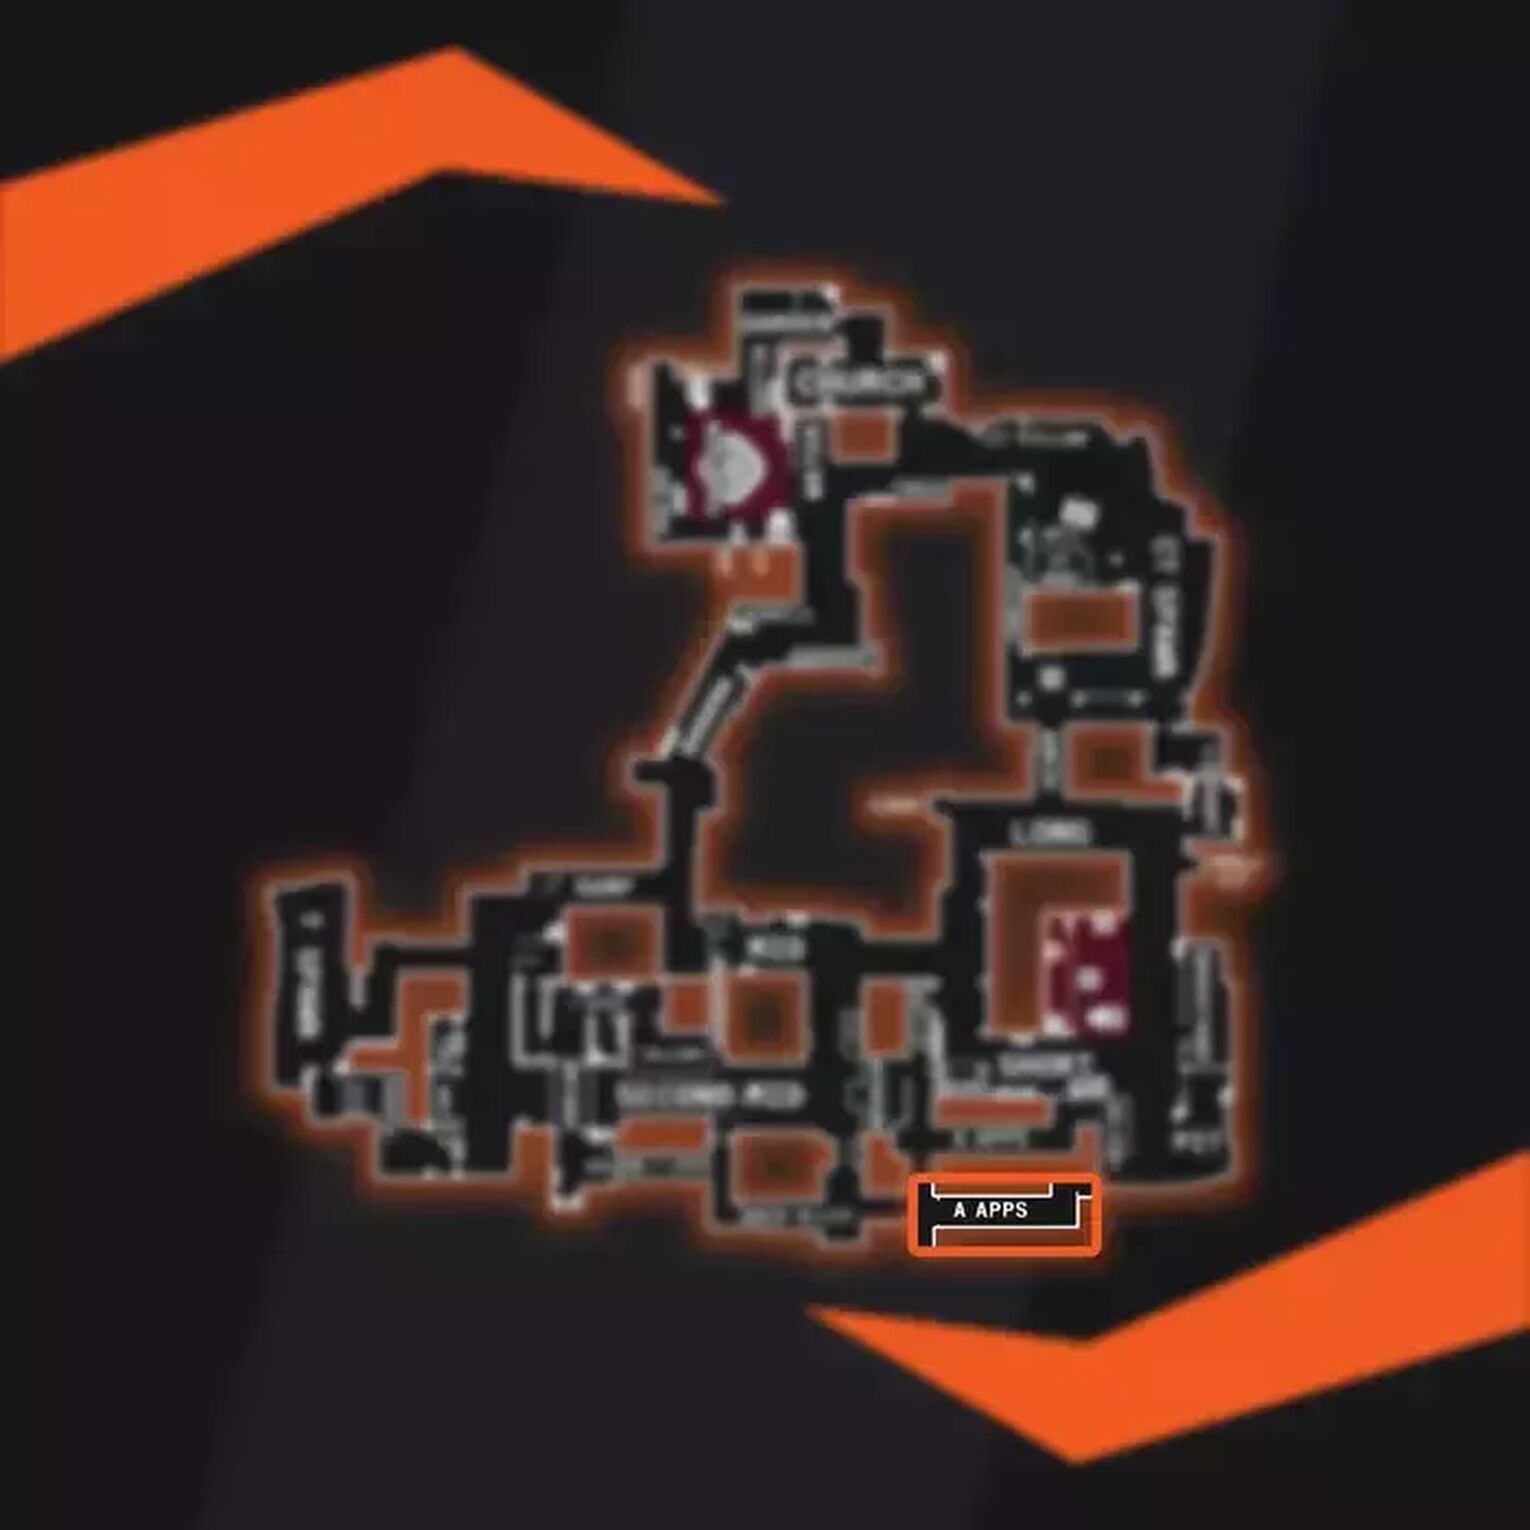
The CT Apps are a close combat area due to these corridors being very narrow and the lack of hiding areas inside the building. This area is very useful as it leads to different areas for the attackers to gain the edge or for the defenders to use and keep the attackers away from Site A. The Window area inside is useful as it gives a clear line of sight into Second Mid but they are dangerous for that reason too.
Once inside the Apartments, you can continue forwards to the Boiler Room which is the exit and leads into Top Mid for another attack position. Alternatively, you can go right from the Back Alley entrance and come to the Balcony overlooking Site A and the other areas near it including the Graveyard and Pit. Defenders can use the Truck there to gain access to the Balcony and the Apartments to wait for attackers to try to come through there.
Second Mid
This is the smaller Mid found on Inferno, it's the section between the T Apps and the CT Apps which runs up to the Window room. The Underpass is underneath the Balcony there allows easy travel between the two Mids on the map.
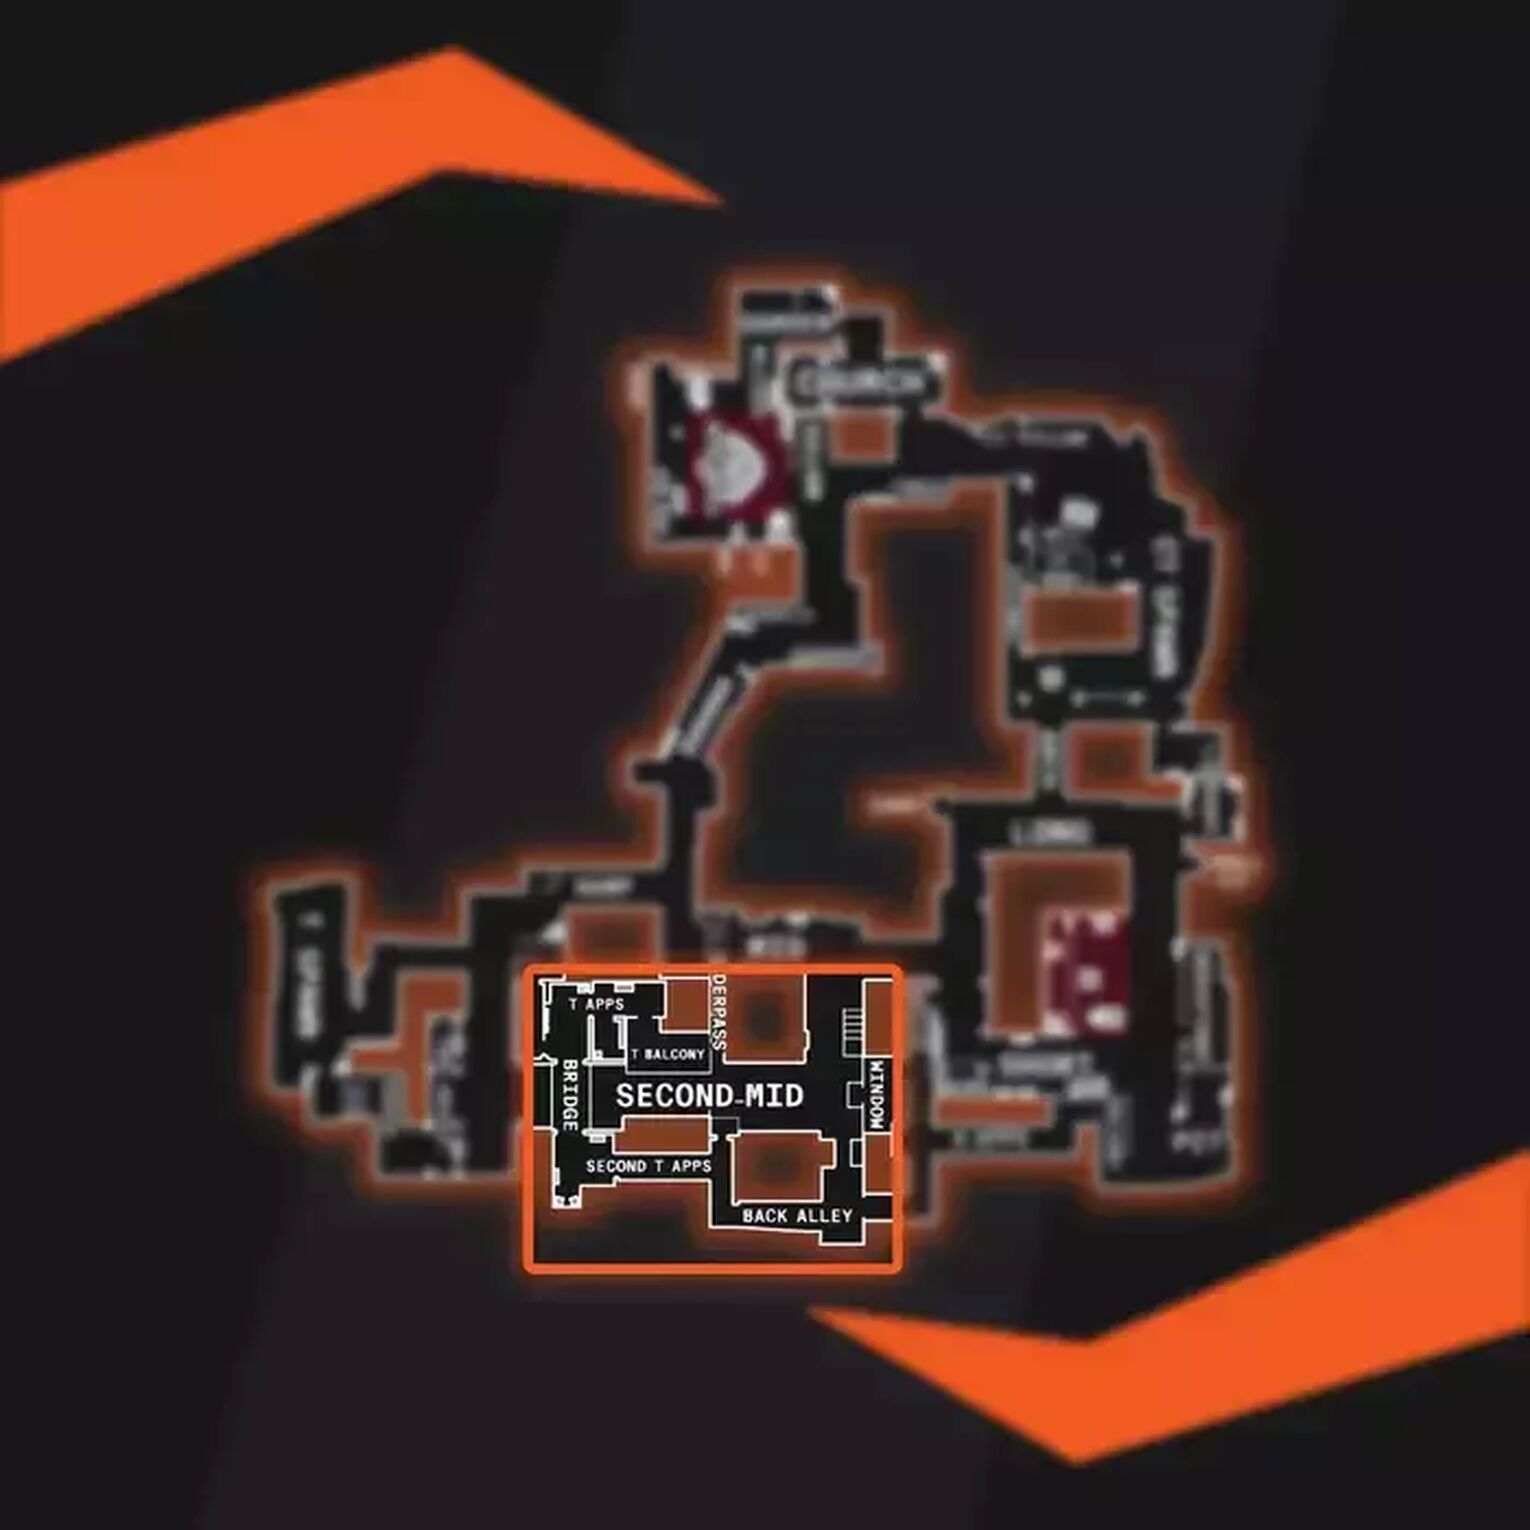
Players can also reach Back Alley from the Second Mid which leads to the CT App Stairs though players can also walk to the Window and turn right to reach the CT App stairs. While this area is mostly for travel, it leads to important areas which allow the attackers to have another attack route.
The defenders can also use this to block off the routes normally accessible to attackers and force them to go towards Top Mid instead, which can also be used as a chokepoint.
Best nades, smokes, and molotovs
Throwables are very important on Inferno, they allow attackers to make sure areas are safe to push through and to provide cover for placing the bomb at Site B. Defenders also need them to hold back the attackers from Site A and Site B while also giving them the chance to clear out certain areas.
Smoke grenades and flashbangs are the most useful for this map due to the open areas that players will need to make their way through to attack or defend. Molotovs are key for clearing out areas such as Sandbags by Banana and to stop attackers placing the bomb at Site B. While these are the most useful for Inferno, other throwables can find some use on this map .Inferno is a map that has existed since the historic days of the Counter-Strike series.
It's one of the favorite maps in CS2 (CSGO) and has seen some major updates to the theme over the years since it was first created. The 2016 changes didn't change the playstyles used on the map too much and despite the new setting, Inferno remains a Counter-Strike classic.
![Best Sites to Buy Skins in CS [All Tested] + Discounts](https://theglobalgaming.com/assets/images/_generated/thumbnails/4092904/61a89a7d2ad69acdabef3deb_Best-CSGO-Buying-sites_03b5a9d7fb07984fa16e839d57c21b54.jpeg)
![CS2 Weekly Care Package System Explained [With Reset Time]](https://theglobalgaming.com/assets/images/_generated/thumbnails/4084023/cs2-weekly-drop-system_03b5a9d7fb07984fa16e839d57c21b54.jpeg)