

.svg)
Valorant Error Code VAN 1: How to Fix It


Fix Error Code VAN 1 Valorant: Why you are getting the Error Code and how to Fix It.
Every game in today’s day and age contains bugs and errors within it. They can either require a simple fix or a hard-on solution to be resolved. The Riot game Valorant is not any different, meeting the Valorant players with errors and bugs in error codes.
One of these error codes is the Valorant Error Code VAN 1. So, if you have encountered this error code, do not worry because here you will learn why you are getting it and how to fix Error Code VAN 1 Valorant.
The Reason behind Valorant Error Code VAN 1
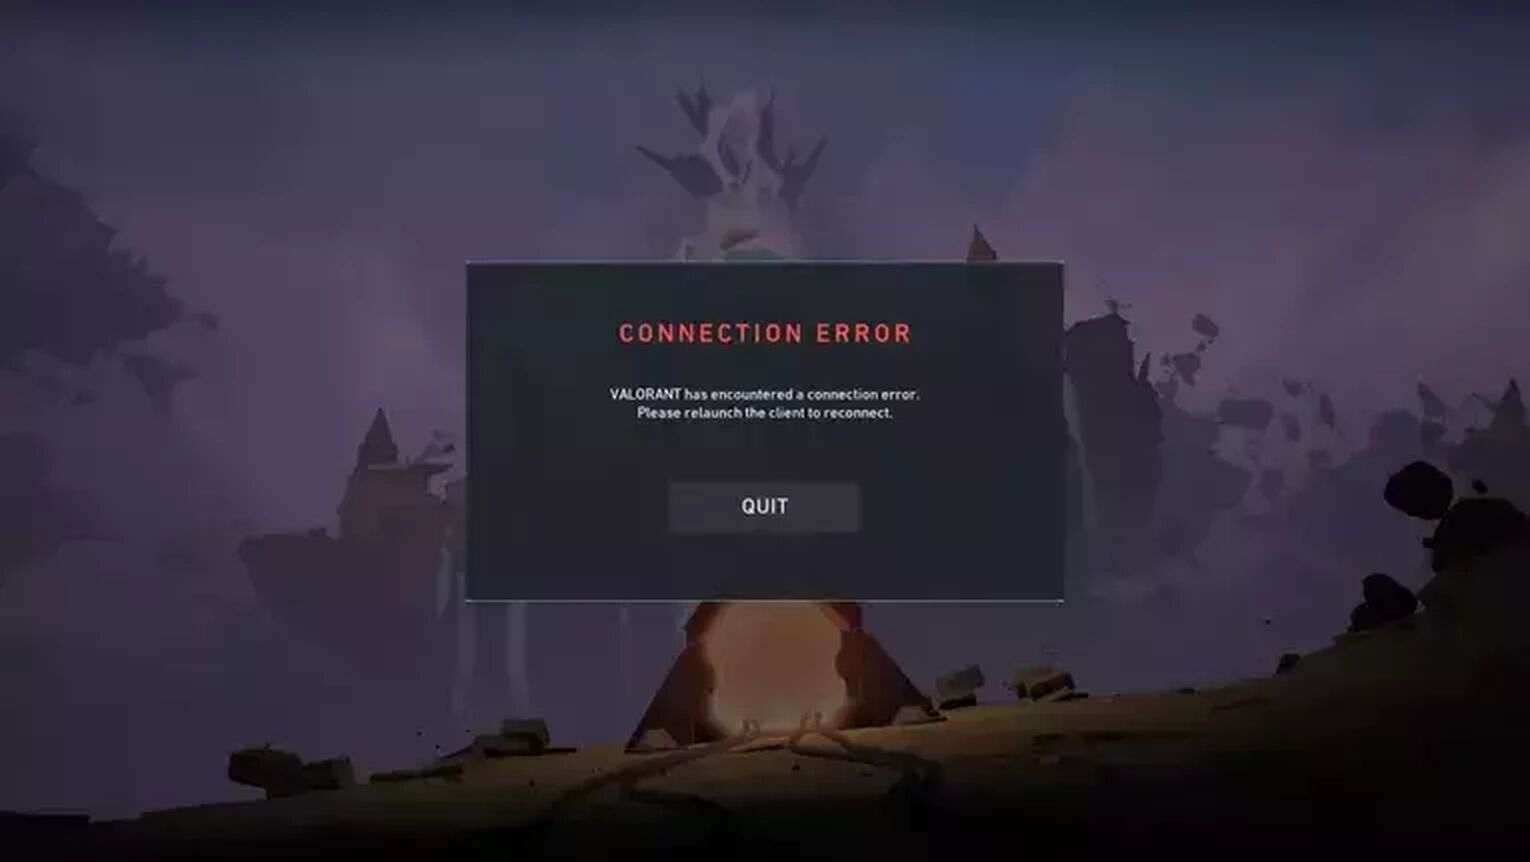
The Valorant Error Code VAN 1 represents a connection error. What this essentially means is that some kind of a service or process from the game has a hard time connecting with the other processes and the game overall.
One process that may have a hard time having connectivity issues is the Riot Client. So if a bad start of the Riot Client was made, you can get hit with Valorant Error Code VAN 1.
Another reason might be due to problems with the Riot Vanguard. This anti-cheat system is one of the best at detecting hackers in the game, but that comes at a cost. It is connected to the deepest part of your Operating System, which means it can cause tons of error codes including Valorant Error Code VAN 1.
Knowing why you are getting Error Code VAN 1 is a key factor towards fixing the issue, so let’s take a look at what solutions you can try out to fix Valorant Error Code VAN 1. And psst, while troubleshooting, make it a bit more entertaining with tools like Valorant Agent randomizer or random Valorant skin generator to play in your next lag-free game!
How to Fix Valorant Error Code VAN 1
Restart the Riot Client
The first simple fix and solution that you can try out, which even Riot Games recommend you do, is to restart the Riot Client. The game client is an entry point into the Valorant game, which loads up all the essentials for gameplay. So if it doesn’t do that properly from the getgo, you can get Error Code VAN 1.
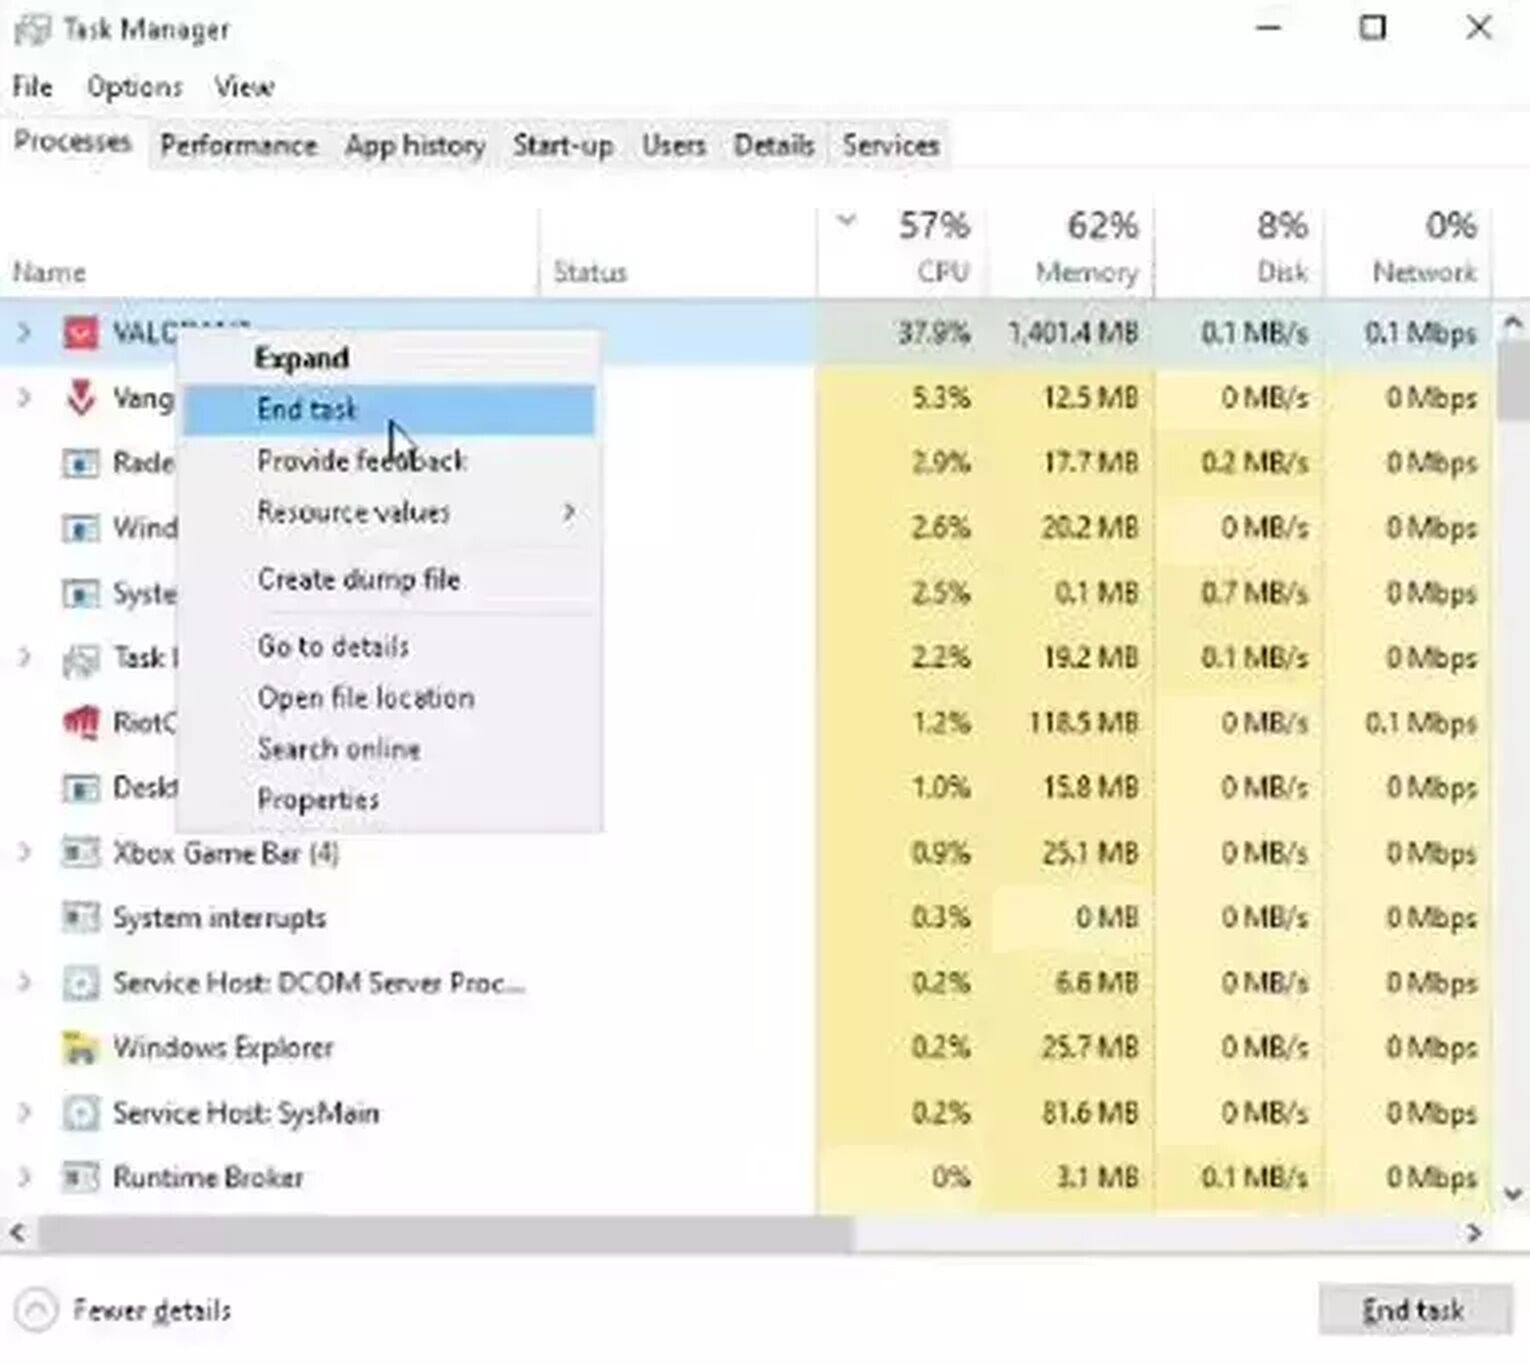
To fully restart the Riot Client, you will open up Task Manager by pressing Ctrl+Shift+Esc. Then select the Processes tab above and locate the Riot Client. Once you do, right-click it and click on End task to close off the Riot Client process. What you could also try doing is restarting other game processes related to Valorant, which can increase the chances of fixing Error Code VAN 1.
Once you restart the game client, open it up again and see if you are still getting Error Code VAN 1. If it does, you will have to take bigger measures towards fixing it.
Run Valorant as an Administrator
Because of how the Valorant game behaves, it needs full control from the PC of the player. If you run Valorant as an Administrator, you will give User Control Access (UAC) to Valorant which can resolve many issues and lag, including Error Code VAN 1.
To run Valorant as an Administrator, you will have to locate the executable file of the game. Depending on where you have installed the game, the location can depend. But the most probable location is here: “C:\Riot Games\VALORANT\live”. Once you see VALORANT, right-click it and select Properties. You may see other advanced options, but you want to select the Compatibility option above and make sure to tick the box Run this program as an administrator. Click on Apply and that’s it.

If Error Code VAN 1 still persists, then the problem may lie within Vanguard.
Make Exceptions for Riot Vanguard
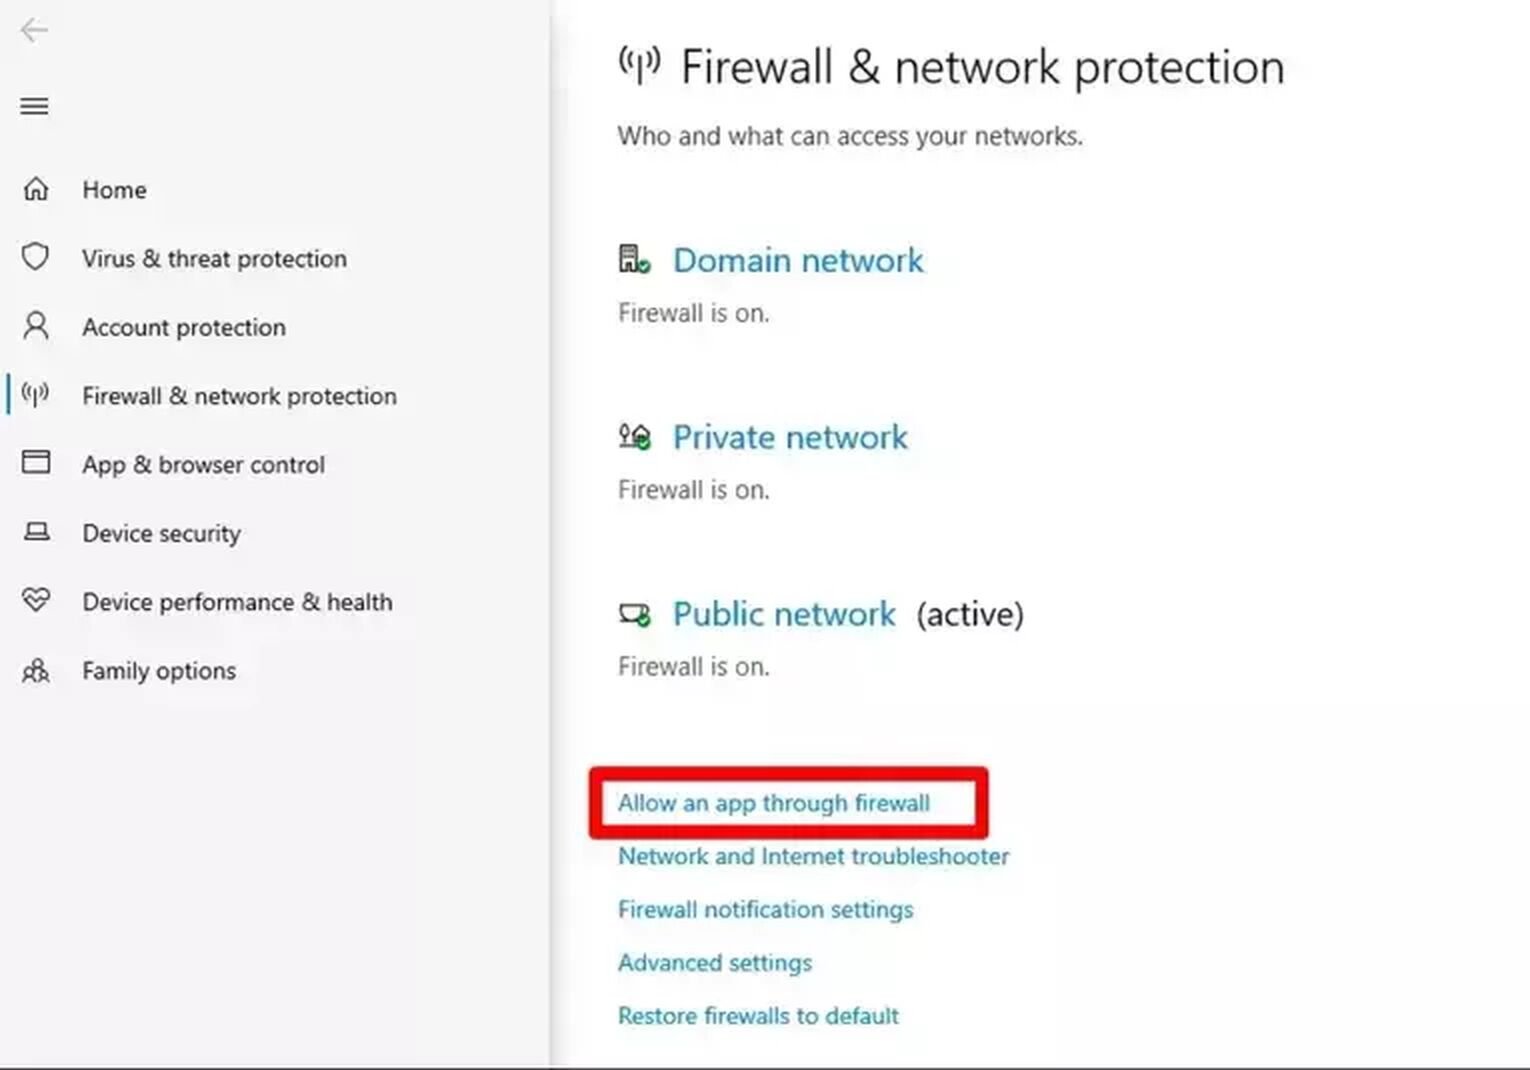
Talking about connectivity issues and the control of Valorant over your PC, Vanguard has to be most prominent in it. Because of its connection, it may encounter problems along the line, so if your PC doesn’t give it the proper access with Firewall and the Virus and Threat Protection, it can cause Error Code VAN 1. In this case, you should make exceptions for Riot Vanguard.
Make Exceptions for Riot Vanguard in Windows Firewall
- In the Search Bar below, search for Firewall & network protection, select it and click on Allow an app through firewall
- Select the Change settings option above and click on Allow another app…
- Find the Riot Vanguard folder, its most probable location is in the Program Files folder on the C Partition (“C:\Program Files\Riot Vanguard”), and open it
- You will see the “vgc” app, select it, click Open, and select Add
- On the initial window with apps through Firewall, find “Vanguard user-mode service” and make sure both the Private and Public boxes are ticked
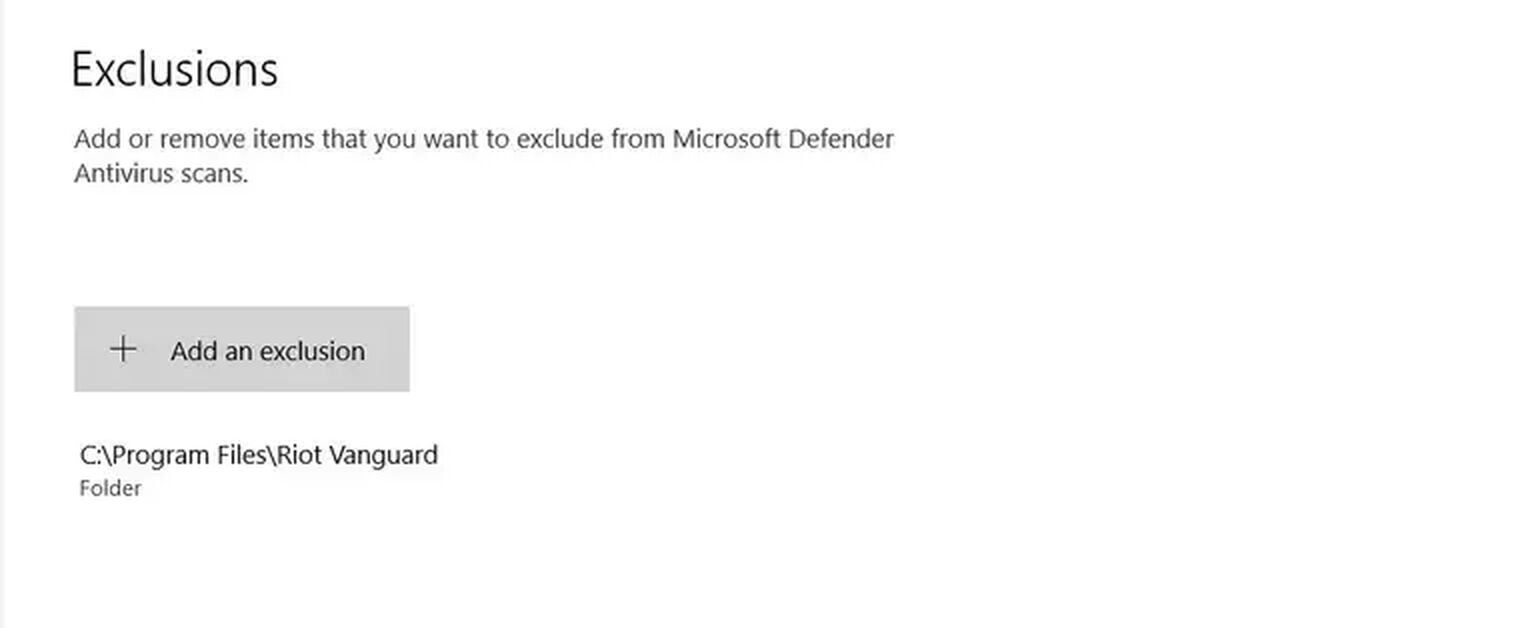
Make exceptions for Riot Vanguard in Windows Virus & Threat Protection
- In the Search Bar below, search for Virus and Threat protection, select it and click on Manage Settings
- Scroll down until you see the option Add or remove exclusions, click it
- Click on Add an exclusion - Folder and locate the Riot Vanguard folder which should be in the Program Files folder in the C Partition (“C:\Program Files\Riot Vanguard”)
- Select the whole Riot Vanguard folder and click on Select Folder
If this didn’t help you fix the issue with Error Code VAN 1, then the final solution that you can try is to
Reinstall Riot Vanguard
The best way to solve connectivity issues that are caused by Vanguard is to reinstall it. Problems may have arisen from a faulty installation from the beginning, or after a new update has been released for the game. A lot of Valorant players have reported that reinstalling Riot Vanguard has helped them resolve tons of issues in the game, so here’s how you can do it step-by-step:
- Make sure you have closed off the Riot Client, Riot Vanguard, or any Valorant related processes in the Task Manager (Ctrl+Shift+Esc). Check the System Tray option too (arrow pointing upwards below on Windows Taskbar), and if you see the Riot Vanguard or Riot Client, right-click them and close them off
- In the Search Bar below, search for Command Prompt, right-click it, and run it as an Administrator
- Type the following commands in the Command Prompt:
- “sc delete vgc”, hit Enter and
- “sc delete vgk”, hit Enter
- Restart your PC
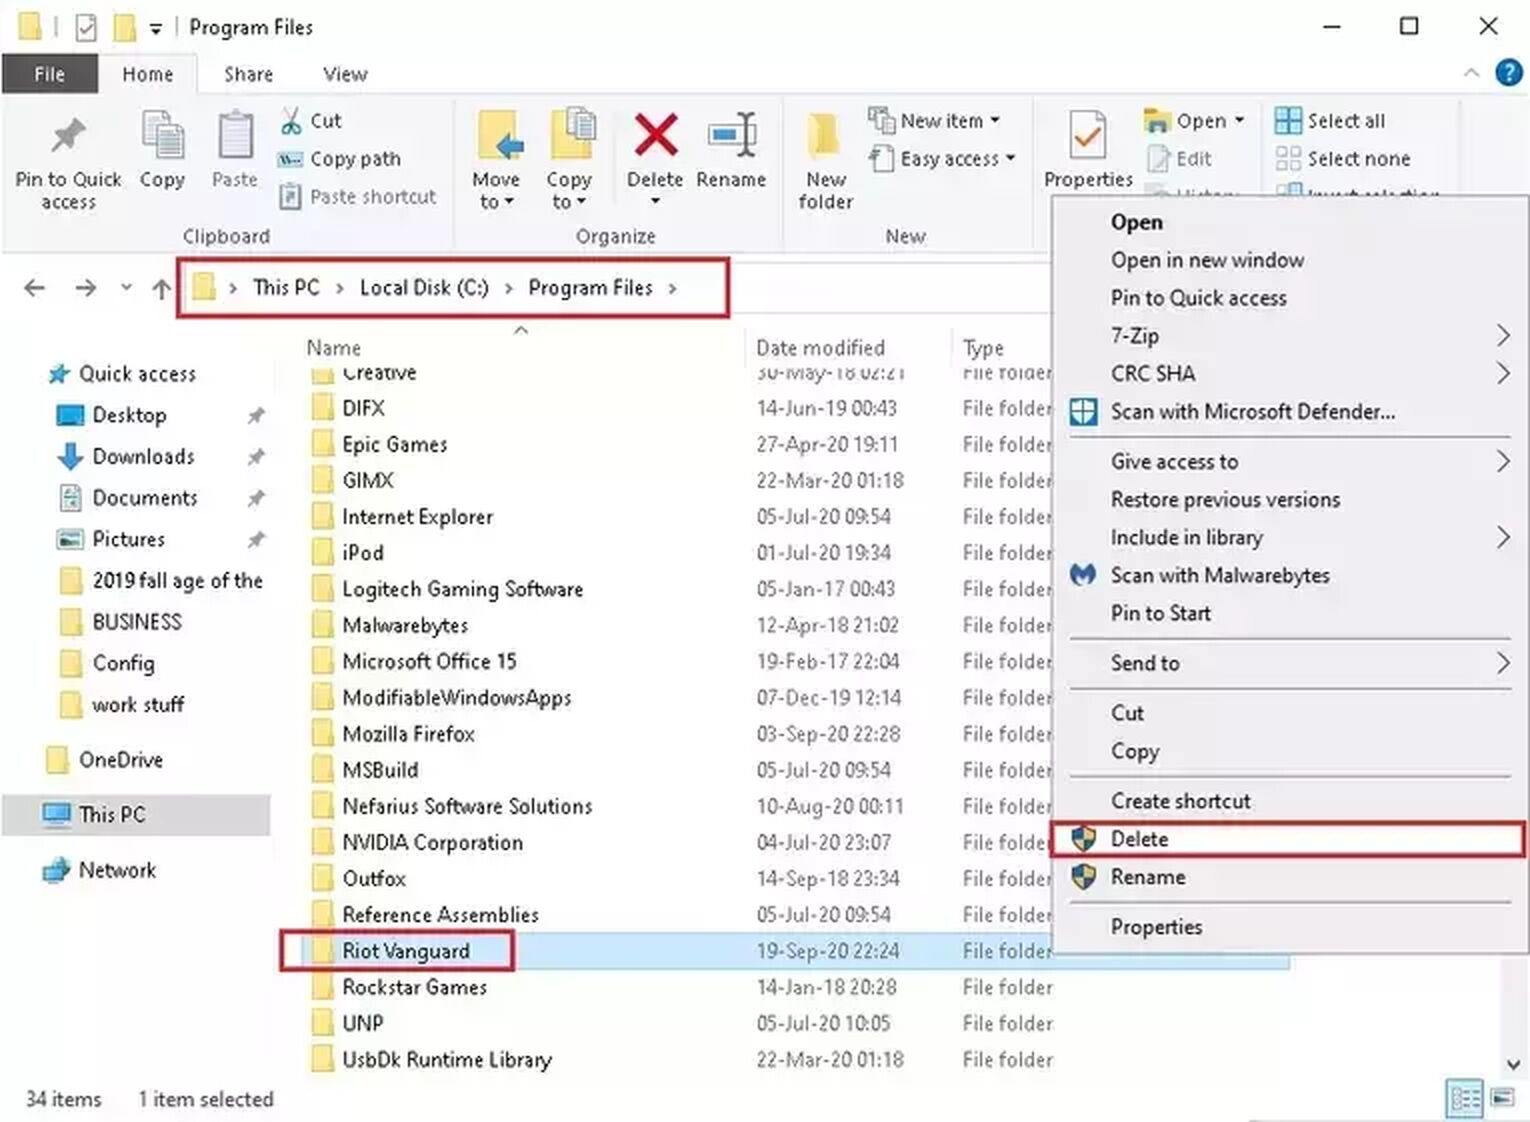
- When your PC does boot up, in the Search Bar below search for This PC and open up the first app
- Locate the Riot Vanguard folder, which should be in the Program Files folder on the C Partition (“C:\Program Files\Riot Vanguard”)
- Right-click the whole folder and click on Delete
- Open up the Riot Client again, this should start reinstalling Vanguard automatically
- When the reinstallation is finished, restart your PC again
If this didn’t help you fix Error Code VAN 1, then you should
Contact Riot Support
The Riot Support team exists for the reason to help out players who have problems with error codes in the game. If your Valorant Error Code VAN 1 still persists, you can submit a ticket on the support site banner here.
Connection errors are a big problem in Valorant. They can be caused by the Riot Games servers, or by a bad Internet connection from your Internet service provider too. Sometimes you can’t even login into the game with your Riot ID. Depending on your PC, even a secure boot may be needed to fix error codes. And let’s not forget how new error codes can come to life too, like the VAN 1067 error. That is why you should keep up with solutions for error codes and visit the Valorant Error Code Hub. Though if you have encountered Error Code VAN 6, you can check it out here.
![How To Fix Valorant 1TB File Size Bug [Fast & Easy]](https://theglobalgaming.com/assets/images/_generated/thumbnails/407081/1TB-SIZE-FILE-FIX-VALORANT_03b5a9d7fb07984fa16e839d57c21b54.jpeg)

![Best Raze Lineups on Icebox [2024 Guide]](https://theglobalgaming.com/assets/images/_generated/thumbnails/58004/6248e15f44720bcdc407f796_best20raze20lineups20icebox20valorant_03b5a9d7fb07984fa16e839d57c21b54.jpeg)