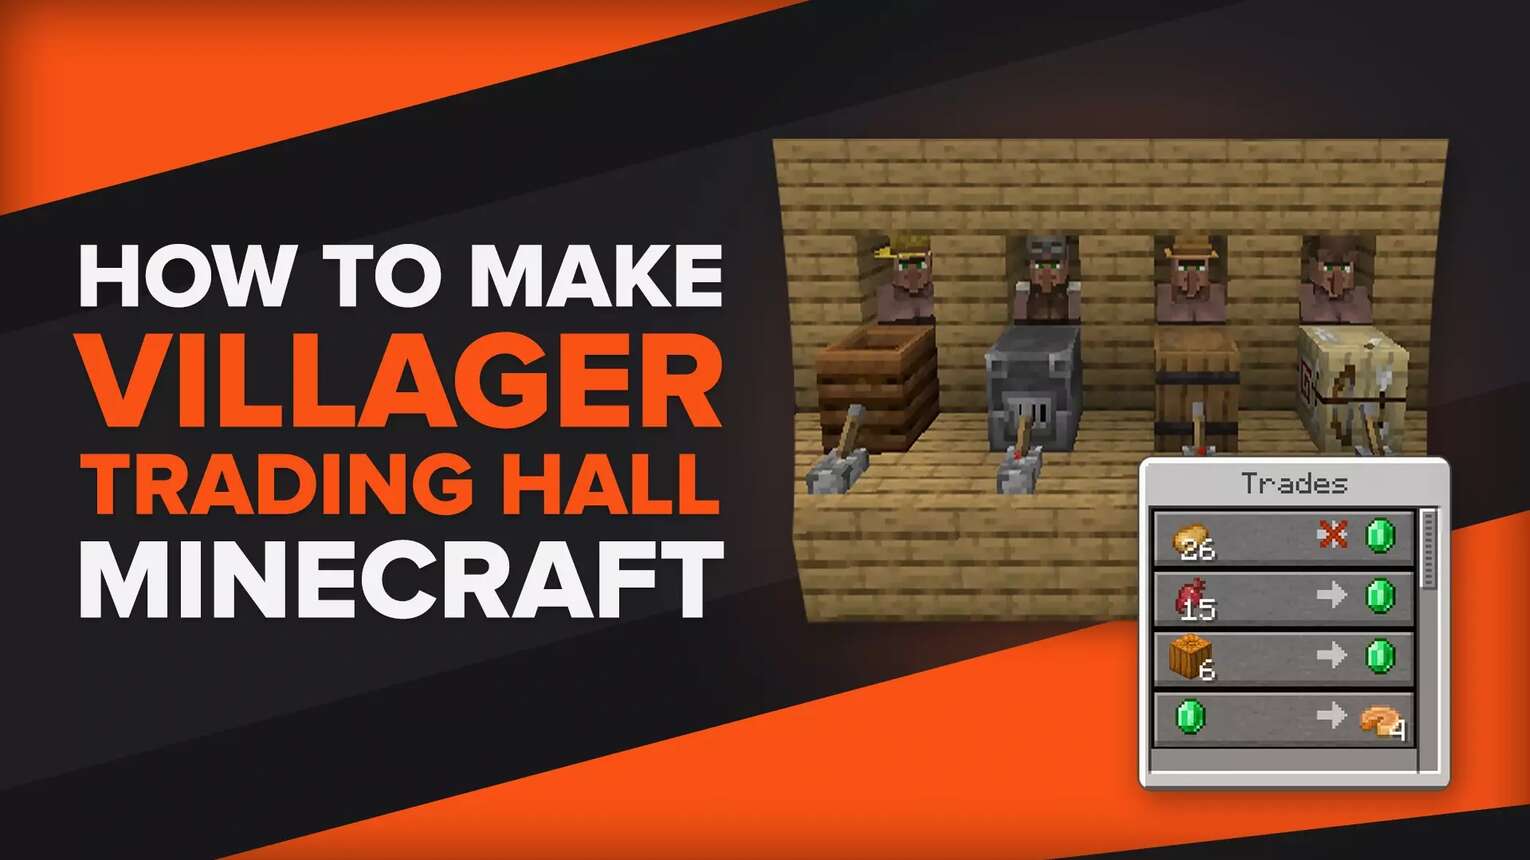
What do you need for a Villager Trading Hall
Before you build a villager trading hall in your survival Minecraft world, there are some requirements you'll have to do first. So here's a complete list of all the items you'll need to make this villager trading hall in Minecraft:
- 180 Wood Planks
- 10 Different workstations of your choice, like a composter that makes a farmer villager
- 10 Pistons
- 10 Levers
- 20 Redstone dust
- 10 Trapdoors
- 35 Temporary blocks, like dirt
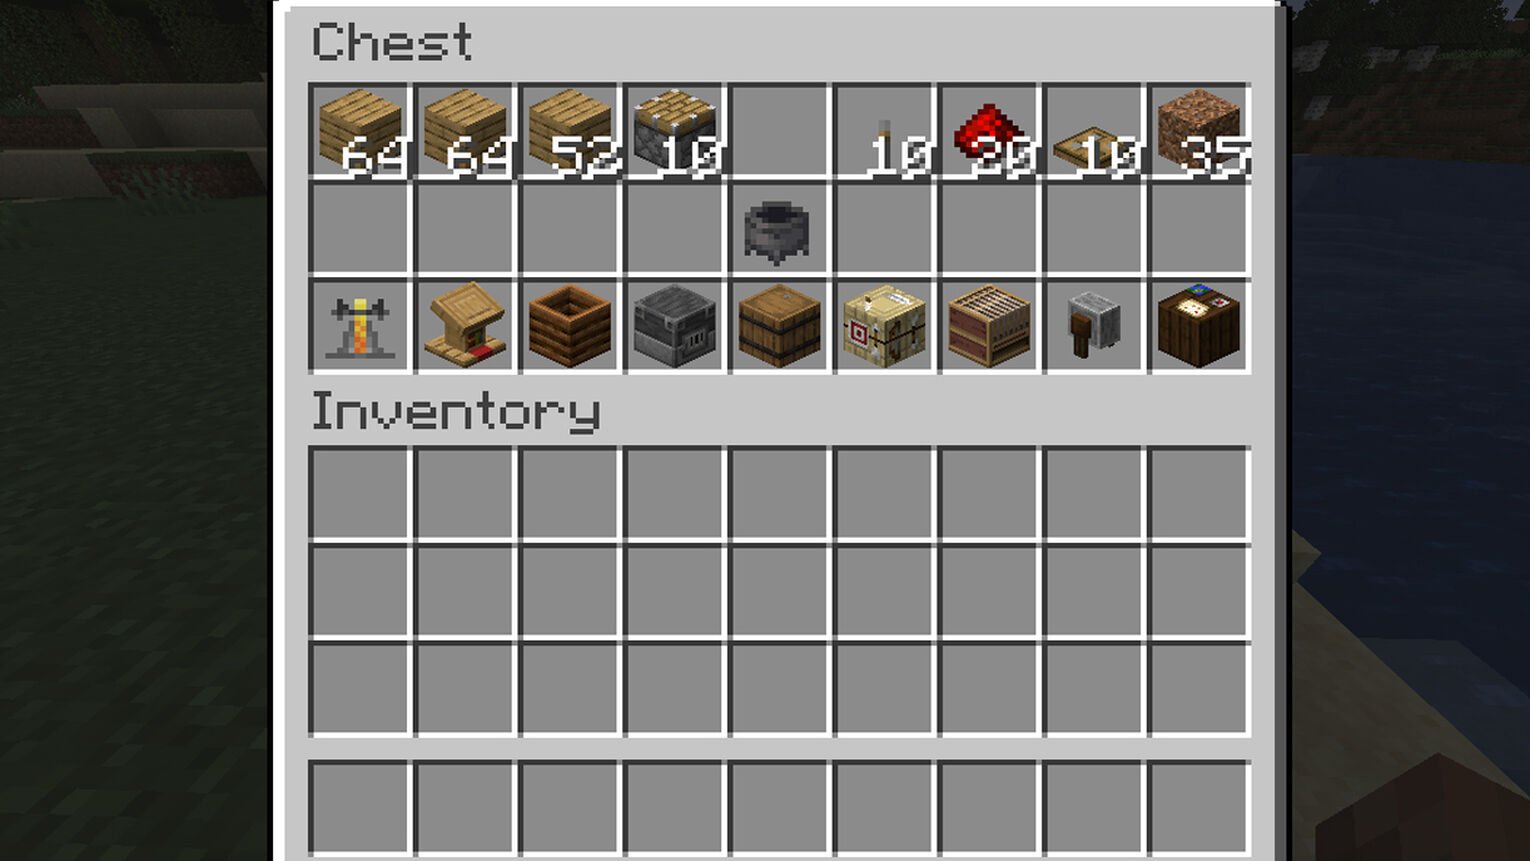
You could also get and craft a name tag, but that's an optional feature if you want to make zombie villagers and cure them for better trades. Once you get all these items, below you can see how to make a Minecraft villager trading hall easily!
How to build a Trading Hall
First, we'll start with the layout. You'll want to build a 21-block row of wood planks. Then starting from the second block of the row, place a piston next to the row while skipping every 1 block. Finally, place 2 Redstone dusts extending from each piston. It'll become much clearer what you need to do below.
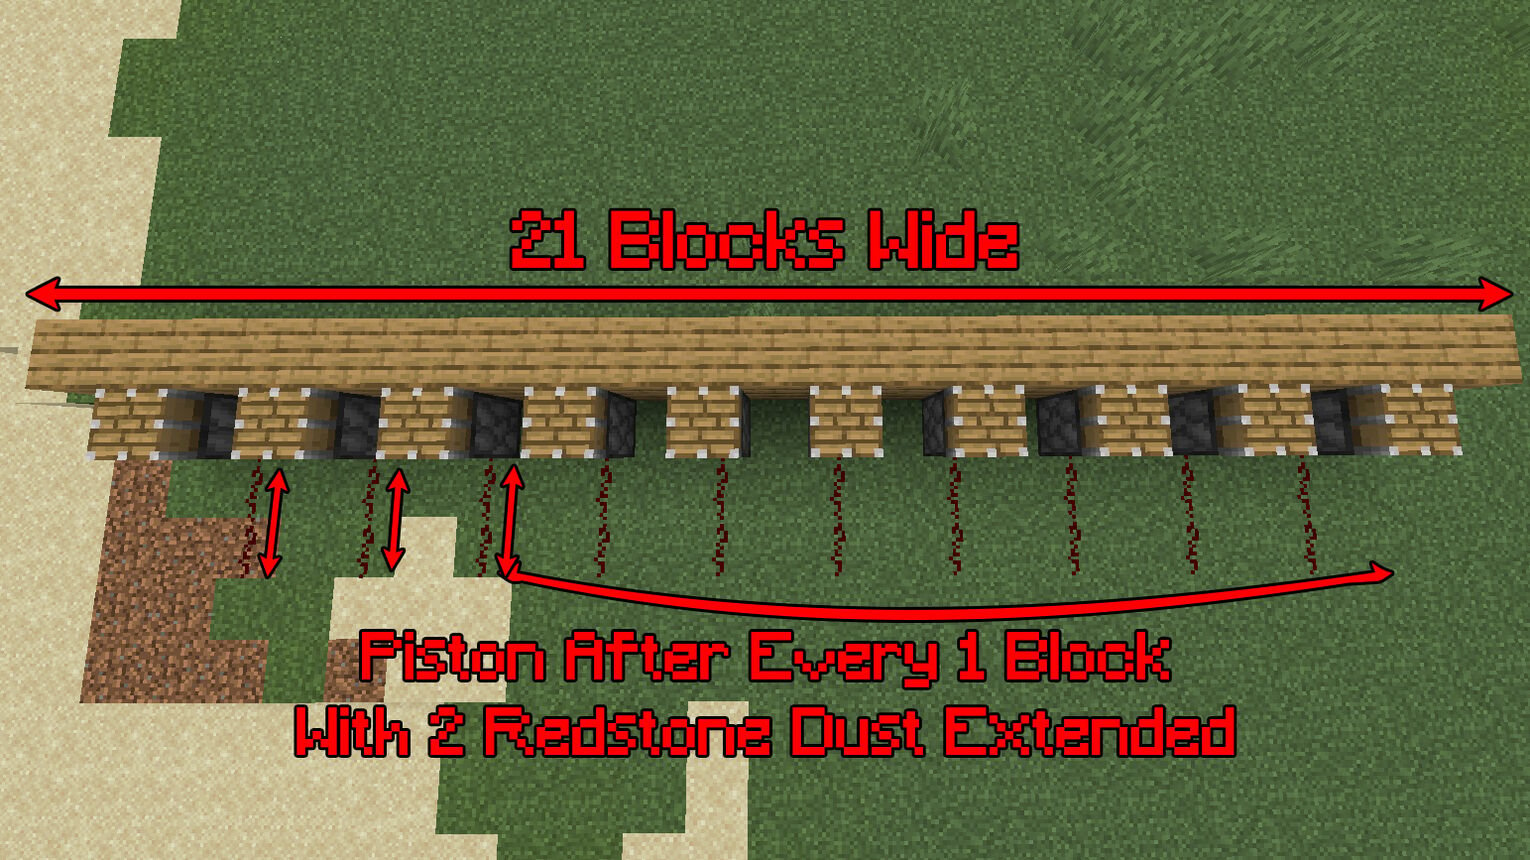
This is the initial layout from where everything is going to happen. Essentially, villagers will stay on the sticky pistons. So if you want more or less villagers, you can just extend this layout with more pistons and wood planks!
Cover Redstone Dust with Wood Planks
Next up you'll want to cover the whole area with wooden planks above the Redstone dust. You can do this by placing a single plank above one Redstone dust, then connecting from it you'll cover the whole 2-block area with the in-betweens from the pistons.
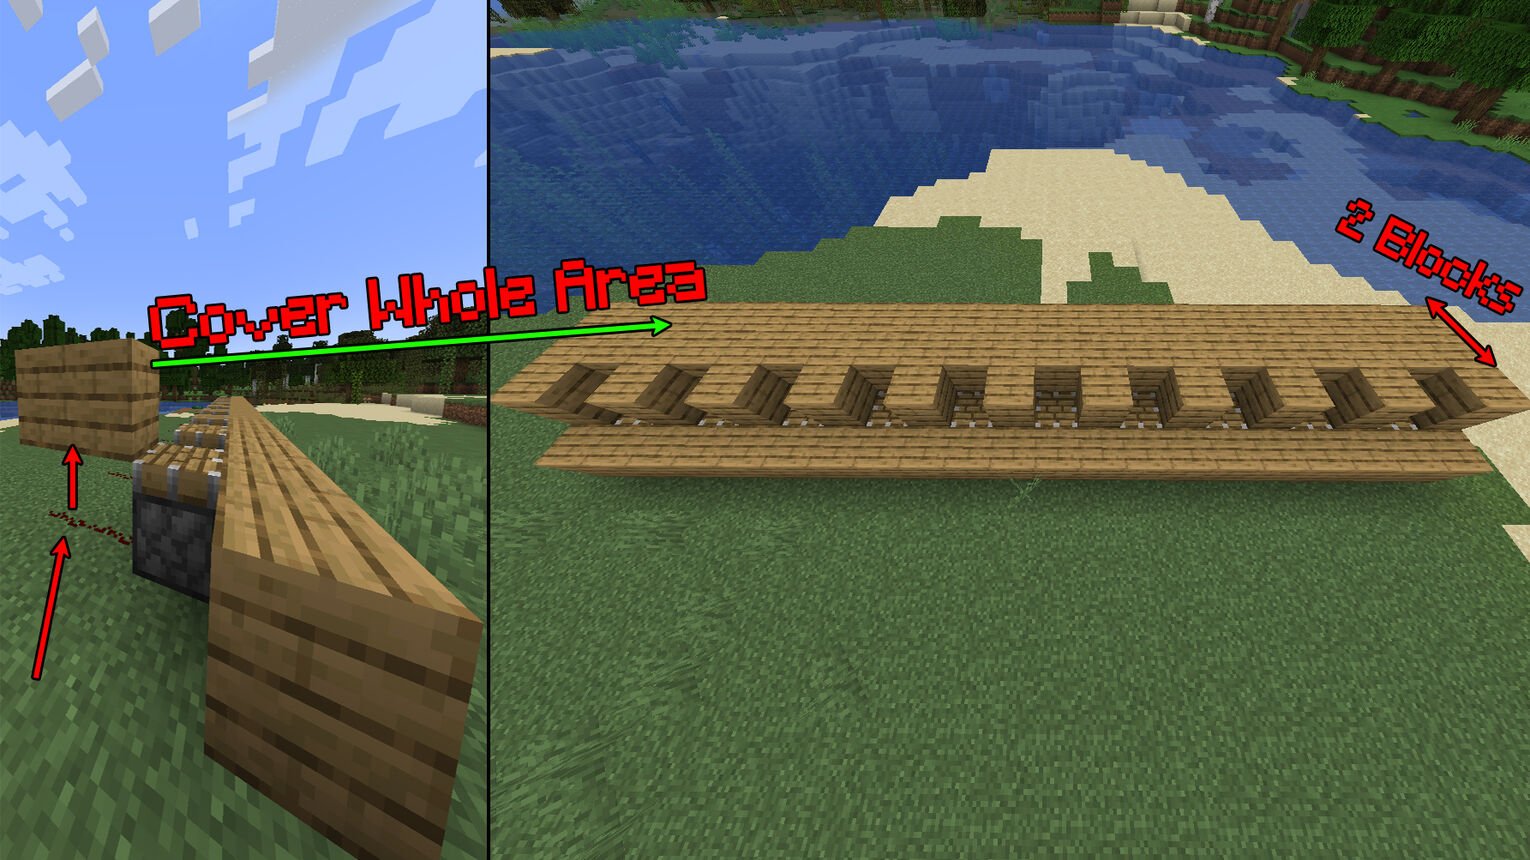
This is just standard procedure for making the initial layout. It may be a bit boring when compared to making the best Minecraft house ideas, but it has to be done when it comes down to villager trading halls!
Place Trapdoors and Workstations Next to Pistons
Now comes the more interesting part which you'll want to start by placing and opening trap doors right next to each piston on the lower wooden plank row. Then depending on what type of villagers you want, place workstations next to the pistons on the platform we built from the previous step.
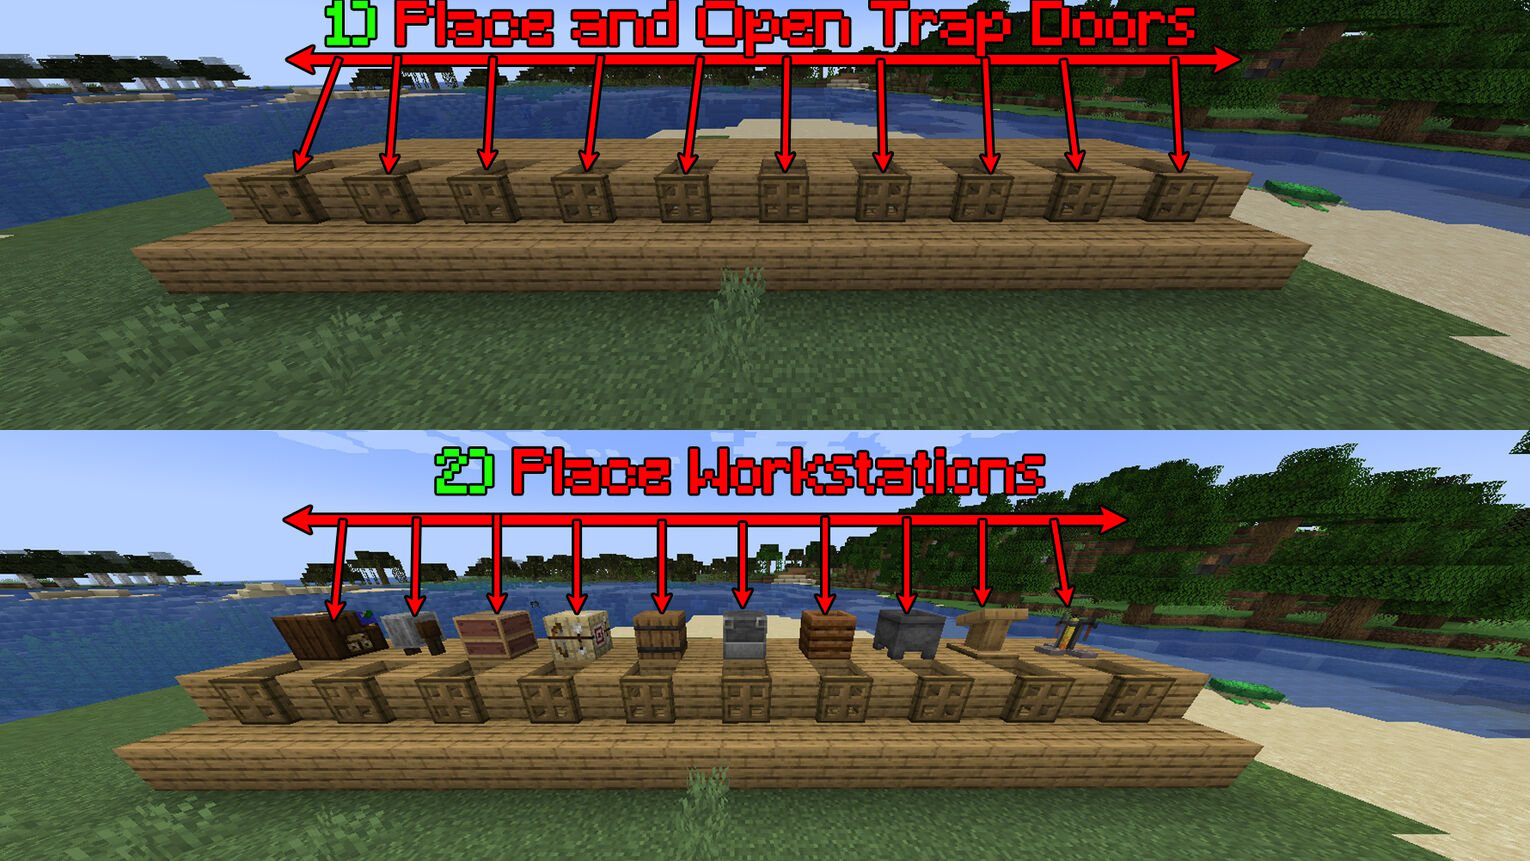
Speaking of workstations, you can choose whichever you want for what type of villager job you're seeking. For example, you can make a smoker and use it to get a butcher villager who will sell cooked meat. You can also get a cartographer in your villager trading hall who can sell banner patterns or various other maps, though I'd say you stick with the best Minecraft villager jobs!
Place and Turn On Levers in Front of Workstations
After you're done choosing what workstations and jobs you want in your own villager trading hall, it's time to put the pistons to use. At the upper platform, place levers in front of each workstation and turn it on. The Redstone dust has to get activated and the pistons should all rise up.
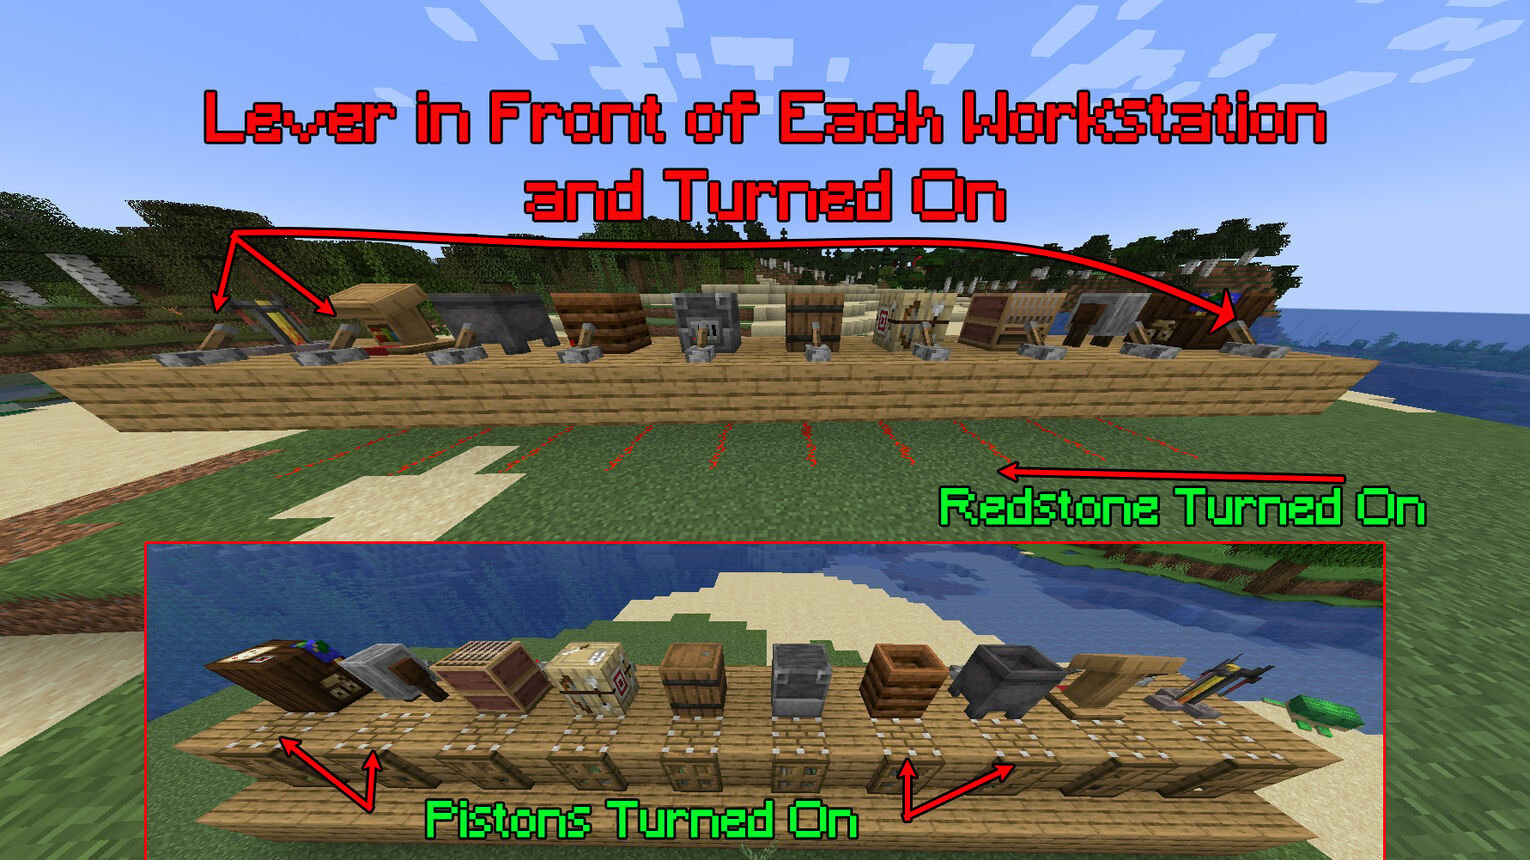
If the pistons don't rise up or the Redstone dust doesn't light up, then there's something wrong with your placement from previously. If that's the case, then definitely try practicing the best Redstone ideas first before you jump into building trading halls!
Place 3-Block High Oak Wood Between Pistons
This is a pretty quick and easy step, as all you'll have to do is place 3-block high wood planks between each piston. This will help you separate each villager in their own little tight spot within the trading hall!
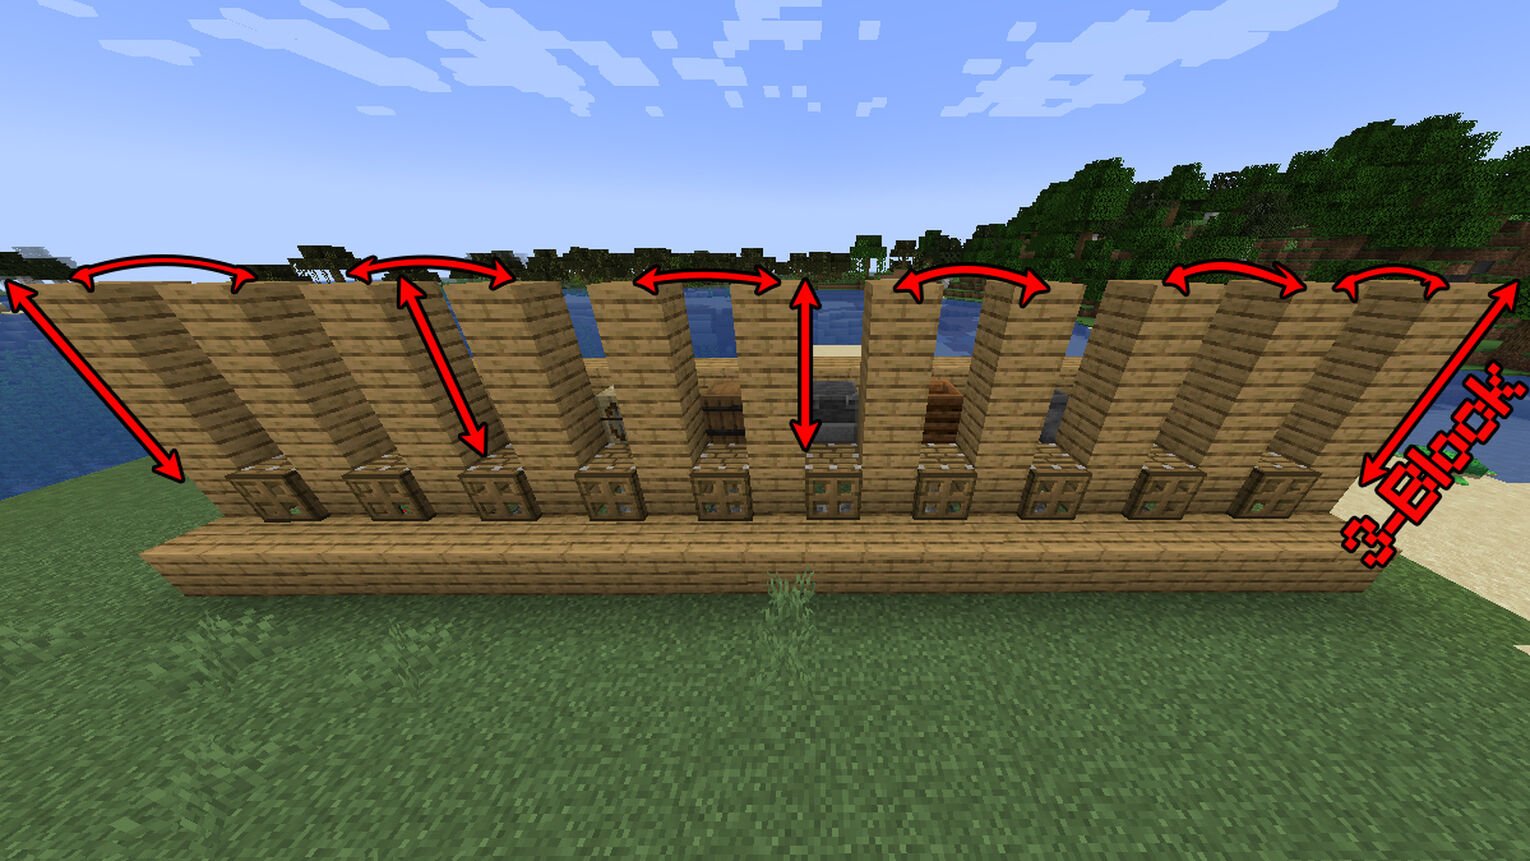
Besides separating the villagers in the trading hall, we'll use these to make the roof for them. But before that, we'll have to enclose them from the other sides.
Build a Little Hallway at the Back Where The Trapdoors Are
Now get yourself at the side where the trapdoors are located. Here you'll want to build a 2-block height hallway throughout the whole first wood plank row you placed below.
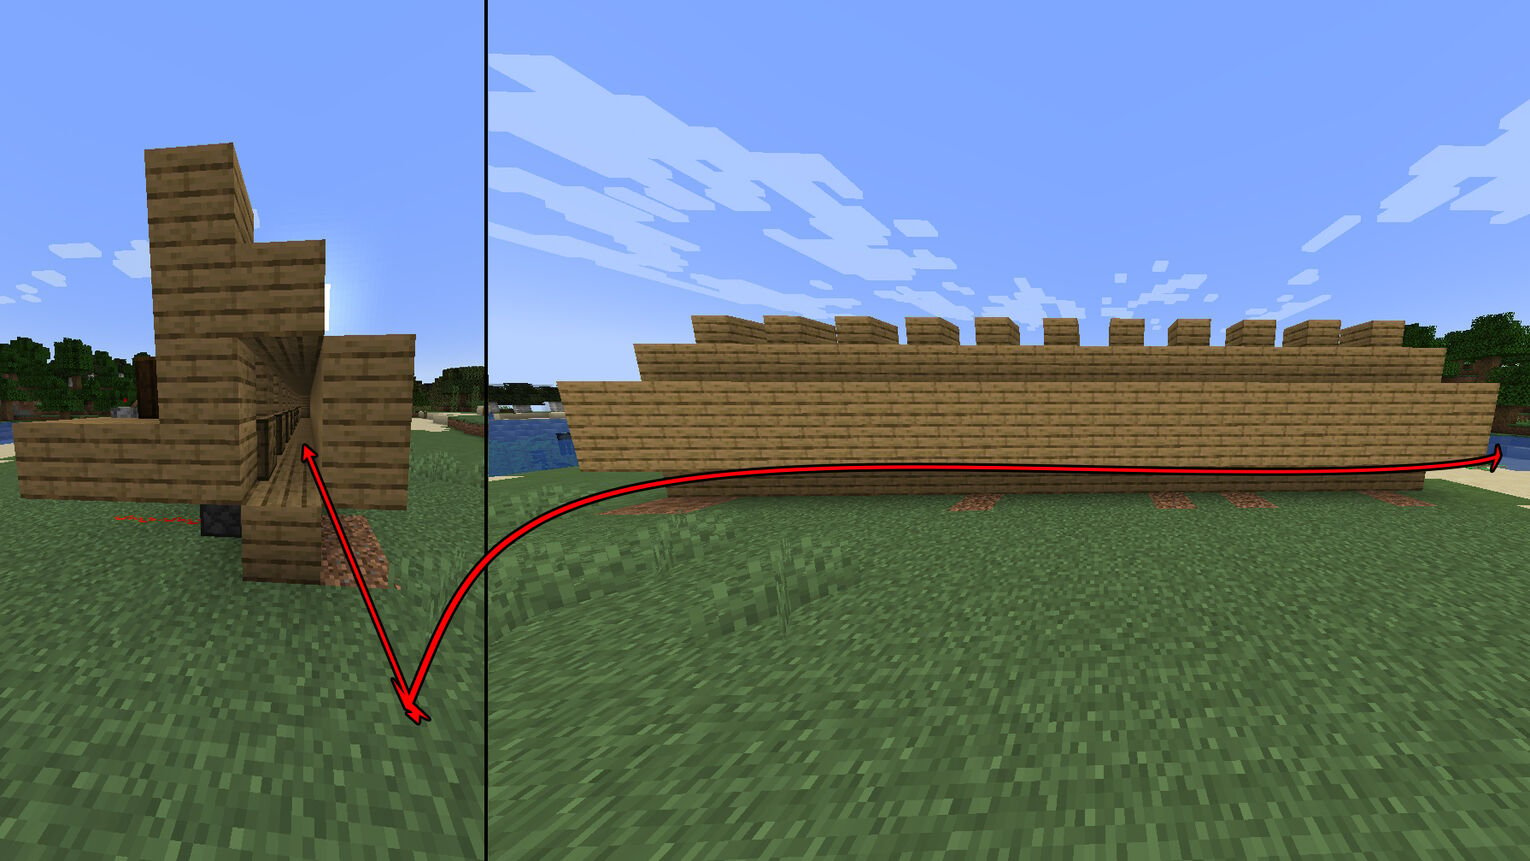
You can leave one side open where zombies can enter to make zombie villagers and cure them with golden apples for better trades. For this, you'll want to use a name tag on the zombie and set the game to hard difficulty. If you don't want to do this, it's very important to close off all entrances to the hall entirely so other hostile mobs won't kill your villagers in the trading hall!
Make a Temporary Dirt Block Roof
We're almost finished with the trading hall build, so now get the temporary dirt blocks in your hand. Right next to the 3rd block at the top of the pillars we built previously between the pistons, build a row with dirt blocks on the side where the workstations are. Then above each workstation, or every other second block, place 1 more dirt block upward on the row.
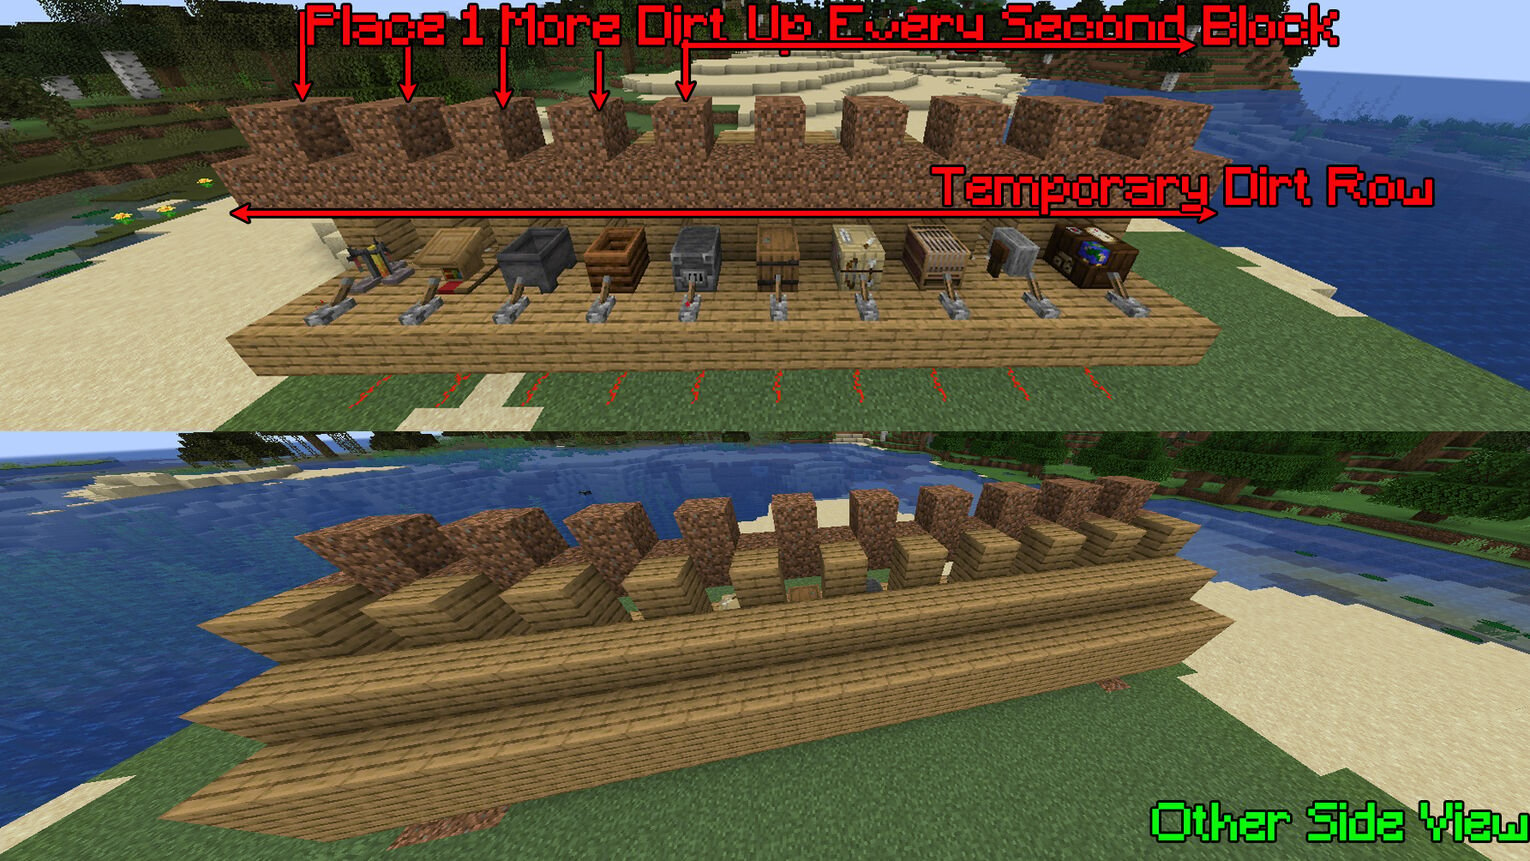
Later you can destroy or even leave this dirt roof, but it depends on how you want this Minecraft villager trading hall to look. But now comes the hardest step of fulfilling the trading hall!
Bring in Villagers Using Boats
This step either requires you to find a village and transport villagers to your trading hall from there or get some by breeding villagers. Either way, you'll have to place boats on the ground, push the villagers in them, and get to the trading hall.
Once you're at the trading hall, get to the side where we built the zombie hall. Make a little staircase using the dirt temporary blocks so the villagers can get atop the trading hall. Then break a boat and watch as the villager enters the trading hall to choose a job!
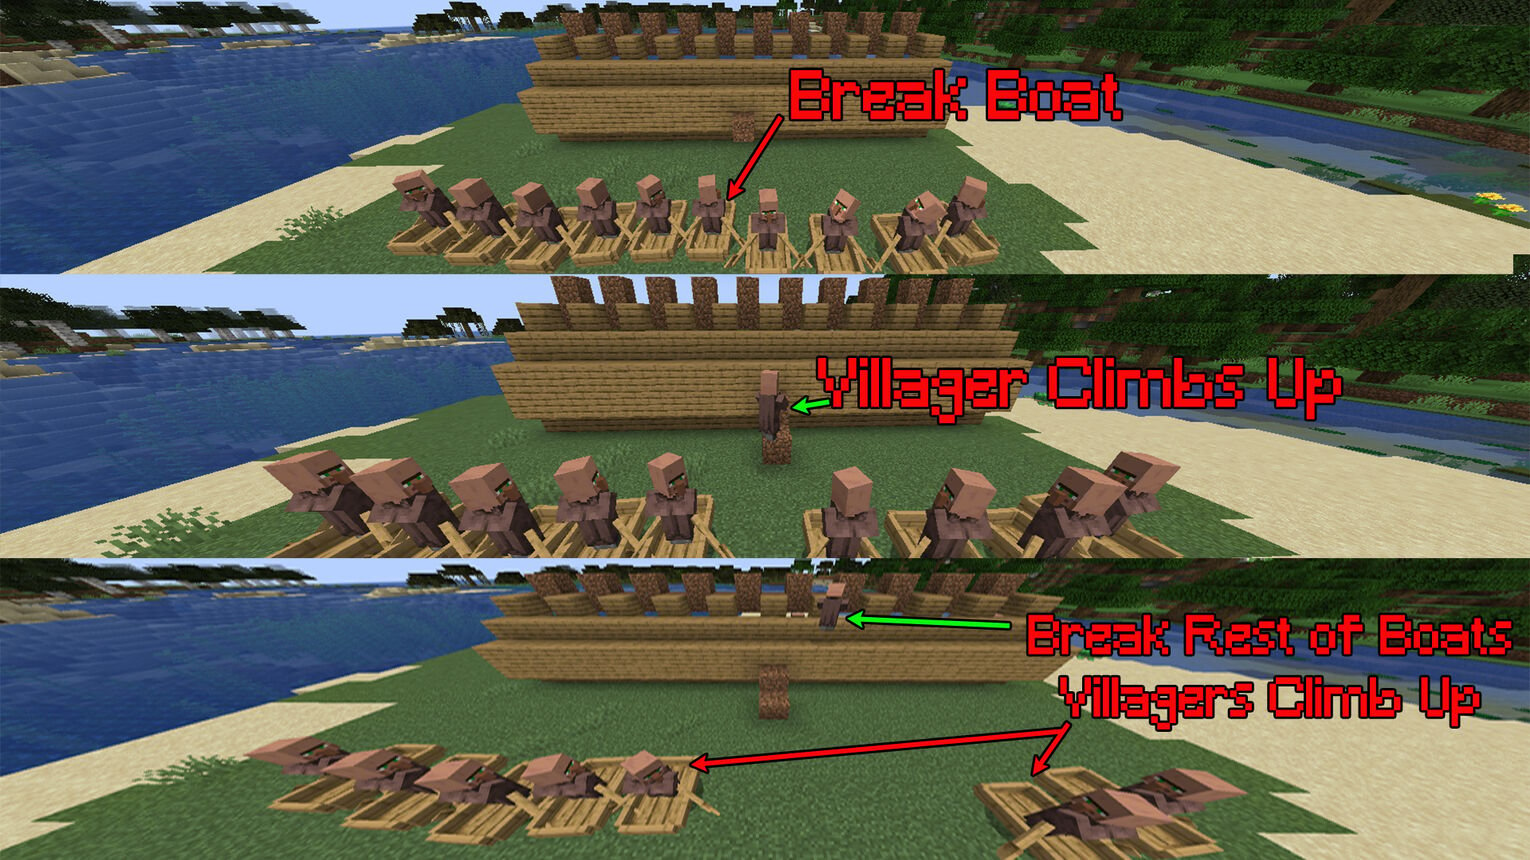
You should break a boat, wait until a villager gets to their outpost, then break another one. Don't break all boats out at once because some may stack and drop in the wrong place.
Complete the Roof and then Break the Temporary Dirt Roof
As we touched upon briefly above, you can leave the dirt block roof and there won't be any problem. But if you hate it, first place a wood plank above each villager's head, and then break the temporary roof. If you break the dirt roof first, the villagers will run away!
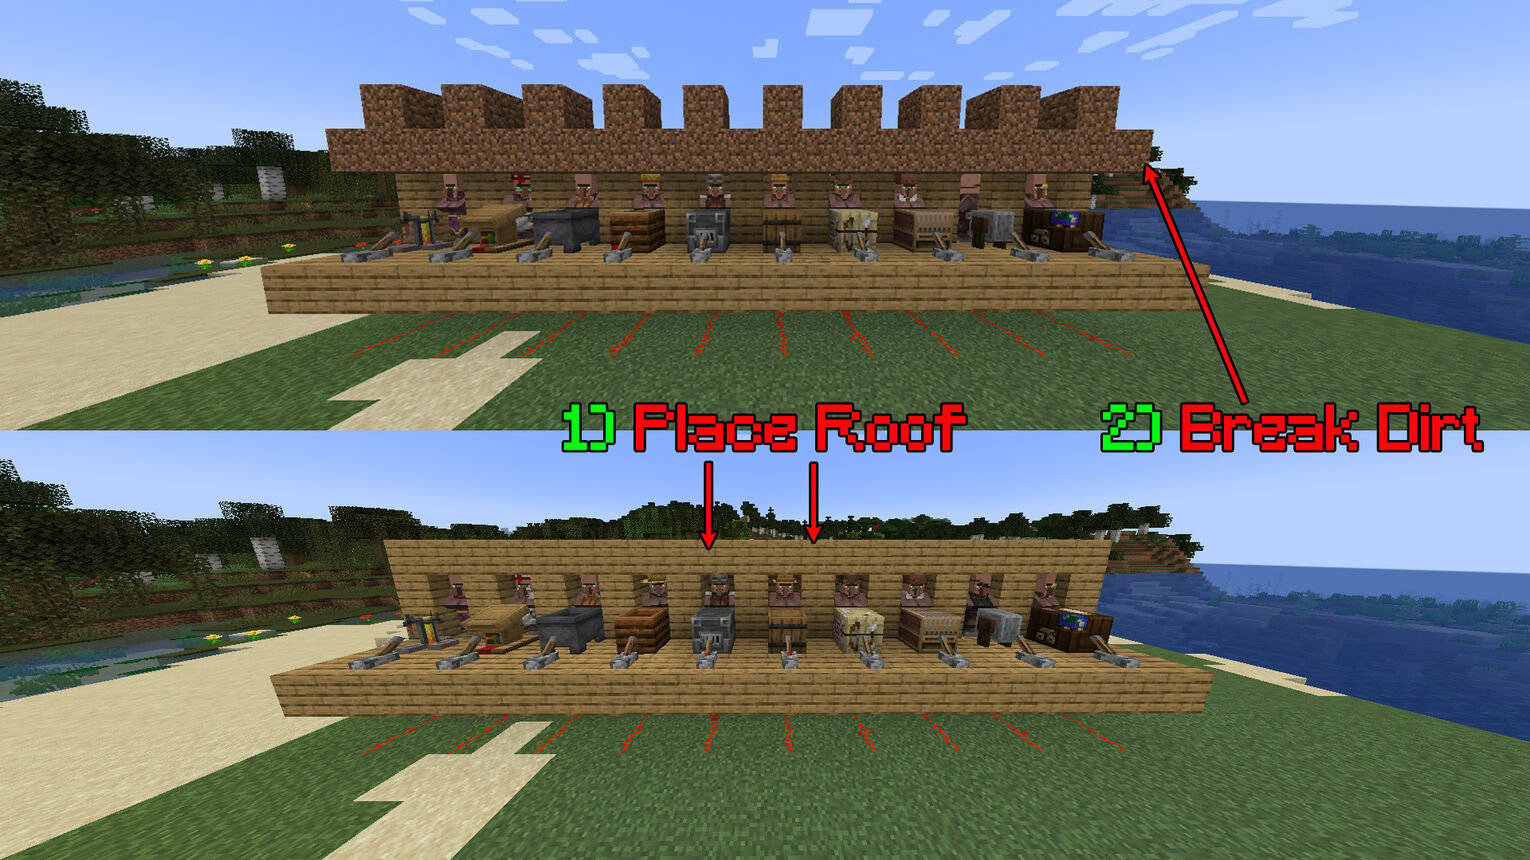
And that's everything you need to know on how to make a Minecraft villager trading hall. It's pretty easy to build big trading halls like these, just make sure you don't get the worst villager trades in Minecraft!


.svg)


![Best HUD Mods in Minecraft [Top 10 List]](https://theglobalgaming.com/assets/images/_generated/thumbnails/4077159/best-hud-mods-minecraft_03b5a9d7fb07984fa16e839d57c21b54.jpeg)
![How to Join a LAN World in Minecraft [Java & Bedrock]](https://theglobalgaming.com/assets/images/_generated/thumbnails/4077161/how-to-join-a-lan-world-minecraft_03b5a9d7fb07984fa16e839d57c21b54.jpeg)
