![Best Aim Assist Settings Apex Legends [Updated]](https://theglobalgaming.com/assets/images/_generated/thumbnails/3829583/best-aim-assist-settings-apex-legends_94948129f3d674eb46f0eebb5e6b8018.jpeg)
Turn On Aim Assist If You Already Haven't
Aim Assist should be on by default, however, if for some reason it isn't. Here's how to enable aim assist in the settings.

In Apex Legends, Aim Assist is called "Compensation." It's not the most gracious of terms, but at least it doesn't carry the negative connotations of "Aim Assist." Here's where you can find it.
- Go to Settings and locate your Controller Settings
- Scroll down and locate Advanced Look Controls
- Activate Custom Look Controls
- Scroll down again and turn on Target Compensation and Melee Target Compensation
After you've done this, you should have aim assist on. Make sure you have the best controller settings as well as the best controller binds set up beforehand, as those will only add to your advantages. Anyway, here's what's important.
The Ideal Deadzone, Outer Threshold, and Response Curve Settings
Getting these three right from the get-go is very important. If you don't you're gonna have a bad time. It won't be a horrible ordeal, however, you'll likely be frustrated by how often you'll be losing 1-on-1s to other controller players who have gotten these down.

Deadzone is practically the amount of force required to create an input. You should ideally keep this at a lower value. This may change based on your controller's stick drift, so it's important to keep that in mind.
Outer Threshold denotes when the extra yaw speed comes into play. You should keep this at 0 at all times. That way, you immediately get the benefits of having extra yaw.
Response Curve is what I like to call "The Possession Meter." Seriously though, if you set this to 0, your aim will begin to move on its own. It's really cool yet creepy at the same time. Keep this at a minimum, just enough to avoid the "nuisance" of having to deal with a jittery cursor. That's generally considered to be the best response curve setting in Apex. Here's a handy table if you're looking to copy these settings.
Setting | Value |
|---|---|
Deadzone | 10% |
Outer Threshold | 2% |
Response Curve | 5% |
When it comes to aiming settings, most values should be kept low. The art of aiming in video games is like surgery, you need precise movements to get the job done, not grandiose maneuvers.
The Best Normal Aim Settings
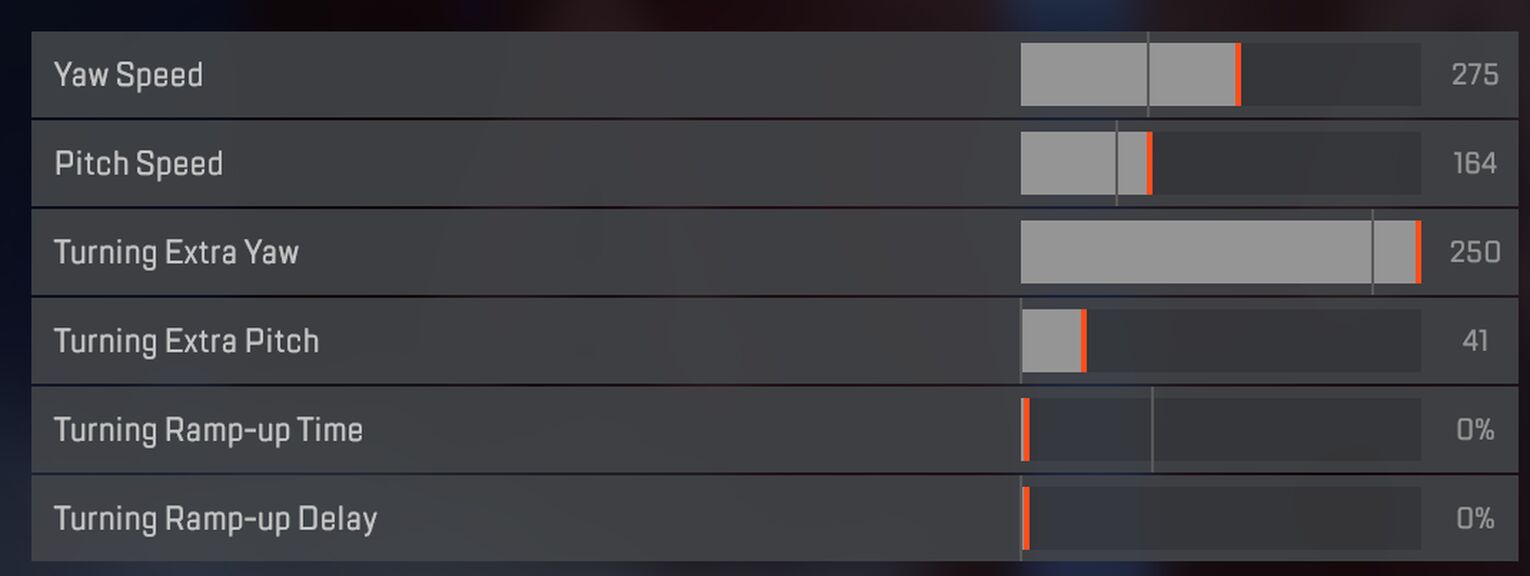
Here comes the fun part, the Normal Aim Settings values. If you don't nail these down perfectly, then everything up to this point would have been for naught. Here's how you should ideally fill them out.

Having higher Yaw and Pitch speeds basically means that you can respond to things quicker than usual. With Aim Assist on, you ideally want to hit a sweet spot where you can have lightning-fast snaps while being in complete control the entire time.
This is also the reason why you set the Turning Ramp-Up Time and Turning Ramp-Up Delay to 0. These increase the time it takes for you to get the Pitch and Yaw speed boosts. Which is bad. If you've ever watched some of the best Apex controller players play, you might have noticed their lightning-fast reflexes. That wouldn't be possible without these values set as they are. Here's another handy table.
Setting | Value |
|---|---|
Yaw Speed | 275 |
Pitch Speed | 164 |
Turning Extra Yaw | 250 |
Turning Extra Pitch | 41 |
Turning Ramp-up Time | 0% |
Turning Ramp-up Delay | 0% |
Don't be afraid of using such high Yaw speeds. You might need a couple of games to get used to it, but once you do, the benefits will become apparent in an instant.
The Perfect ADS Aim Settings
With your ADS values, it's practically the same, but different. Here's how.

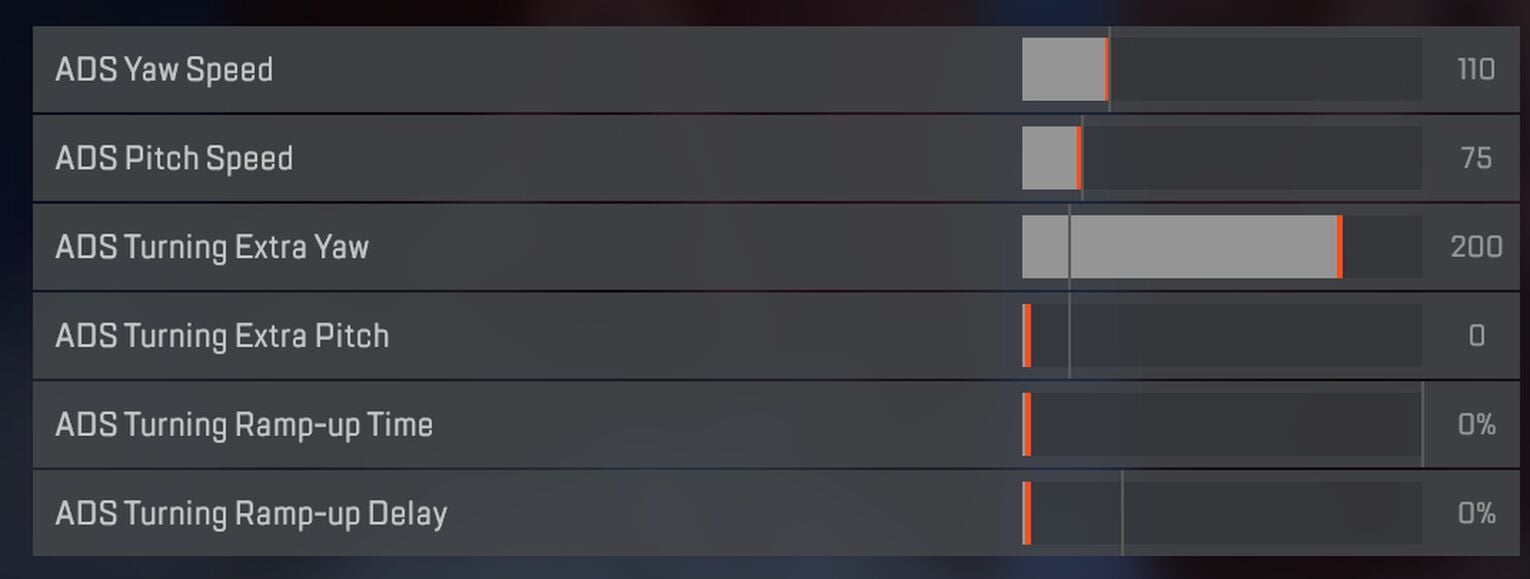
With the Pitch and Yaw values, you don't change that much. The only thing you should change is the extra pitch value, which I personally lower, but you can comfortably leave it at default if you want. However, when it comes to the Ramp-Up times, it's practically the same story.
Both your Ramp Up Time and Ramp Up Delay should be set to 0. It doesn't matter if you're Aimed Down Sight. Having that extra speed boost from the get-go is a godsend. Plus, it makes for some really epic snapshots that look amazing in compilations. Don't ask me why I know, or why I have all these recordings in my library.
Setting | Value |
|---|---|
ADS Yaw Speed | 110 |
ADS Pitch Speed | 75 |
ADS Turning Yaw Speed | 200 |
ASD Turning Pitch Speed | 0 |
ASD Turning Ramp-up Time | 0% |
ASD Turning Ramp-up Delay | 0% |
If you've set your normal aim speed to an appropriate amount, you should have to alter your ADS settings too much. Still, consider your ADS settings a cherry on top. It's not the most important part of the cake, but it's the thing that completes it.


.svg)


![Best Mouse & Keyboard Settings For Apex Legends [From Pros]](https://theglobalgaming.com/assets/images/_generated/thumbnails/3802211/best-mouse-and-keyboard-settings-apex-legends_03b5a9d7fb07984fa16e839d57c21b54.jpeg)
![What is The Best Mouse Sens in Apex Legends [Analysis]](https://theglobalgaming.com/assets/images/_generated/thumbnails/3996305/best-mouse-sens-apex-legends_03b5a9d7fb07984fa16e839d57c21b54.jpeg)
![Best Apex Controller Binds [From a Predator Player]](https://theglobalgaming.com/assets/images/_generated/thumbnails/3996307/best-apex-controller-binds-apex-legends_03b5a9d7fb07984fa16e839d57c21b54.jpeg)
![The Best ALC Settings Apex Legends [Picked by Pros]](https://theglobalgaming.com/assets/images/_generated/thumbnails/3919496/best-alc-settings-apex-apex-legends_03b5a9d7fb07984fa16e839d57c21b54.jpeg)