![How To Stream Valorant [Streamlabs Full Guide]](https://theglobalgaming.com/assets/images/_generated/thumbnails/3519140/How-To-Stream-Valorant_94948129f3d674eb46f0eebb5e6b8018.jpeg)
If this is your first time getting into streaming, I highly recommend using Streamlabs, one of the most popular and beginner-friendly streaming softwares used by millions of streamers. Keep in mind that this entire guide revolves around Streamlabs!
Download Streamlabs
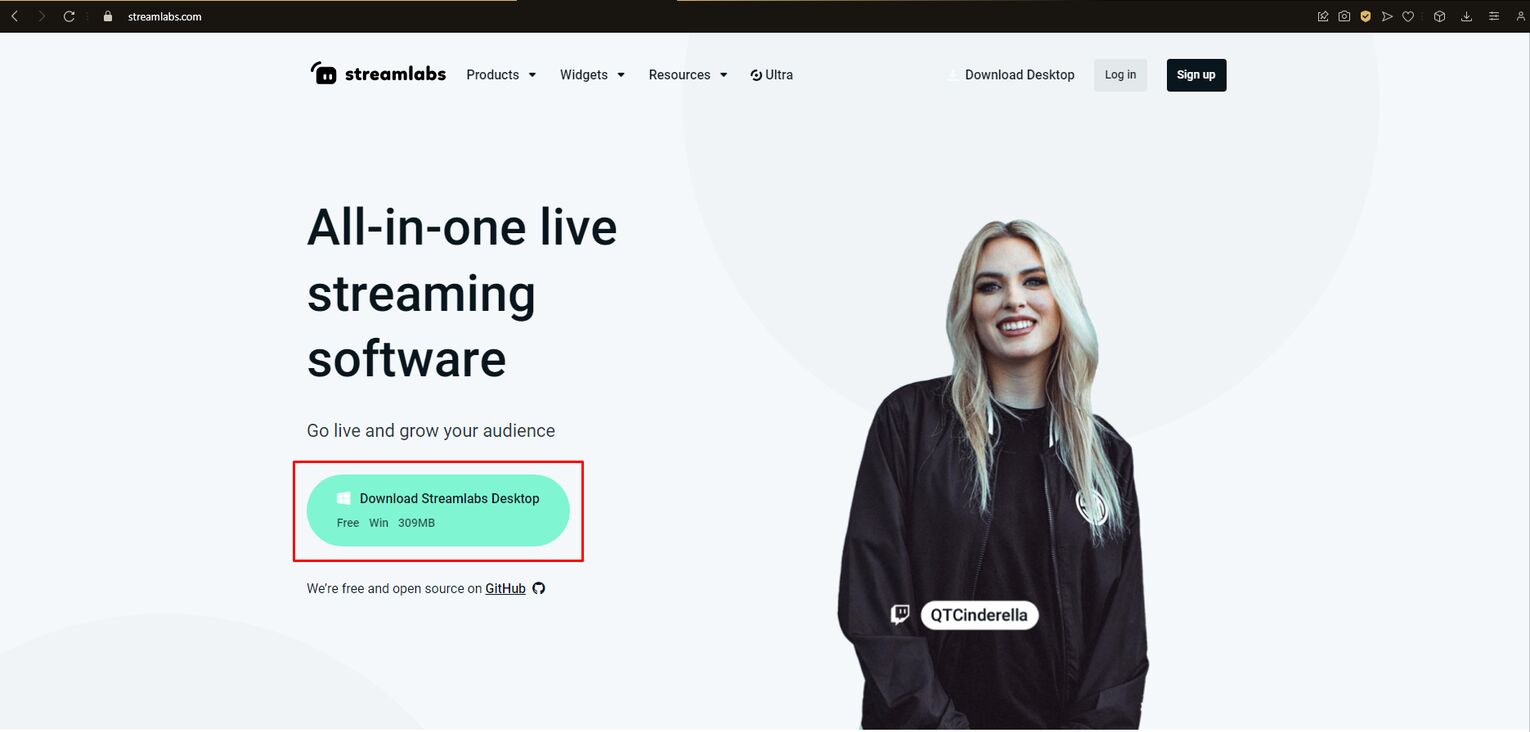
The first step is to download it to your computer. Head over to the official Streamlabs website, and click on the Download button. Once you’ve successfully downloaded Streamlabs and have it open, you might be a little confused, but we’ll walk you through everything.
Understanding The Interface
Here’s a quick rundown of the Streamlabs interface, and what every section does:
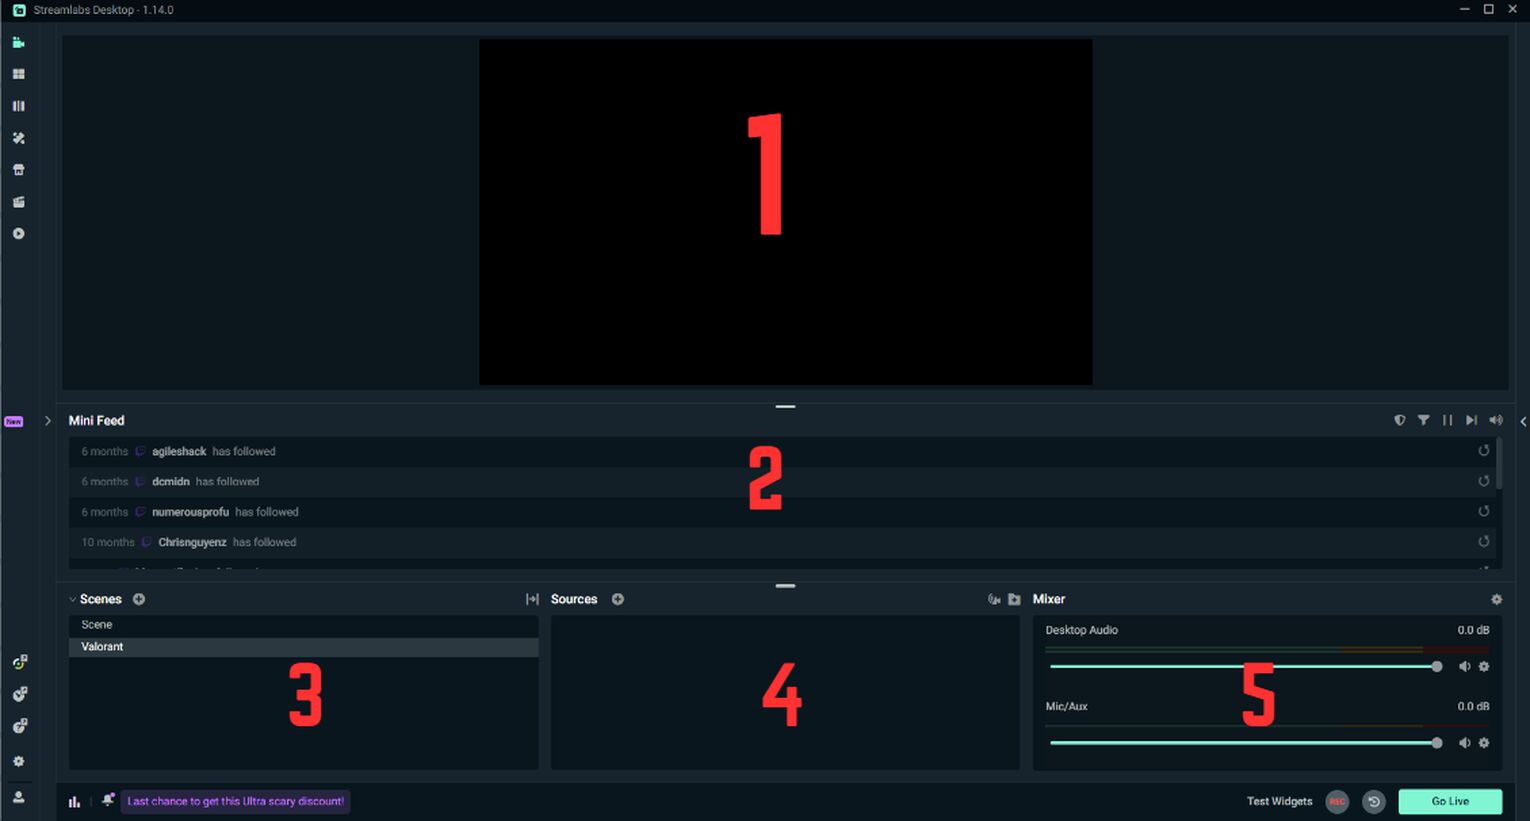
Output: what your streaming audience will see on their screens. This section acts as a preview of your output mode in the Streamlabs application so you’ll know how your screen will look when you go live, and what your audience can and cannot see.
Mini Feed: shows recent audience activity on your stream. You will be notified with new followers, donations, etc.
Scenes: adjust different stream layouts. Your Valorant gameplay will be your main scene, but you can add more scenes for when you want to capture specific window, play different games, start your stream, or end your stream.
Sources: video, images, and sounds that will appear on your stream. Your main source will be your monitor display so your audience can see you playing the game. However, you can also add things like images, gifs or your webcam.
Mixer: adjust audio and sounds. You will have multiple sliders to work with, which you can use to increase or decrease the output volume from different sources, such as desktop audio or your microphone.
Now that you’ve understood the entire interface, let’s get straight to work and set up your stream.
Add Video And Audio Sources
The first part to setting up your stream is adding video and audio sources for your main scene, which is displaying your screen while playing Valorant. Here’s a step-by-step guide on how to do it:
First, we’re going to have to create a Scene. You can name this scene whatever you want.
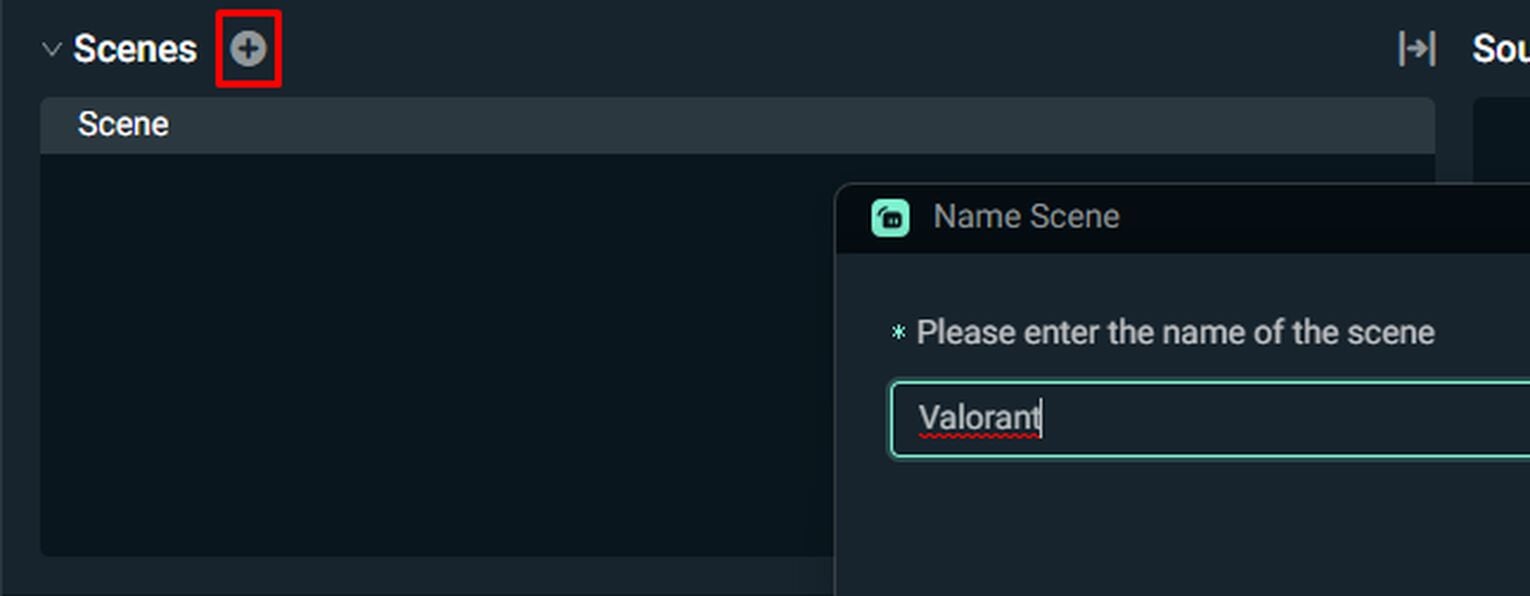
For this example, I’ll name it Valorant. Now, we’re going to add some sources.
Screen Capture
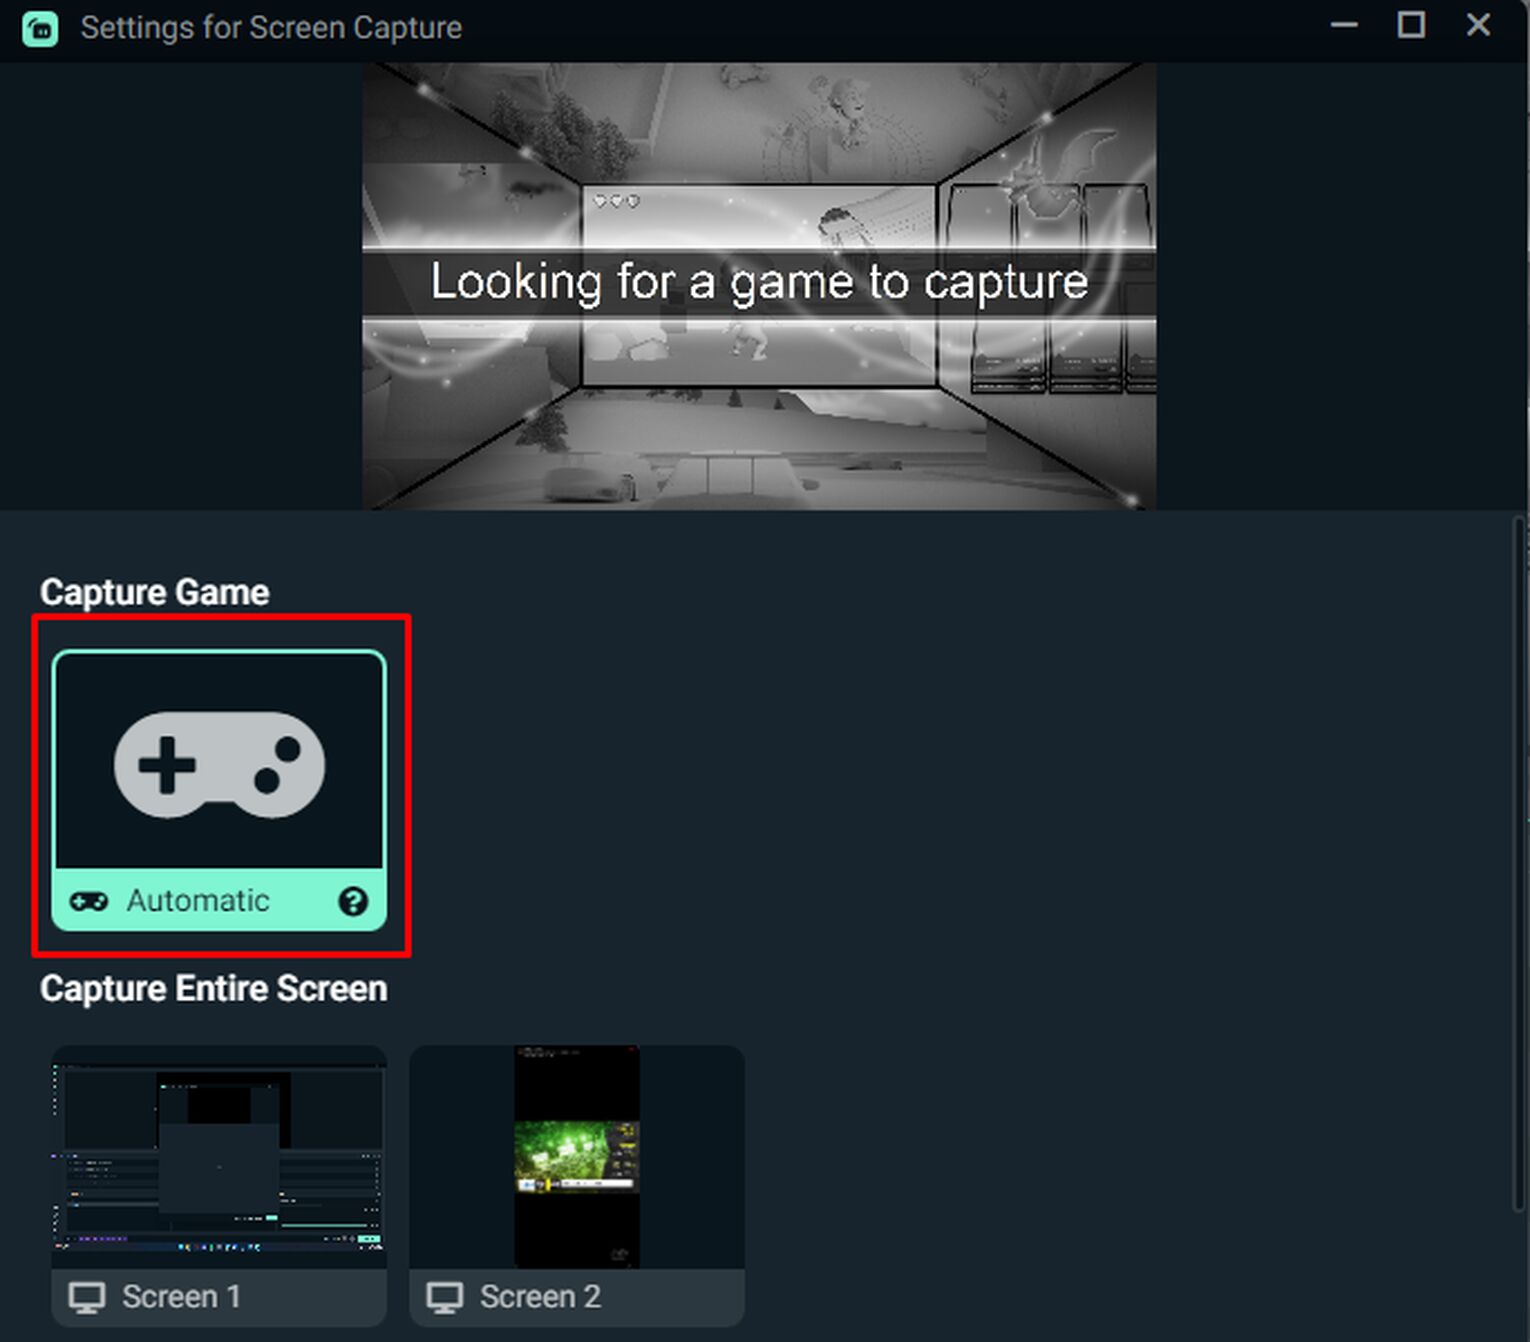
The first Source you should add is Screen Capture. This source displays what is on your monitor. Name the source whatever you want, then click Automatic under Game Capture.
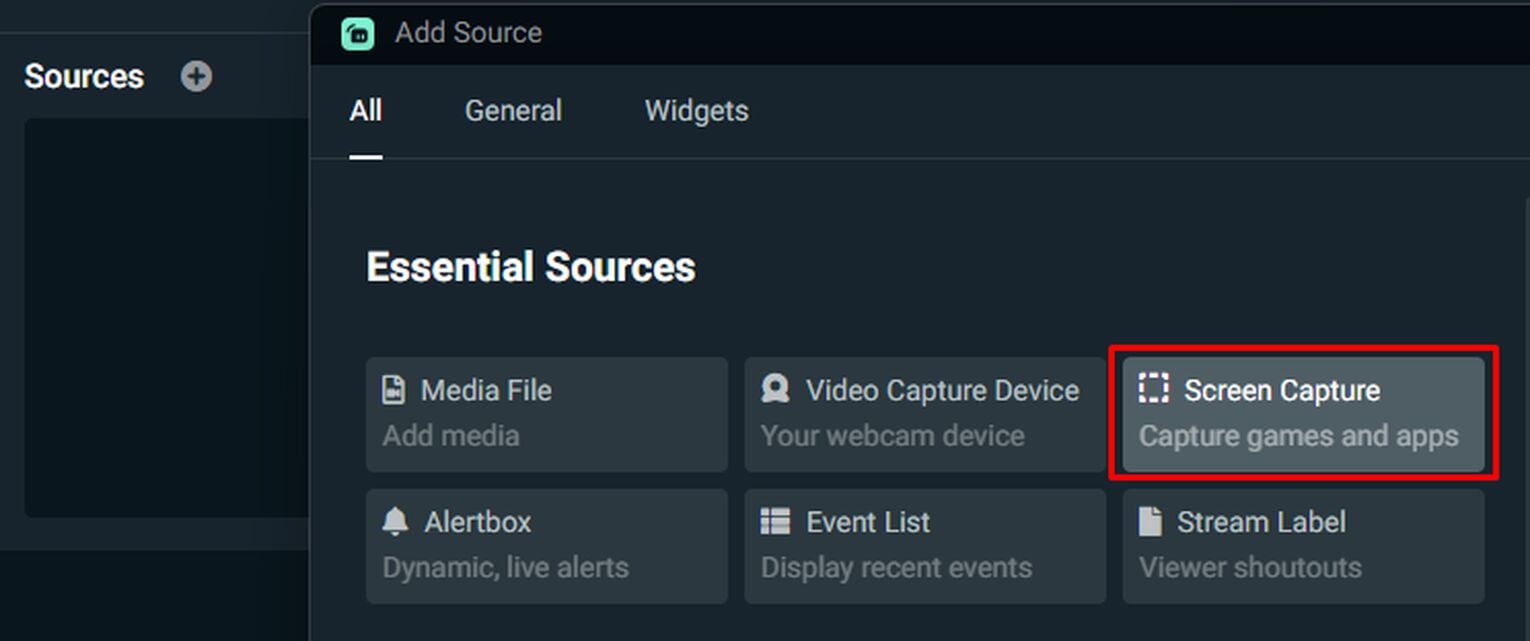
You can also set it to Capture Entire Screen, but your audience will be able to see your screen when you tab out of Valorant. If this option is enabled, make sure you don’t have anything important or private on your screen!
Video Capture
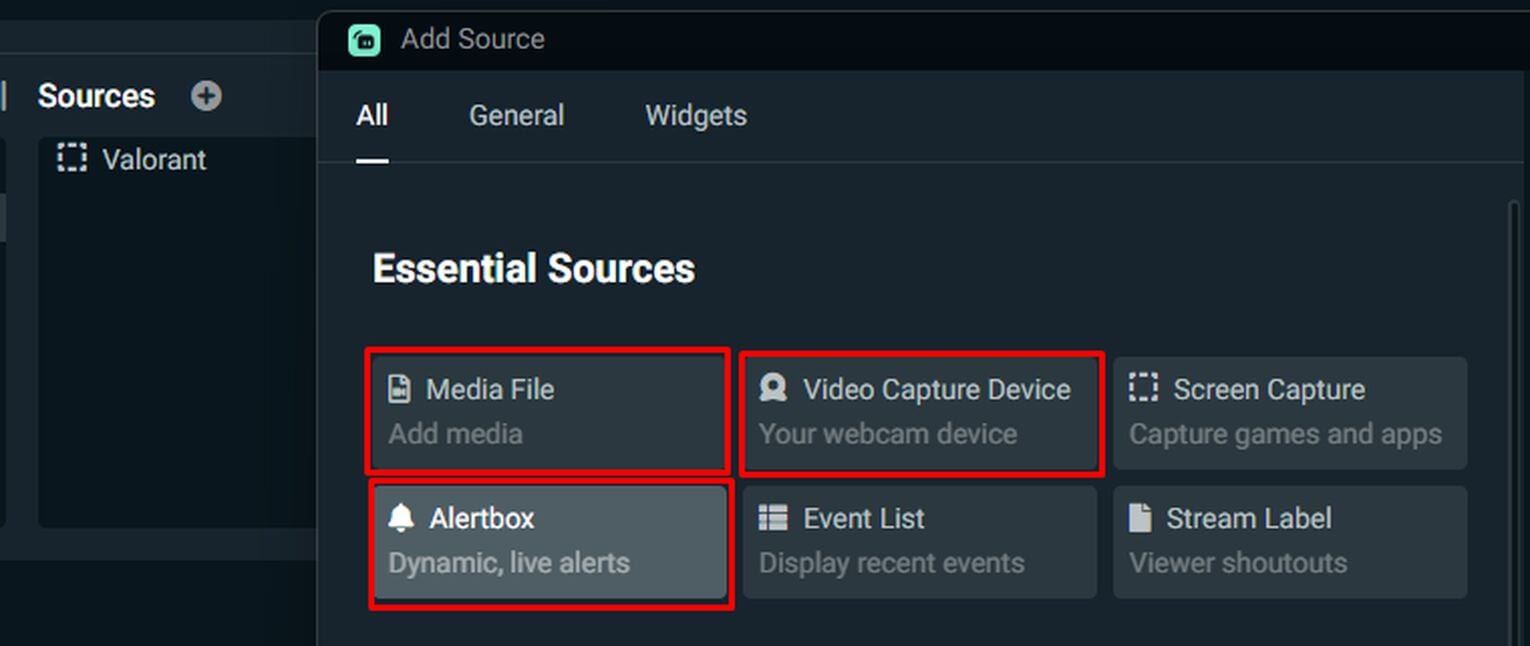
In case you want to have your video capture on, or in other words, your webcam, you can add another source titled Video Capture Device. When adding the source, choose the appropriate device.
Media (Images/GIFs)
You can also add images or gifs on your screen. The most popular Valorant celebrities and streamers display their sponsors in the form of a GIF. If you’re a high-ranked player scared of stream snipers, you can also add a random image to block your minimap.
If you do this, you can see the minimap just fine, but your audience won’t. To add on, you might as well turn on the Valorant Streamer Mode while playing.
Alerts
Alerts will trigger when someone follows, subscribes, or donates to your stream. These alerts won’t appear on your screen, but will appear on your stream for your audience to see. To add alerts, just add another source named Alertbox.
These four sources are the most essential and basic ones. If you want to add more of them, feel free to! You can add an unlimited amount of them.
Optimizing Stream Settings
Now that your sources are set up, you shouldn’t go live just yet. I highly recommend optimizing some important stream settings to ensure your stream runs well. Open the Settings tab on Streamlabs, and optimize these sections:
Output Settings
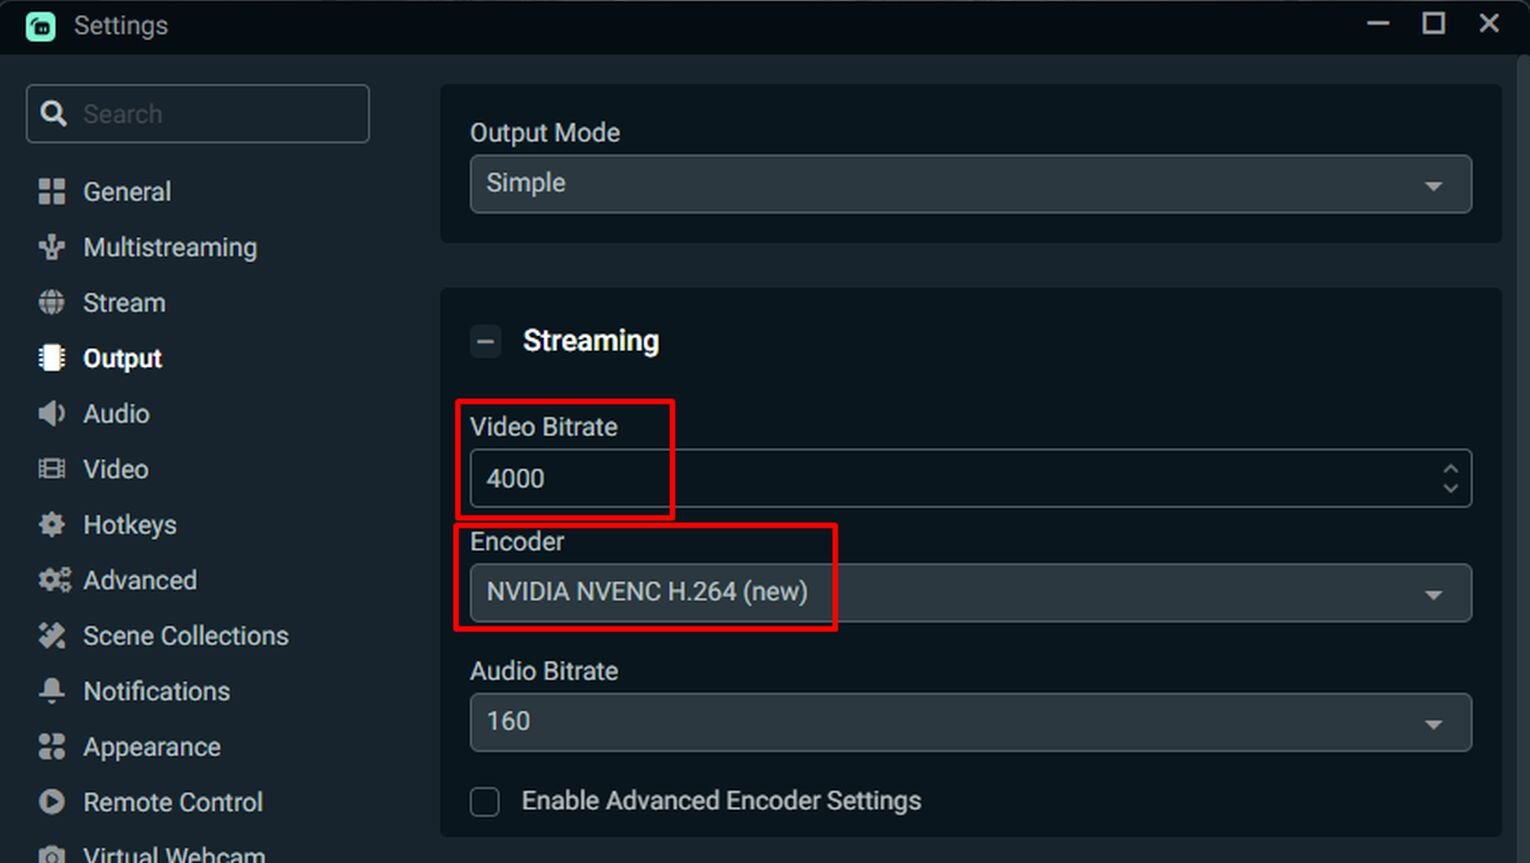
The main thing we’re looking to change in the output settings is your Video Bitrate. Your Bitrate is important for the quality of your stream, but you need sufficient upload speed to increase the Bitrate.
Perform a speed test and check for your upload speed in megabits, not megabytes.
If your upload speed is higher than 12 Mbps, set your Bitrate to 6000
If your upload speed is 6 to 12 Mbps, set your Bitrate to 4000
If your upload speed is below 6 Mbps, set your Bitrate to 3000 or lower.
To stream Valorant at 1080p, you will need a targeted Bitrate of 4000, but the absolute minimum Bitrate is 3000. If you have a slower internet connection, you’ll have to stick with a Bitrate of 3000. Meanwhile, a Bitrate of 6000 will give you a very smooth stream.
Another Output Setting to look out for is your Encoder. If you have a NVIDIA graphics card, set your encoder to NVIDIA NVENC H.264. Streaming Valorant will also take a toll on your computer's performance, so make sure you are playing Valorant with maximum GPU.
Audio Settings
For audio settings, the only thing you’re looking for is Mic/Auxiliary Device 1, which is your main microphone. All you need to do is set the correct device, and that’s pretty much it.
Video Settings
In your video settings, there are two things you should do.
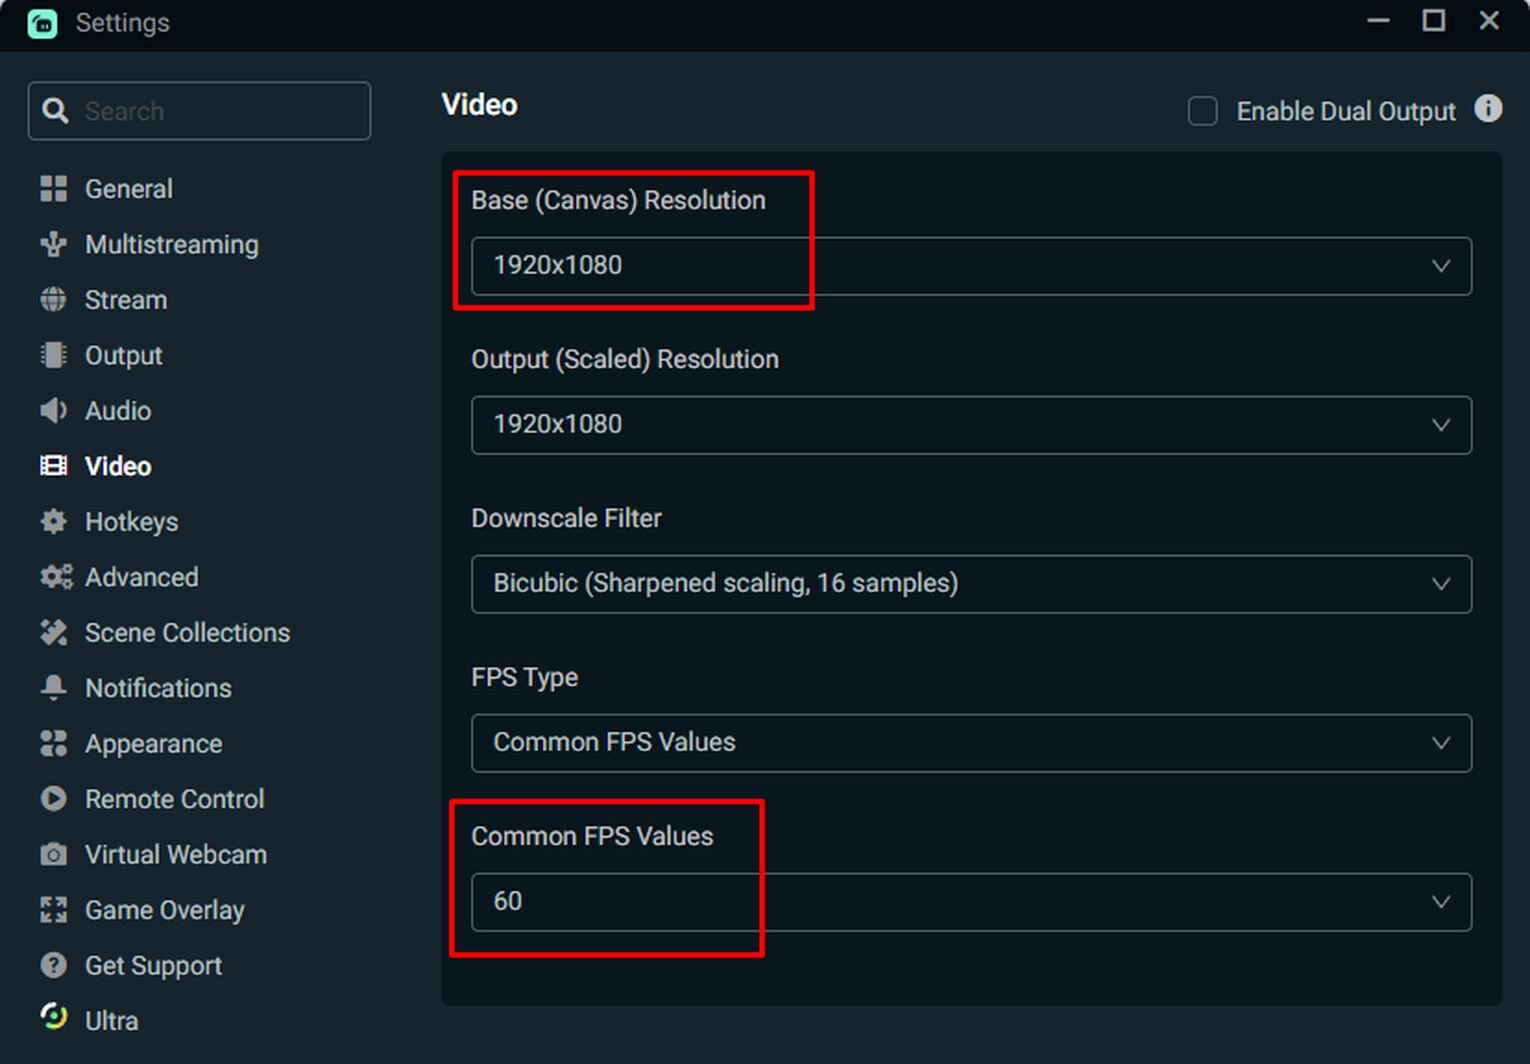
For your Base Resolution, you ideally want it to be 1920x1080, which allows you to stream at 1080p. If you cannot handle 1080p, you can lower it down to 1280x720, which will run your stream at a maximum of 720p.
You should also set your Common FPS Values to 60 for an optimal viewing experience for your viewers.
Link Streamlabs To Your Streaming Service
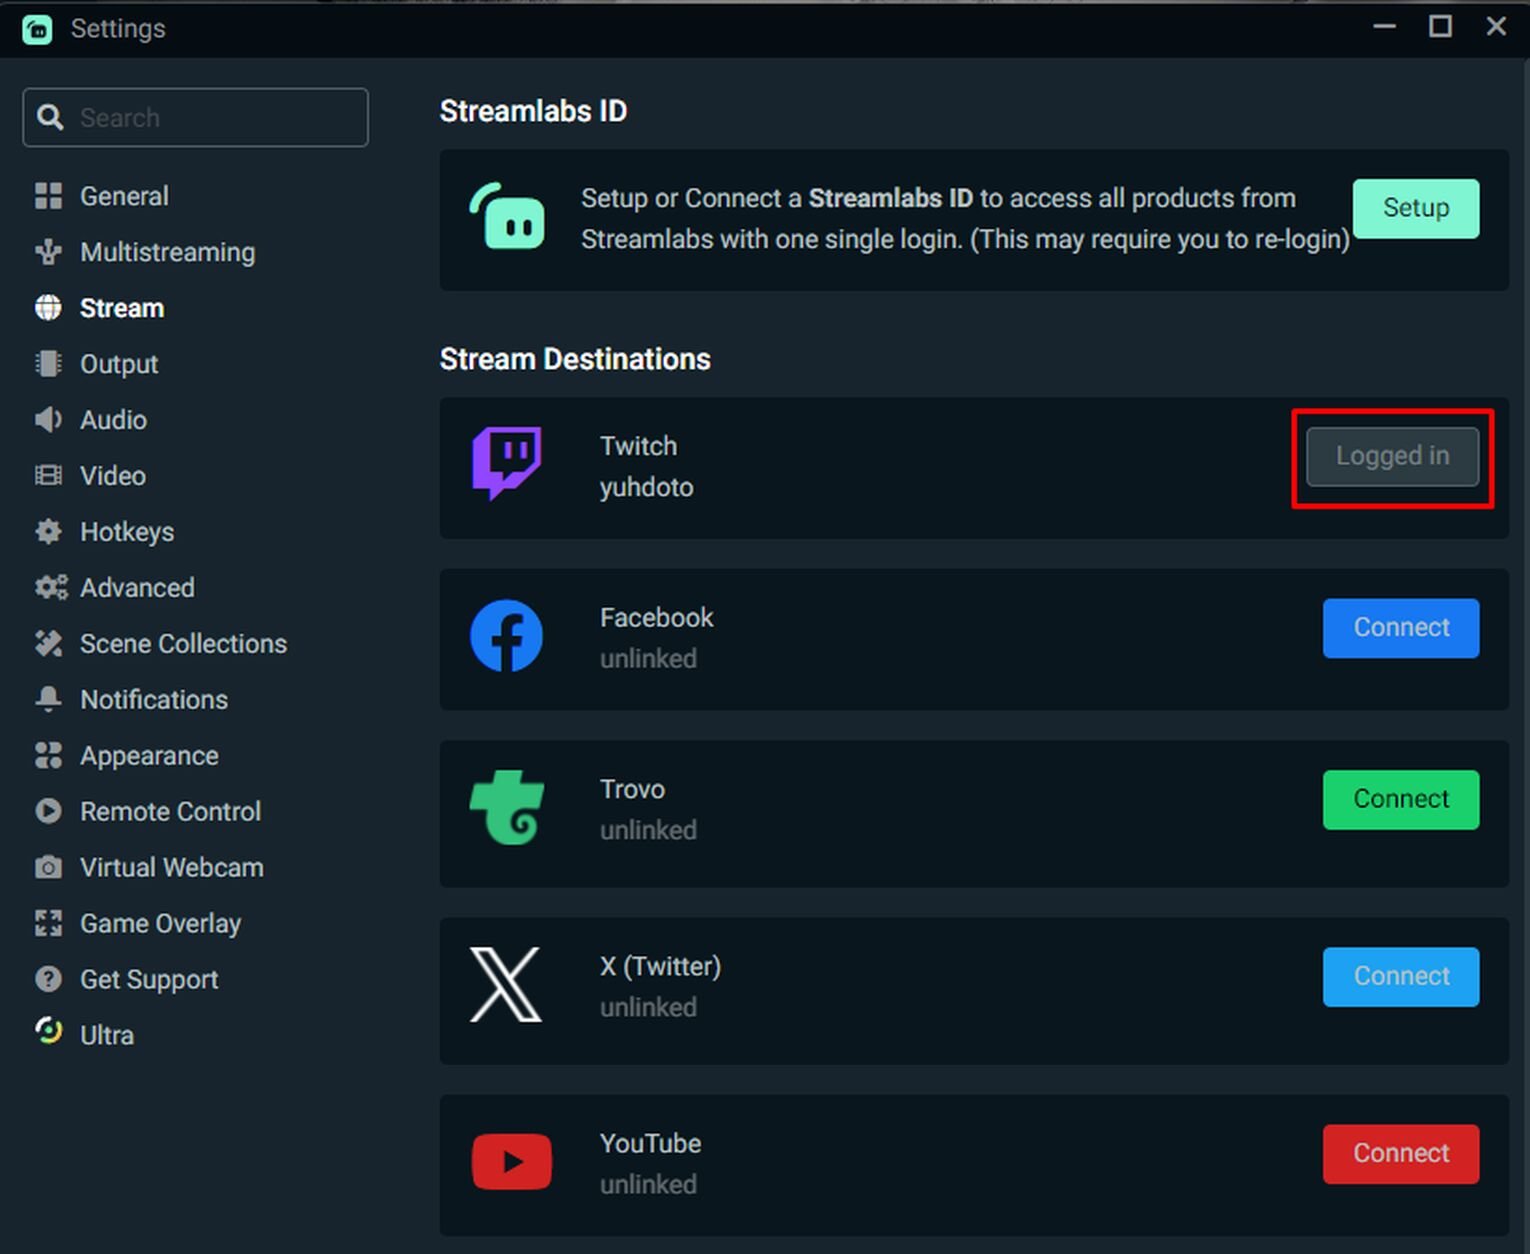
Okay, now that everything is set up, the last thing to do before going live is to link Streamlabs to your Twitch account, or whatever platform you’re planning to use.
We’re gonna go back to the Settings tab. This time, click on the Stream settings.
Now, you’re going to link Streamlabs to the streaming service you will use.
Go Live
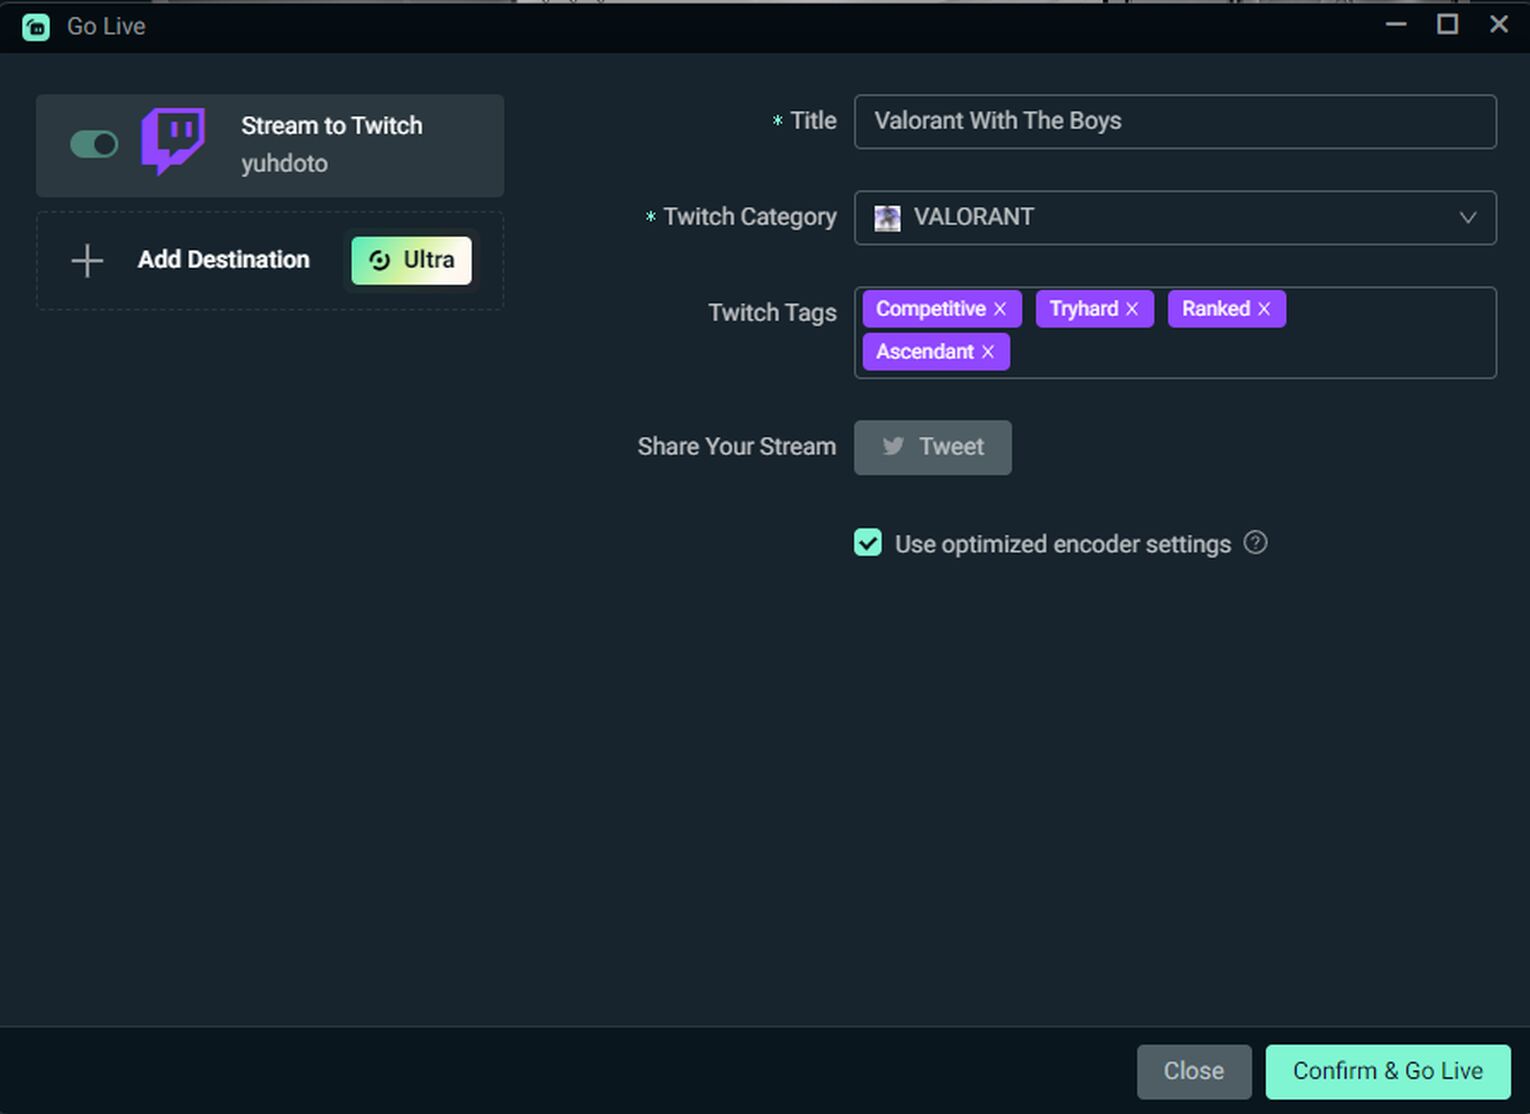
Finally, you can go back to the main menu, and click the Go Live button at the bottom right of the screen.
Before your stream goes live to start streaming Valorant, you can edit the following:
Stream Title
Twitch Category
Tags
And that’s all the settings you’ll need to have a basic Valorant stream. Remember to be yourself, as everyone wants to watch someone genuine! Who knows, maybe one day you'll be as big as Tarik.


.svg)


![How To Turn Off Language Filter In Valorant [Uncensoring]](https://theglobalgaming.com/assets/images/_generated/thumbnails/3519151/Turn-off-language-valorant_03b5a9d7fb07984fa16e839d57c21b54.jpeg)
![How To Fix Valorant 1TB File Size Bug [Fast & Easy]](https://theglobalgaming.com/assets/images/_generated/thumbnails/407081/1TB-SIZE-FILE-FIX-VALORANT_03b5a9d7fb07984fa16e839d57c21b54.jpeg)
![Best Raze Lineups on Icebox [2024 Guide]](https://theglobalgaming.com/assets/images/_generated/thumbnails/58004/6248e15f44720bcdc407f796_best20raze20lineups20icebox20valorant_03b5a9d7fb07984fa16e839d57c21b54.jpeg)