![How to Make a Slime Farm in Minecraft [10 Steps]](https://theglobalgaming.com/assets/images/_generated/thumbnails/3682675/how-to-make-slime-farm-minecraft-1_94948129f3d674eb46f0eebb5e6b8018.jpeg)
What Items Do You Need to Build a Slime Farm in Minecraft?
Before you start making this Minecraft slime farm, there are some required items you'll need to gather. They aren't that hard to get if you've already made some progress in your survival world. So here are the required items to make this Minecraft slime farm:
- 1031 of any solid blocks, we'll be using wood planks and smooth stone
- 1 Carved or normal pumpkin depending on the edition for making an iron golem
- 1 slab of any type, we'll be using a smooth stone slab
- Lots of scaffolding depending on the edition for making an AFK spot
- 49 Magma blocks
- 16 Glow lichens
- 16 Fences
- 4 Iron blocks
- 2 Chests
- 1 Hopper
- 2 Cobblestone walls
- 24 Buttons
- 4 Water buckets
- Any blocks for making the AFK spot
- Around 4 stacks of torches
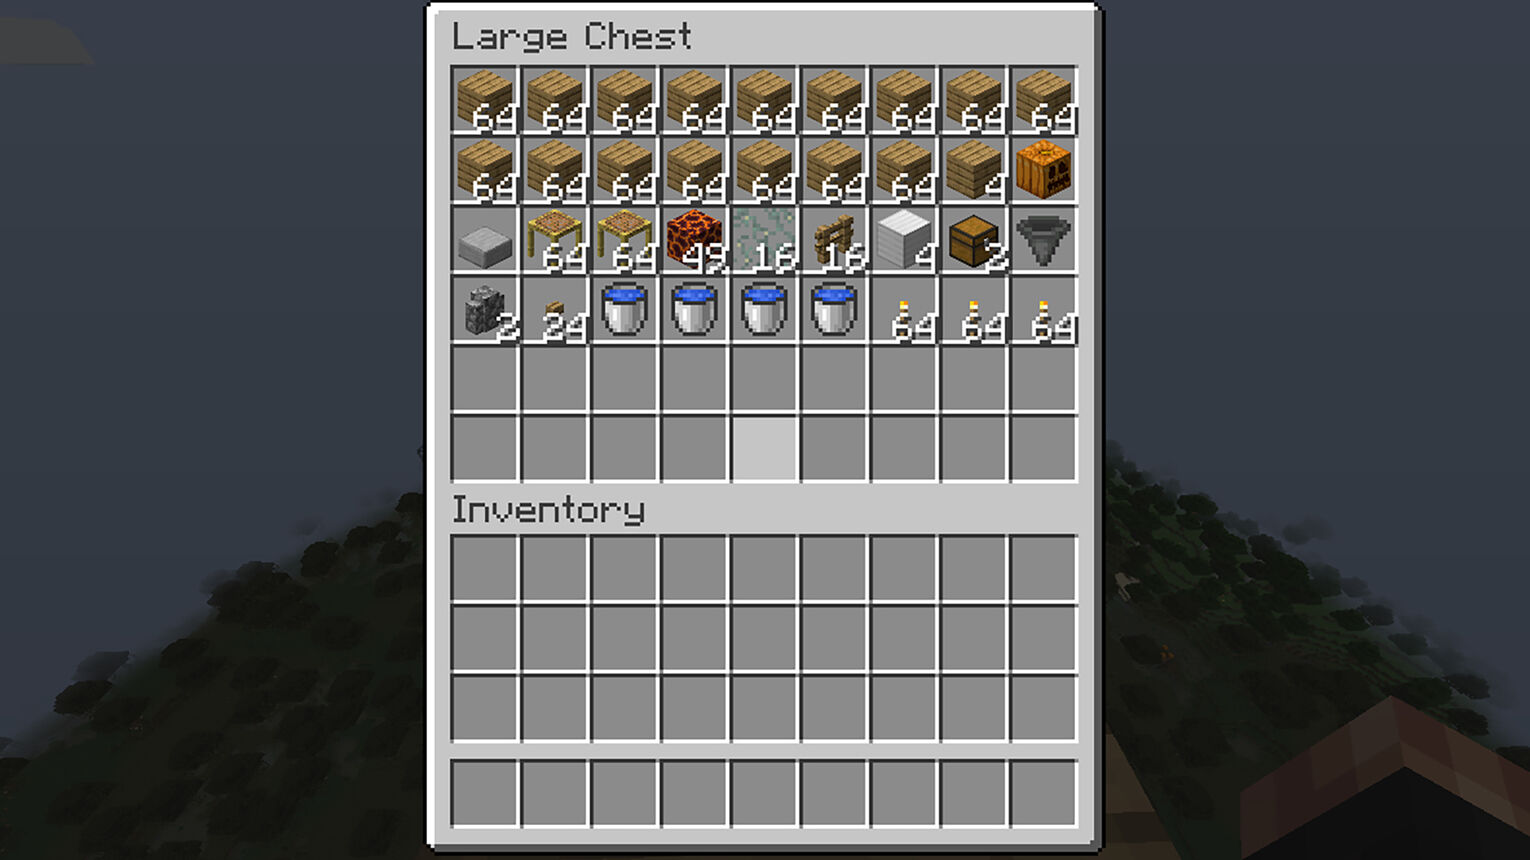
Having tested the farm in a personal survival world, it gave me around 10-15 slime balls in 10 minutes. There are other methods to making the farm more efficient like using a slime chunk, but that isn't necessary here. Now below you can see exactly how to make a slime farm in Minecraft!
How to Build a Slime Farm in Minecraft
Find a Swamp or Mangrove Location
The first thing you'll have to do to make this Minecraft slime farm is to find a swamp biome in Java edition or a mangrove biome in Bedrock edition. That's where the slime chunks are located and where they'll spawn.
Then all you'll have to do is ensure you're on the Y height coordinate between 51 and 69 as that's where you'll spawn slimes. You can easily see the coordinates by pressing F3 on Java or turning on the option in the settings on Bedrock.
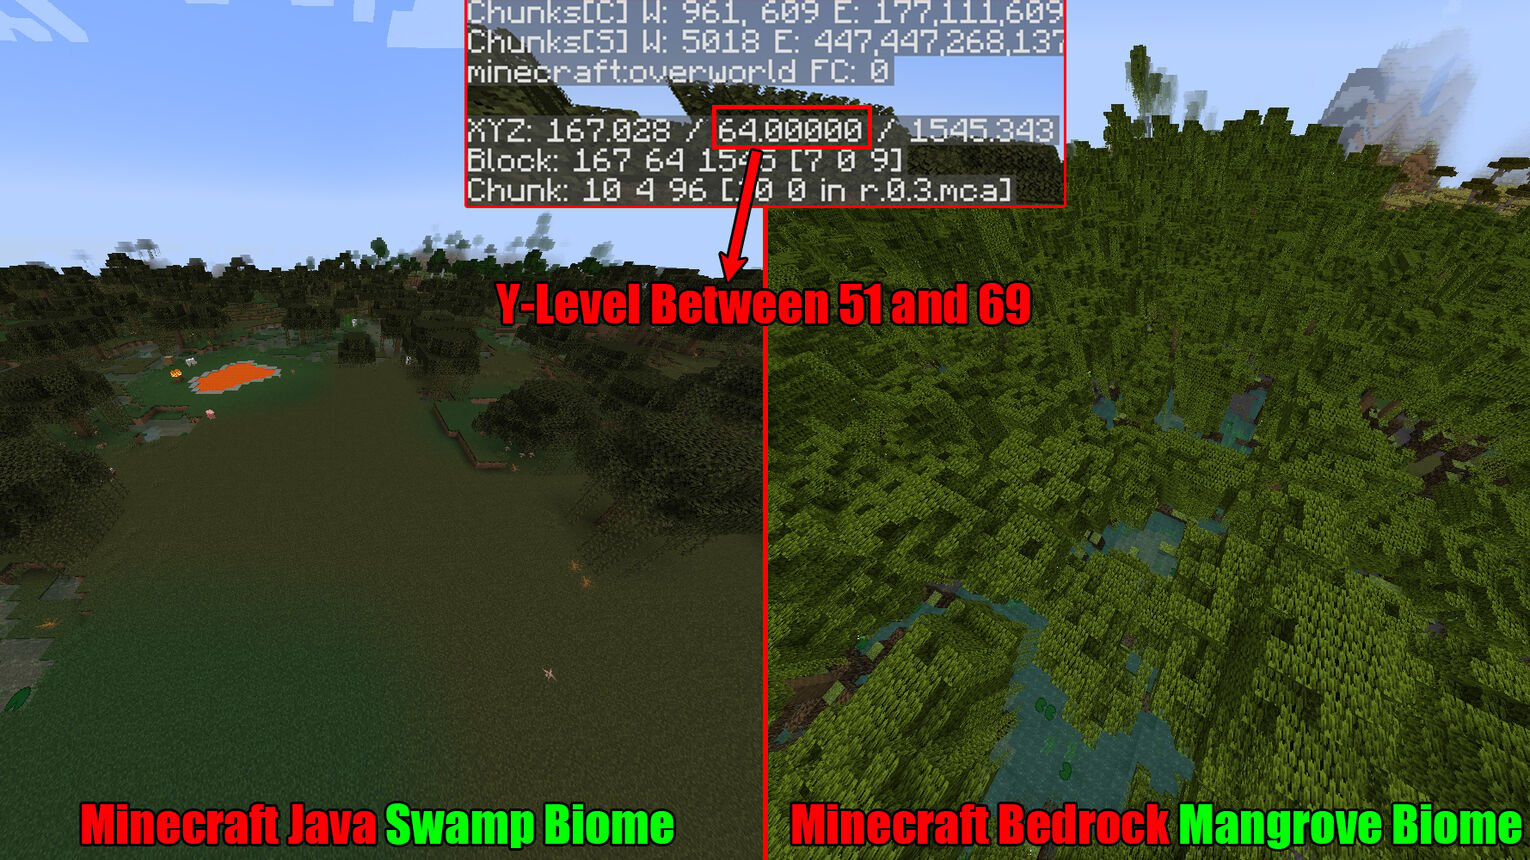
Make sure you clear the surrounding area a bit. That's because this farm will be approximately 33 blocks long and wide.
Make a 4-block Deep 7x7 Hole With a Slab in the Middle
Now in the place where you're making the farm, around the center place a slab. Then around the slab, dig a 7x7 hole that's 4 blocks deep with the slab in the dead center.
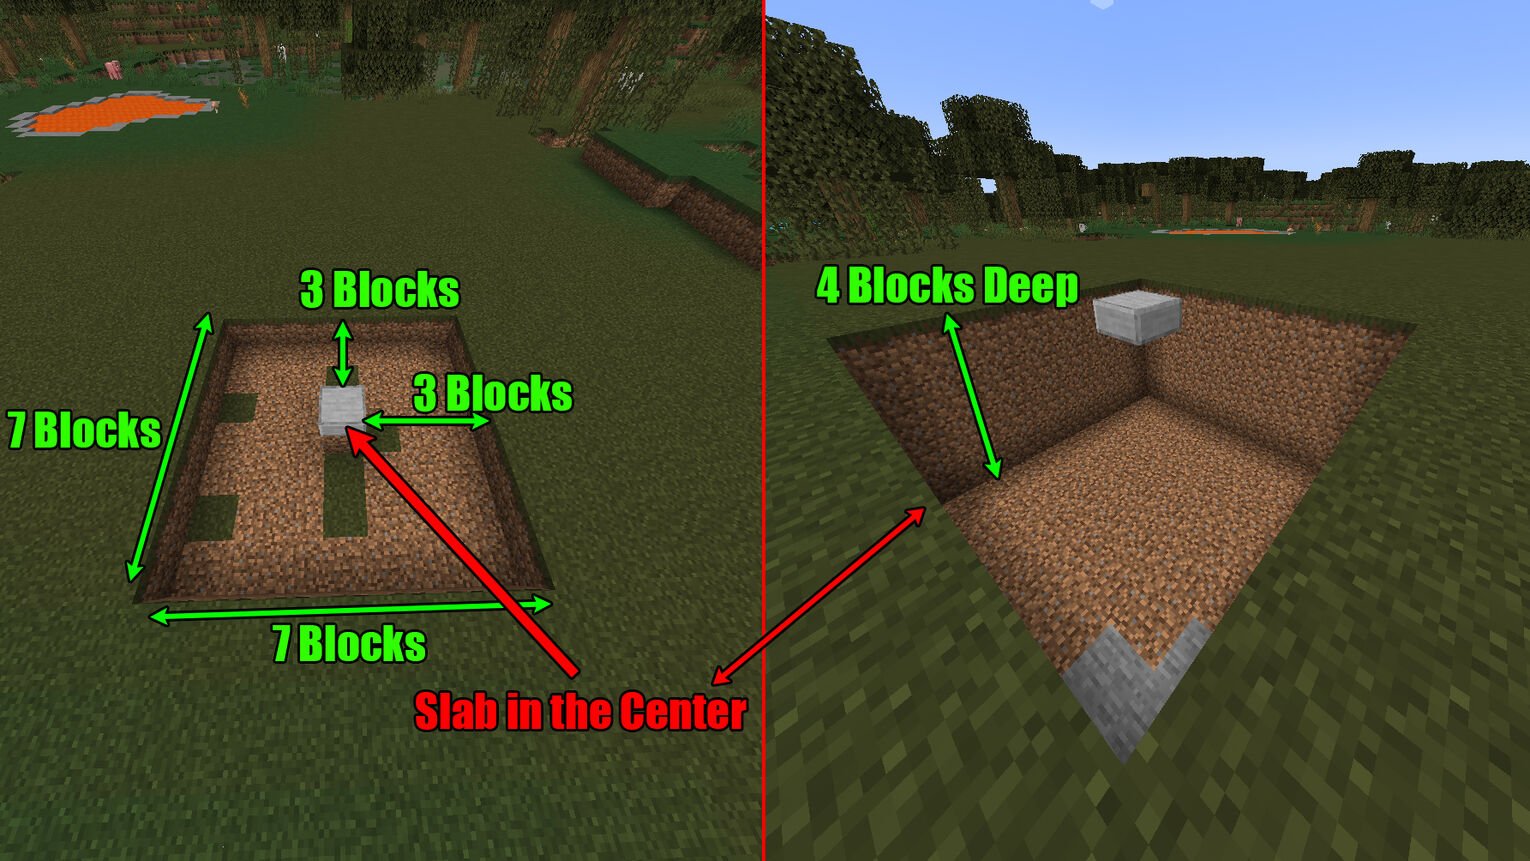
You can also do this hole by digging 3 blocks in all directions from the slab. This way you won't have to count the exact blocks to make the slab stand in the center!
Build a Hole With a Chest and a Hopper Below the Slab
Right underneath the slab in the center on the ground in the hole, dig in 2 more blocks below and to the side. Here, you'll want to place a double chest, and then connect a hopper to it directly underneath the slab. Then place a temporary block above the hopper, add a cobblestone wall atop it, and break the temporary block.
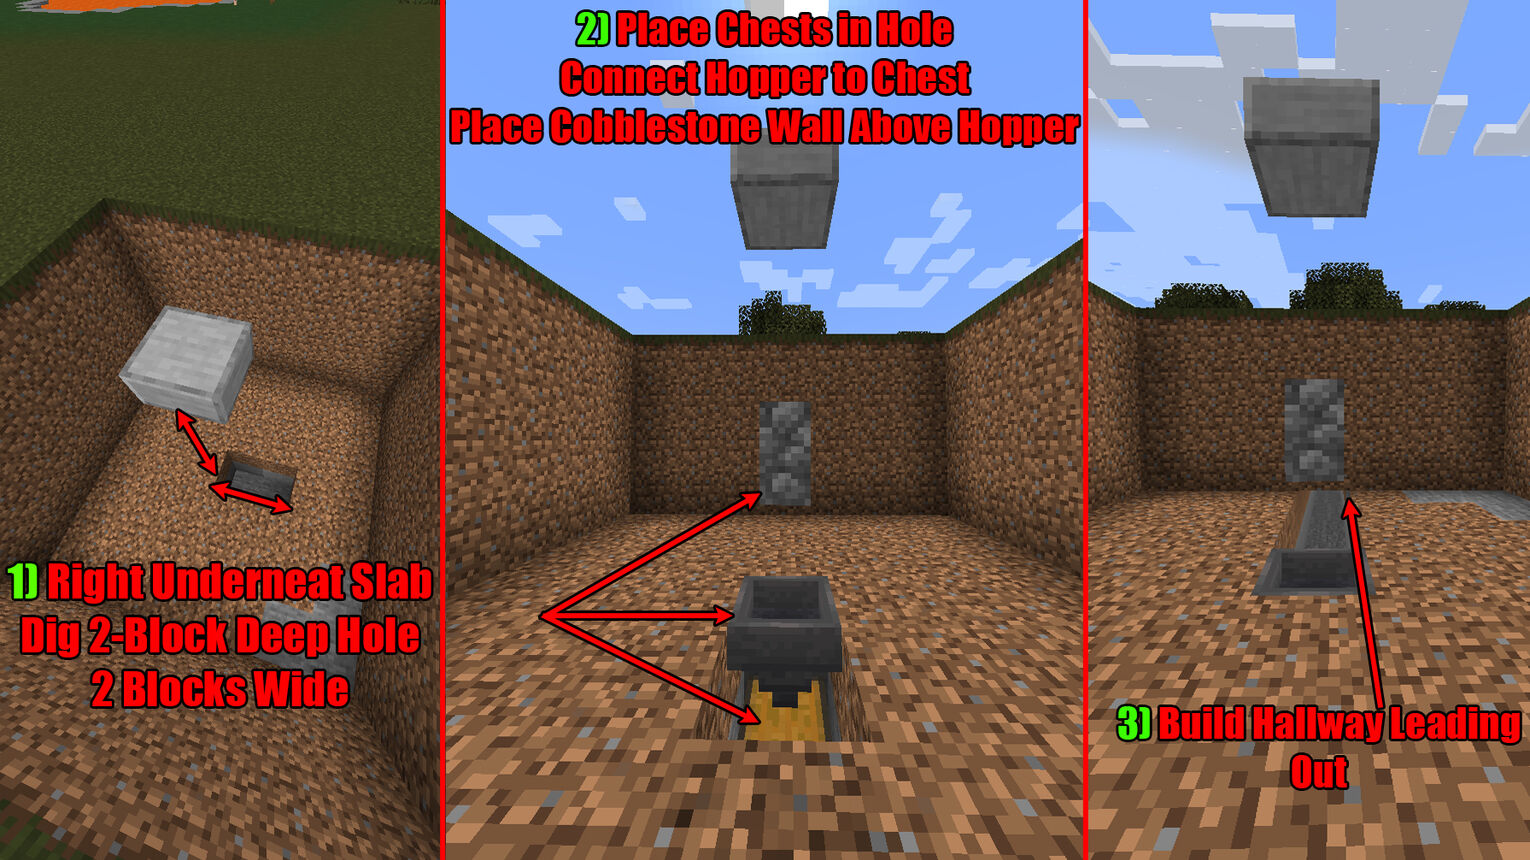
To connect a hopper to the chest, press Shift to crouch and right-click the chests with the hopper in hand. Make sure the hopper is underneath the slab connected to the chests. These chests are where the slime balls will drop. So you can also build a tunnel leading out sideways from the double chest to have faster access!
Cover the Whole Hole With Magma Blocks
With the chest and hopper placement done, this step is easy. Go ahead and just fill the hole with magma blocks.
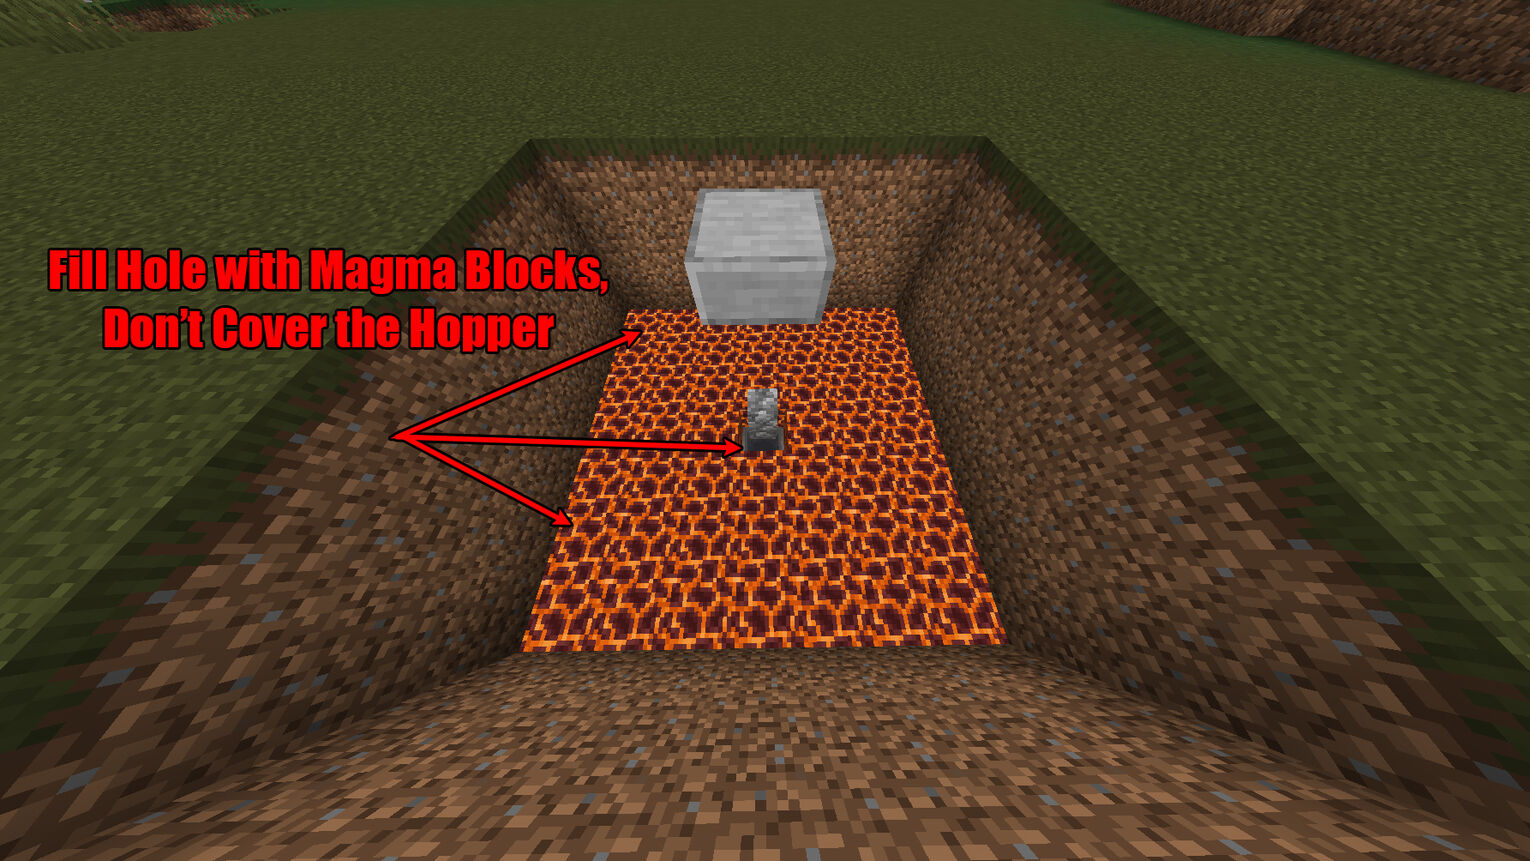
Make sure you don't place magma blocks underneath the cobblestone wall. These magma blocks are where the Minecraft slimes will drop to their death, so the hopper should be able to collect their slime balls!
Make a Wall Circle Layout 13 Blocks Away From Hole
From the center of the sides of the hole, on each side, you'll want to count 13 blocks outward and place a solid block. Then on each side from those blocks, place 4 more blocks which should make it 9 blocks width in total.
Now diagonally directly underneath these little walls, place 3 more blocks on all sides. Finally, connect each side diagonally with the solid blocks. You'll instantly understand how to build the layout with the image below:
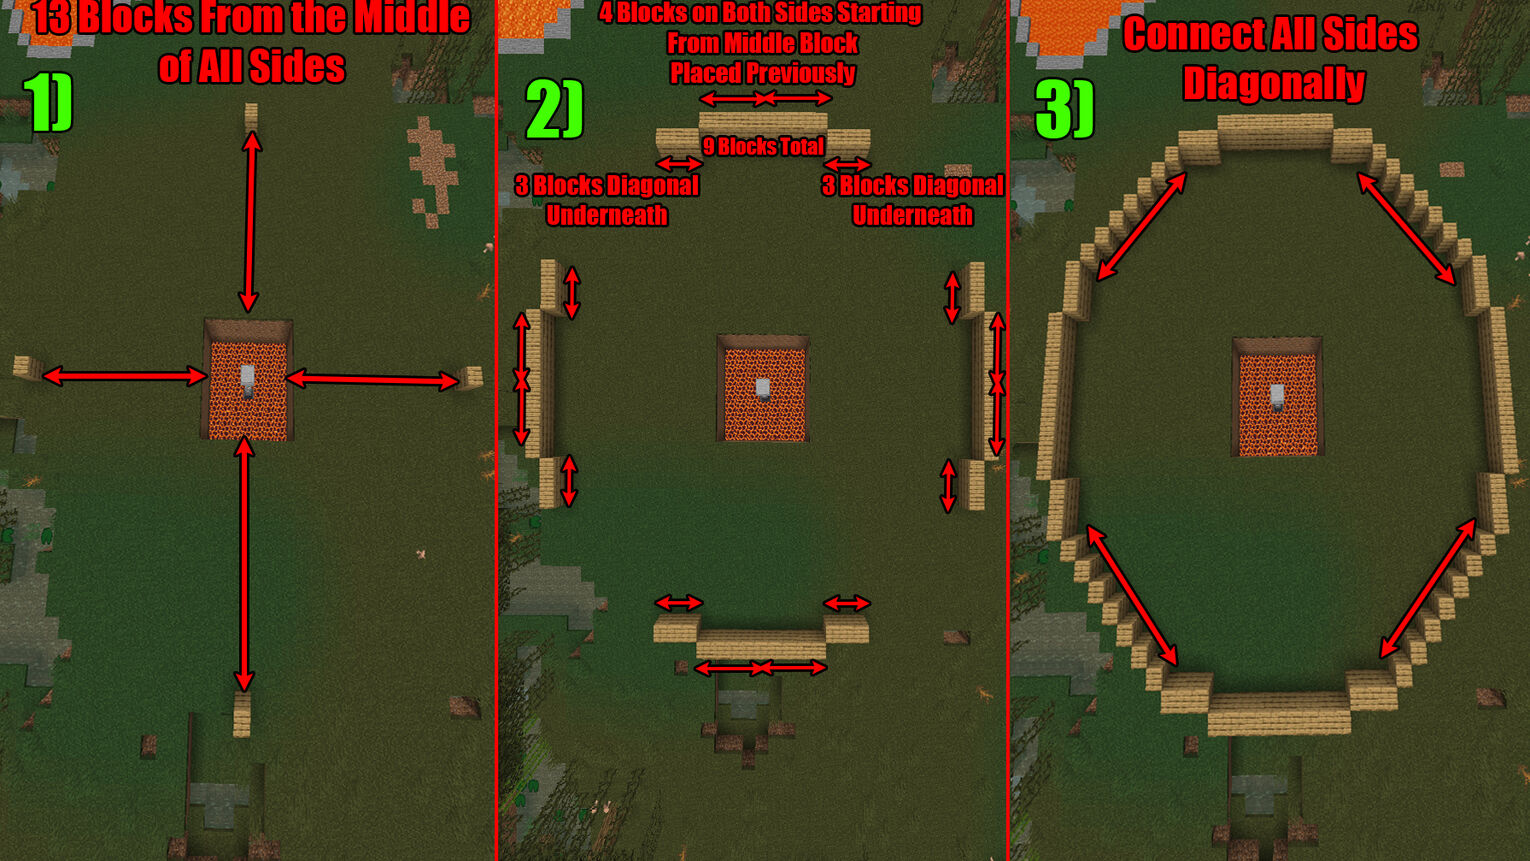
Although it sounds complicated, the layout's basically a giant circle that's easy to build. You'll even need these kinds of circles when you're building the best Minecraft house ideas!
Place Glow Lichen in a Pattern Inside the Dome
Get the glow lichen in your hand now and get inside the circle you built. Place the lichen diagonally on each corner of the hole while leaving 1 block empty on the ground.
Then count 5 blocks to the sides closest to the walls of all the lichens and place 1 more lichen. Finally, from those outside lichens, count 4 blocks to the middle and place a lichen again on all sides. These middle ones should be parallel to the slab of the hole in the middle.
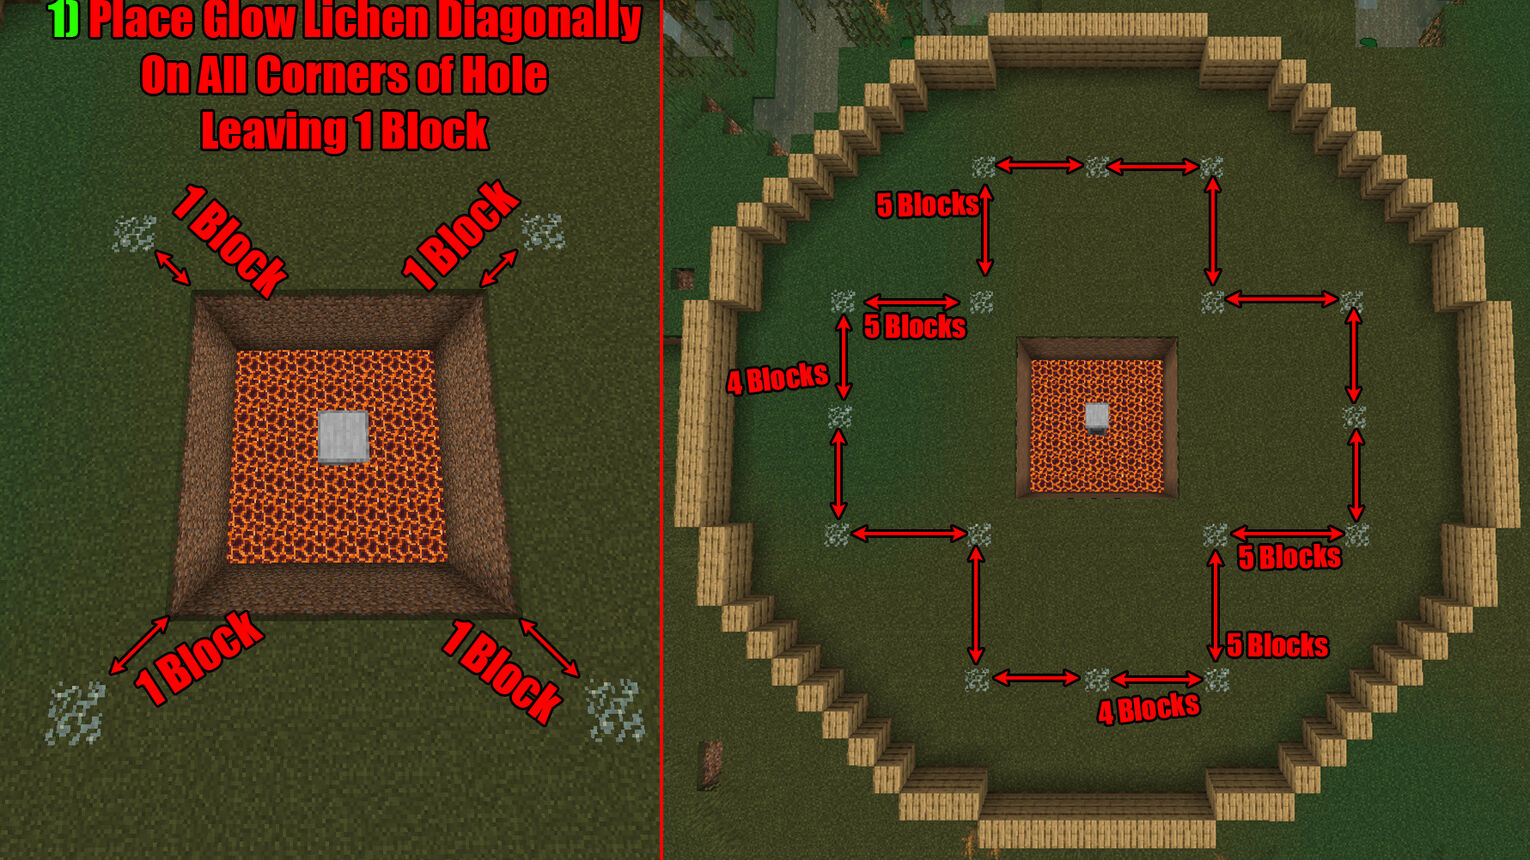
Besides glowing lichens, you can also cover the whole ground with brown mushrooms of the dome slime chunk which will make slimes spawn faster! But for this to work, first you'll have to farm a lot of brown mushrooms and make the roof of this build.
Place Fence Around the Slab and Spawn an Iron Golem
Even when farming on a slime chunk, using an iron golem is essential since when slimes spawn, they'll go toward it. So now you'll want to cover the middle slab of the hole with fences and spawn an iron golem in it.
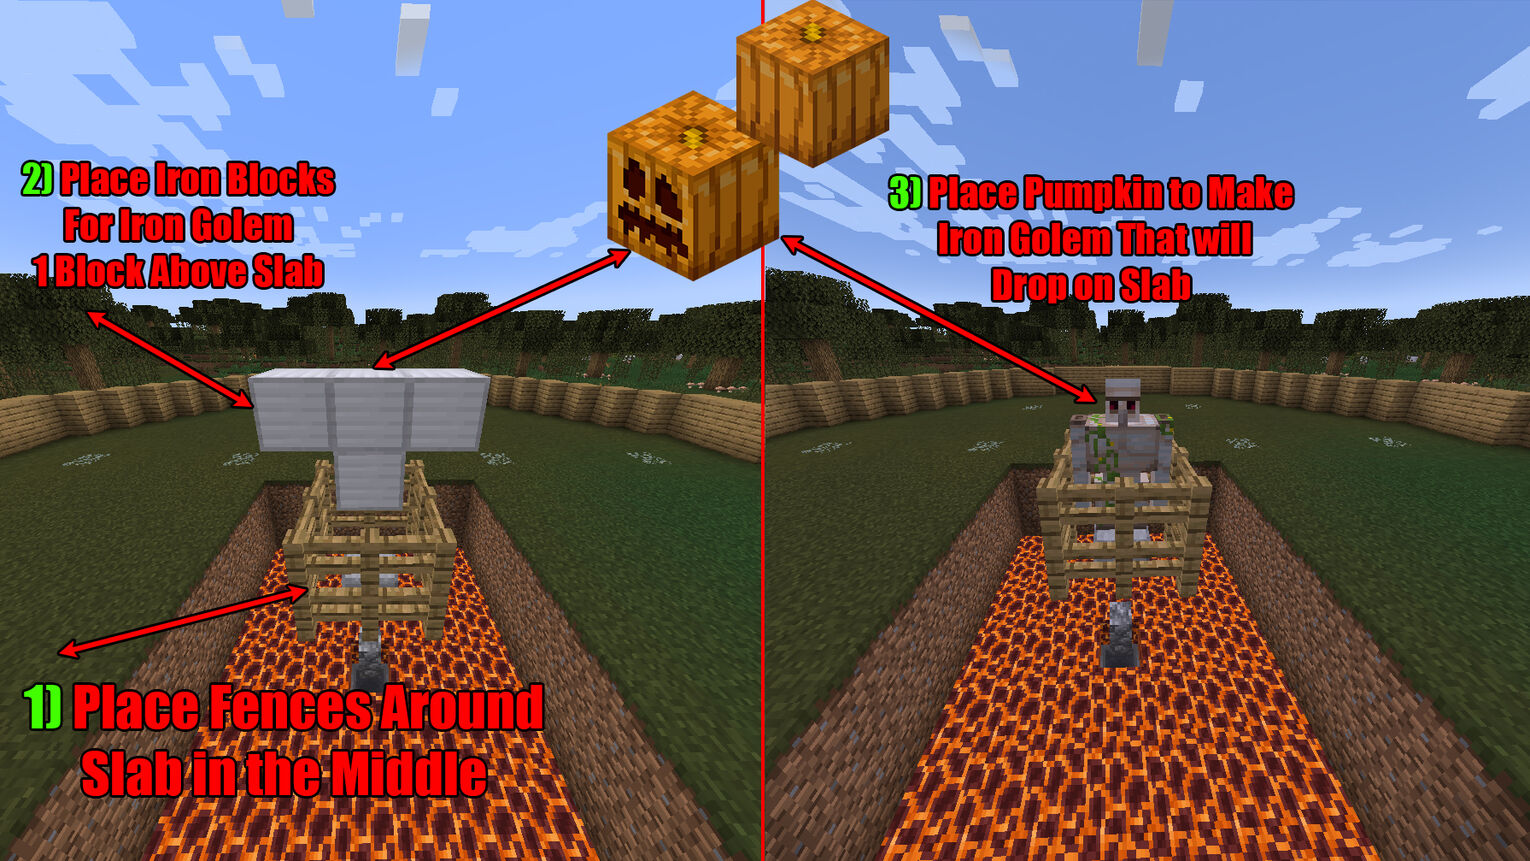
When placing the iron blocks, use a temporary block and make the iron golem a bit above the slab and fences. If you place the iron blocks directly on the middle slab, the golem won't spawn. You can even try adding a custom golem by getting the Extra Golems mod!
Place Water Buckets and Buttons in the Hole
After spawning the iron golem, place a water bucket on each corner of the hole. The water should be flowing towards the middle. If you're on the Bedrock edition, you should also add buttonsat the top of all the sides of the hole.
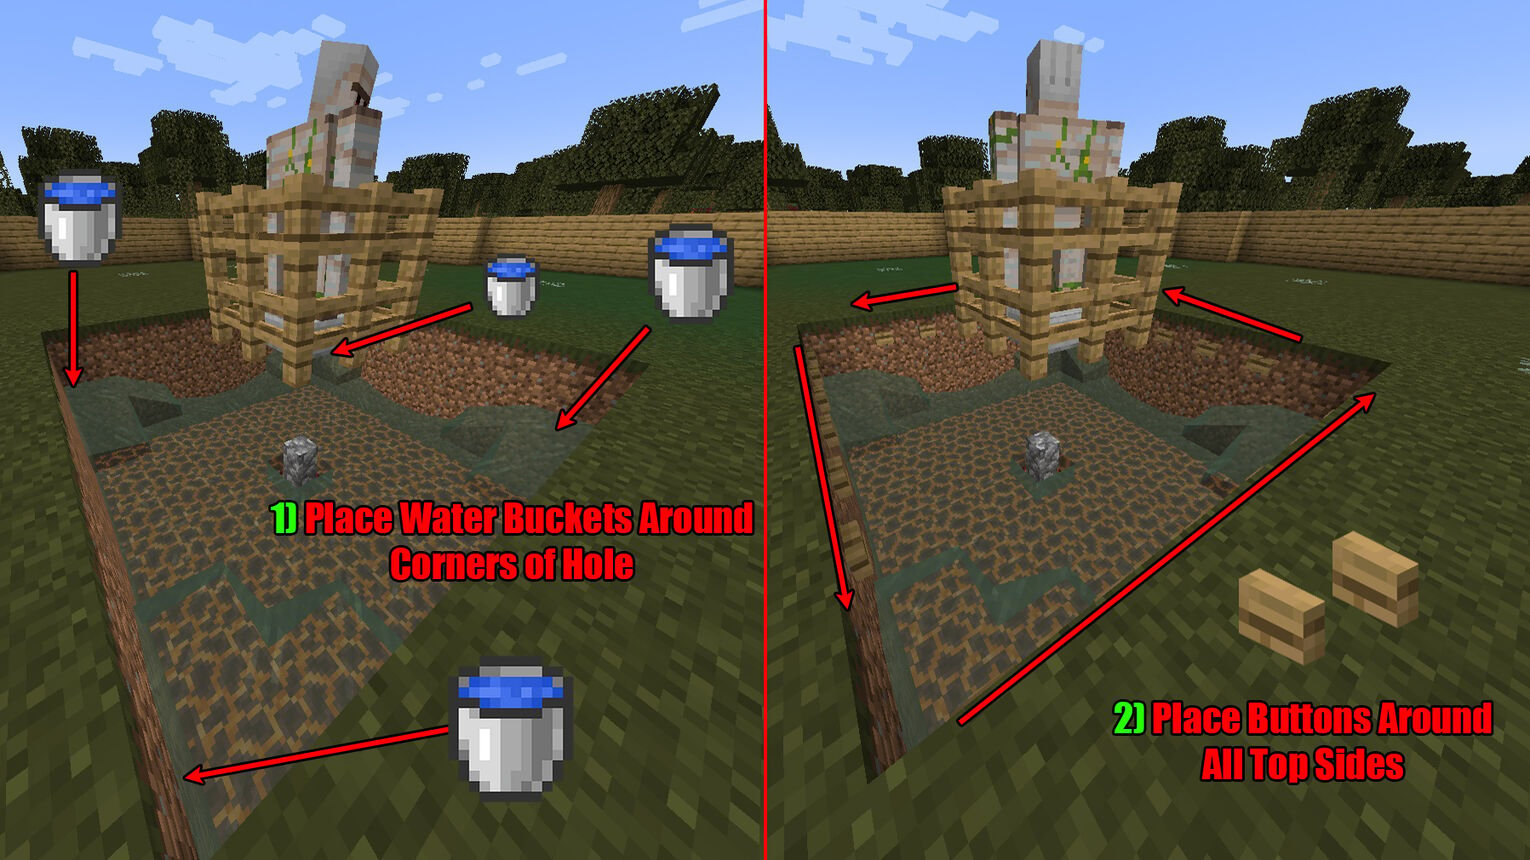
You can add the buttonson the Java edition as well, but on Bedrock it especially makes the naturally spawning slime drop much easier to the magma blocks of the slime chunk. So if you're on Java, you can avoid placing the button s!
Make the Walls 3-Block High and Cover the Top Using Blocks
We're reaching the final stages which you'll have to make all the sides of the walls 3 blocks high. Then by placing a temporary block above the walls cover the whole roof using solid blocks. In the center, make the roof a bit bigger to fit the iron golem.
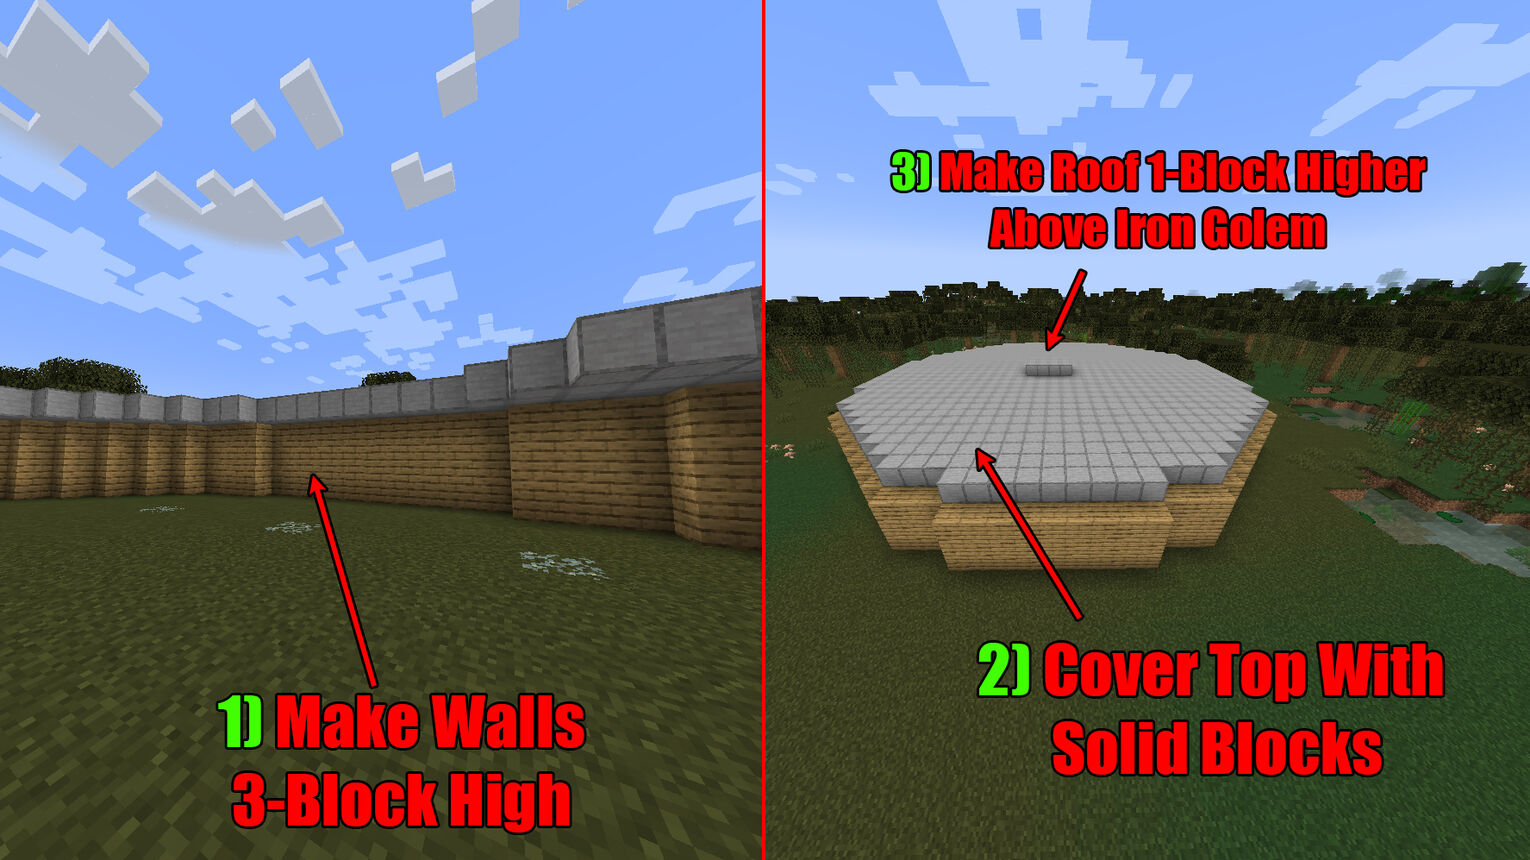
This is a tedious process, even though it'll save you the time from searching for a slime chunk. Finalizing the structure for any farm is the hardest part, even when you're making a Minecraft gold farm!
Surround the Farm With Torches and Build an AFK Hub Spot
To stop other hostile mobs from spawning near the Minecraft slime farm, you'll want to place torches on top of the farm and around it. When other hostile mobs spawn, they'll decrease the spawn rate of the Minecraft slimes in your slime chunk.
After you're done taking care of the hostile mobs, all that's left is to make an AFK hub using the scaffolding high above the ground from the center of the dome. In Java, make an AFK hub 121 blocks above the center. And in Bedrock make the AFK hub 38 blocks above the center.
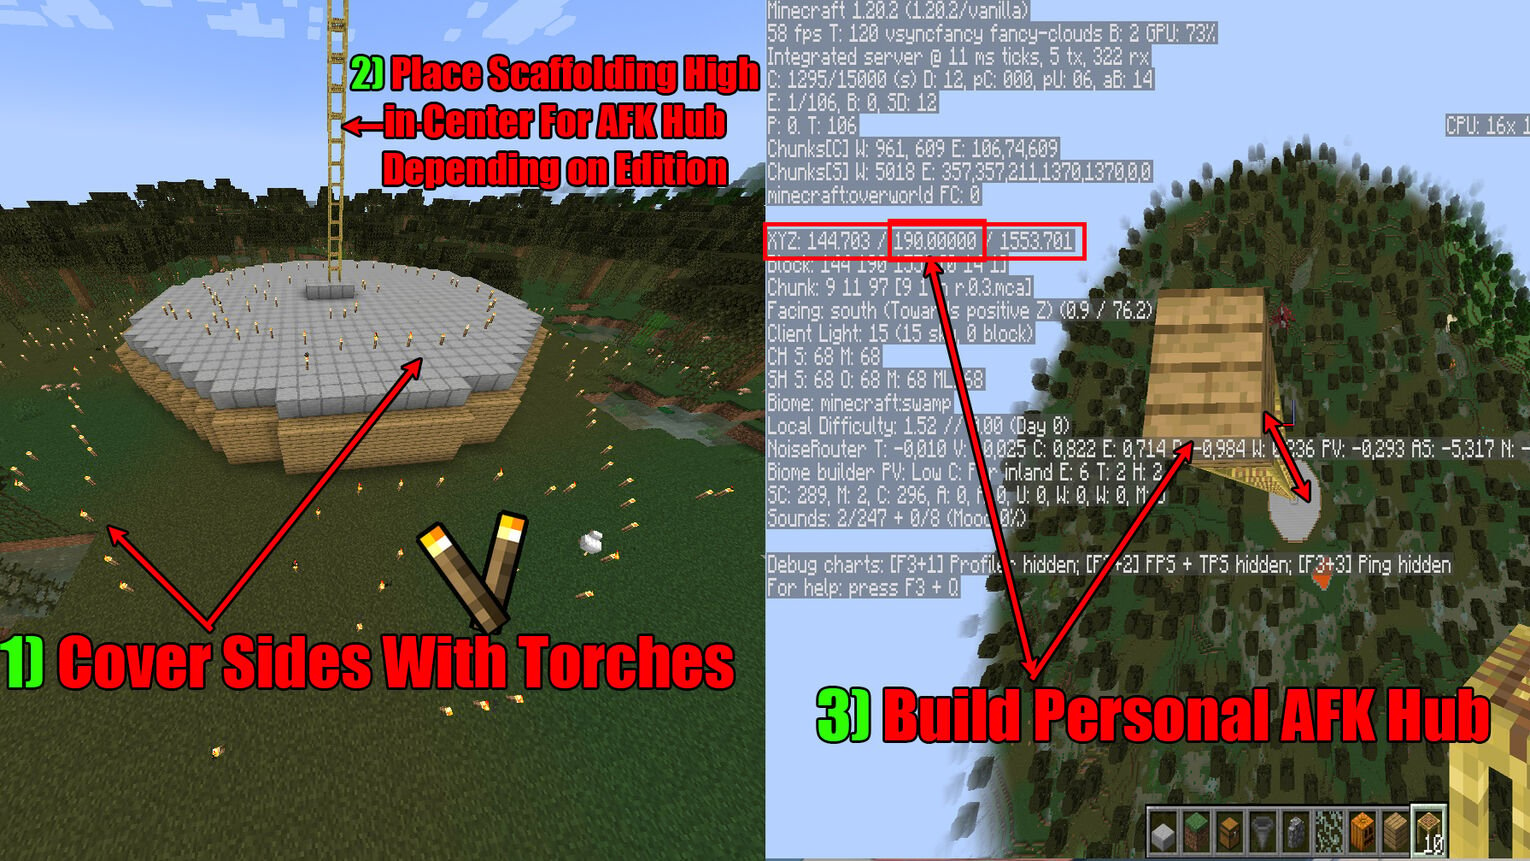
That wraps it up for how to make a slime farm in Minecraft. Although other slime farms use special slime chunks, you won't go through the hassle of finding one with this. Now you can easily make slime blocks and craft sticky pistons!


.svg)


![Best HUD Mods in Minecraft [Top 10 List]](https://theglobalgaming.com/assets/images/_generated/thumbnails/4077159/best-hud-mods-minecraft_03b5a9d7fb07984fa16e839d57c21b54.jpeg)
![How to Join a LAN World in Minecraft [Java & Bedrock]](https://theglobalgaming.com/assets/images/_generated/thumbnails/4077161/how-to-join-a-lan-world-minecraft_03b5a9d7fb07984fa16e839d57c21b54.jpeg)
