![How to Make an Elevator in Minecraft [Redstone Guide]](https://theglobalgaming.com/assets/images/_generated/thumbnails/2885875/how-to-make-elevator-minecraft-1_94948129f3d674eb46f0eebb5e6b8018.jpeg)
Minecraft Elevator Java Edition: Items and Guide
This Redstone elevator will only work for the Minecraft Java edition, but don't worry! We'll also see how to make a functioning water elevator that works for both Bedrock and Java below. So here are the items you'll need to build this Redstone elevator:
- 1x Obsidian block
- 2x Note blocks
- 2x Observers
- 3x Sticky pistons
- 5x Slime blocks
- 2x Redstone dust
- 2x Buttons
- Random building blocks, we'll be using wood planks
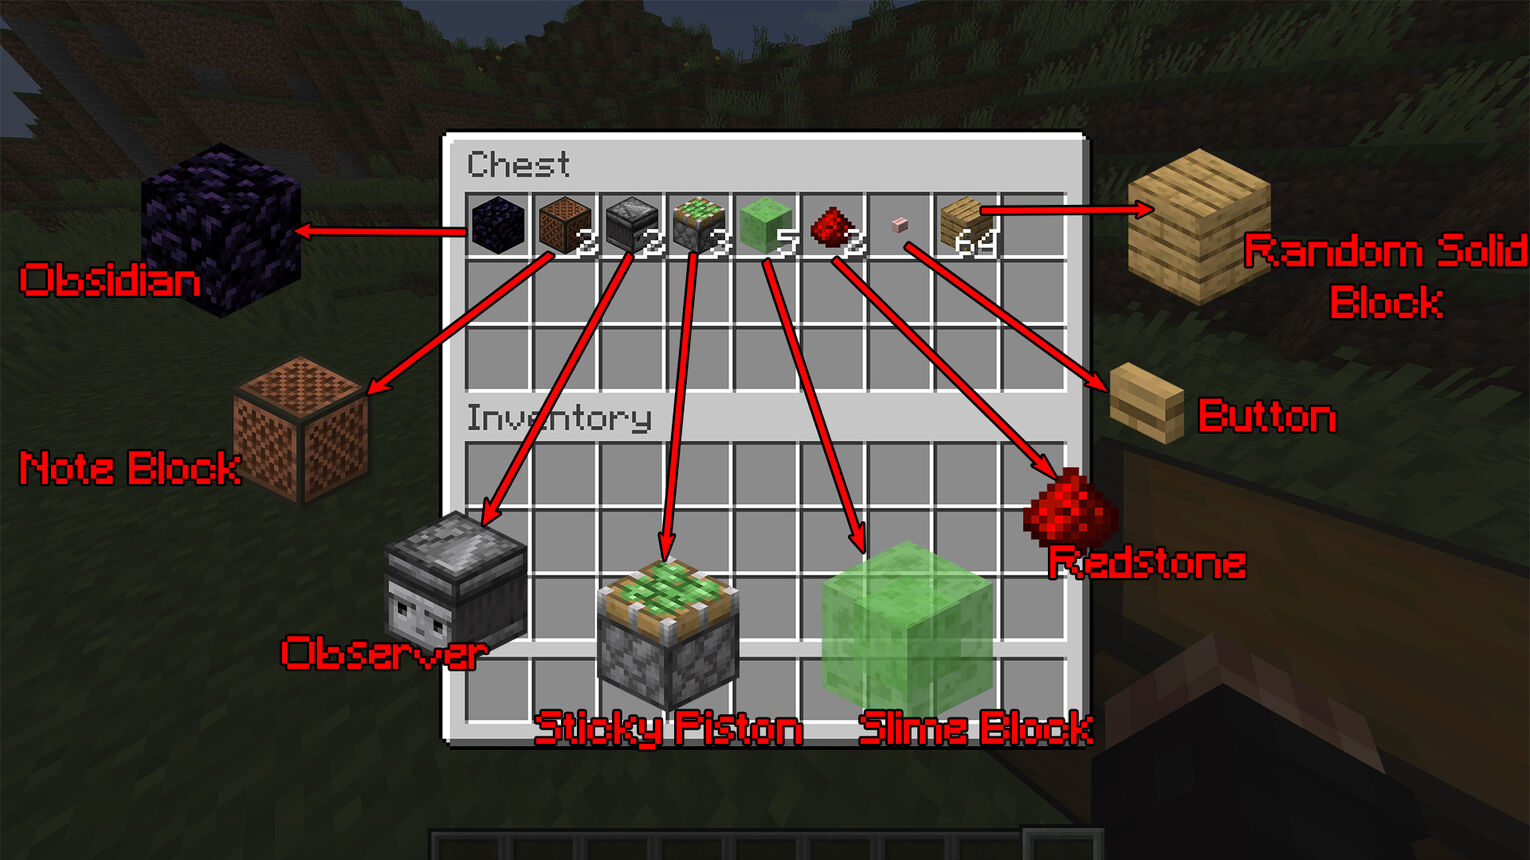
These items are fairly easy to get and craft if you're making the elevator in Survival mode. Once you have them all, here's how to make an elevator in Minecraft!
Dig a Cross Hole
First thing first, you'll want to dig a cross hole where the elevator will be located. Choose a side from which you'll enter the elevator, and extend it by 1 more block.
Then, you'll want to make the center of the cross 3 blocks deep, the side which you chose 2 blocks deep, and make the other sides only 1 block deep. The hole should look a little something like this:
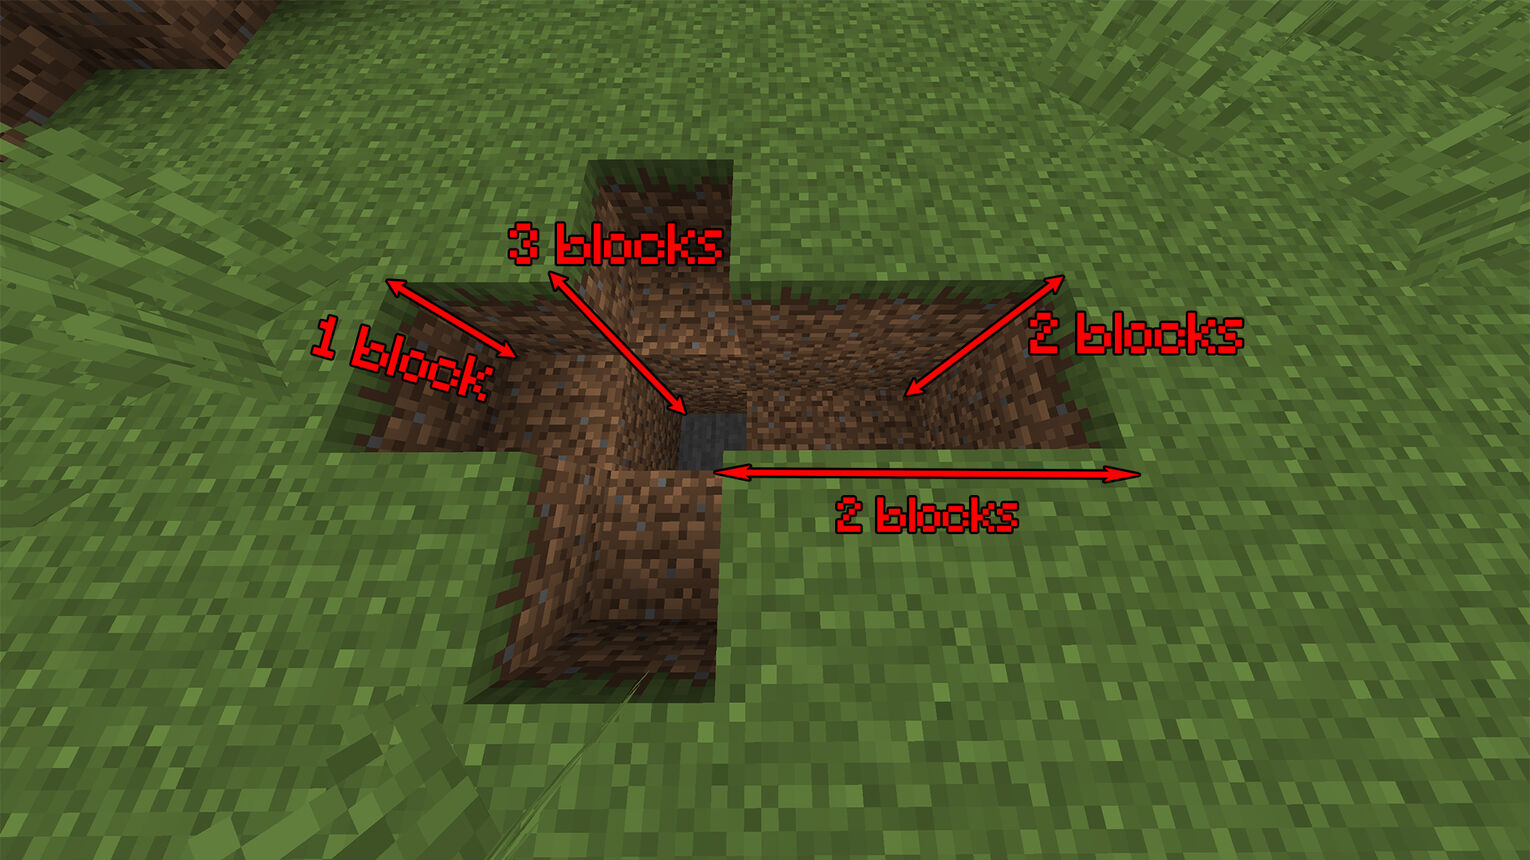
If you're already building this elevator in your great Minecraft home, keep in mind where the cross is facing as you'll be entering from there. Also, make sure to leave some space around the hole to make the process of building the elevator a bit easier!
Place a Note Block and Redstone Dust in the Hole
Once you define your hole, you'll want to place a note block in the center of the hole. Then, add the 2 Redstone dust in the hole to the side you chose to enter the elevator from connecting to the note block. And finally, at the end of that side on top of the Redstone dust place a solid block and a button atop it.
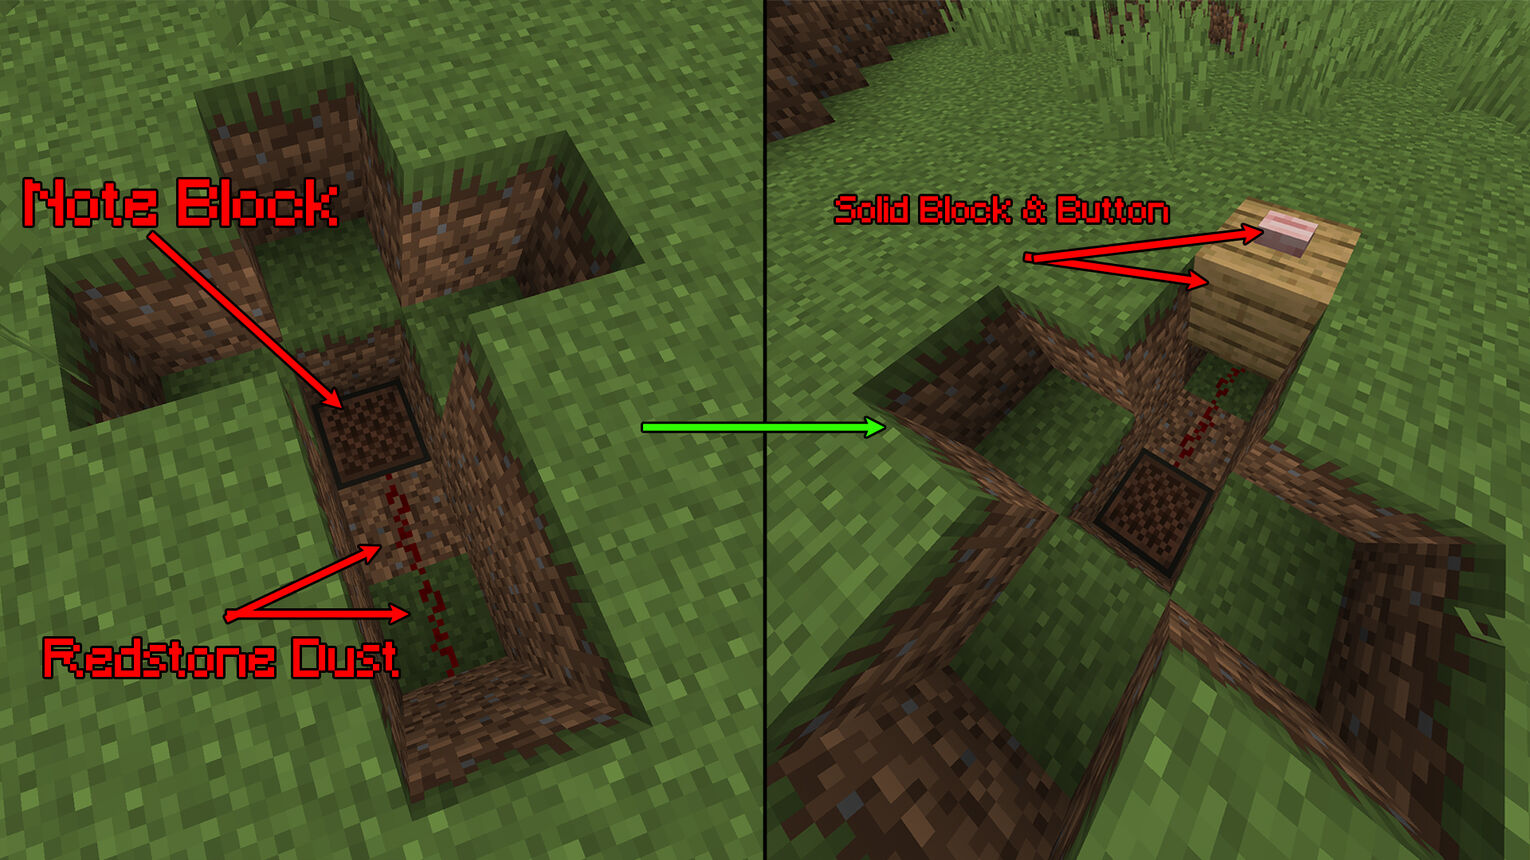
The button is how you'll be activating the elevator to go up and down. If you hate stepping on buttons, you might love stepping on pressure plates. That's right - you can change the button for a pressure plate and once you step on it to enter the elevator, it will instantly activate it!
Place an Observer, Sticky Pistons, and Slime Blocks
Now comes the trickier part of making this Minecraft elevator, and that's the mechanism. We'll start by placing an observer on top of the note block. You can do so by Shift crouching while placing the block so as to not activate the note block. Afterward, add a slime block on the observer.
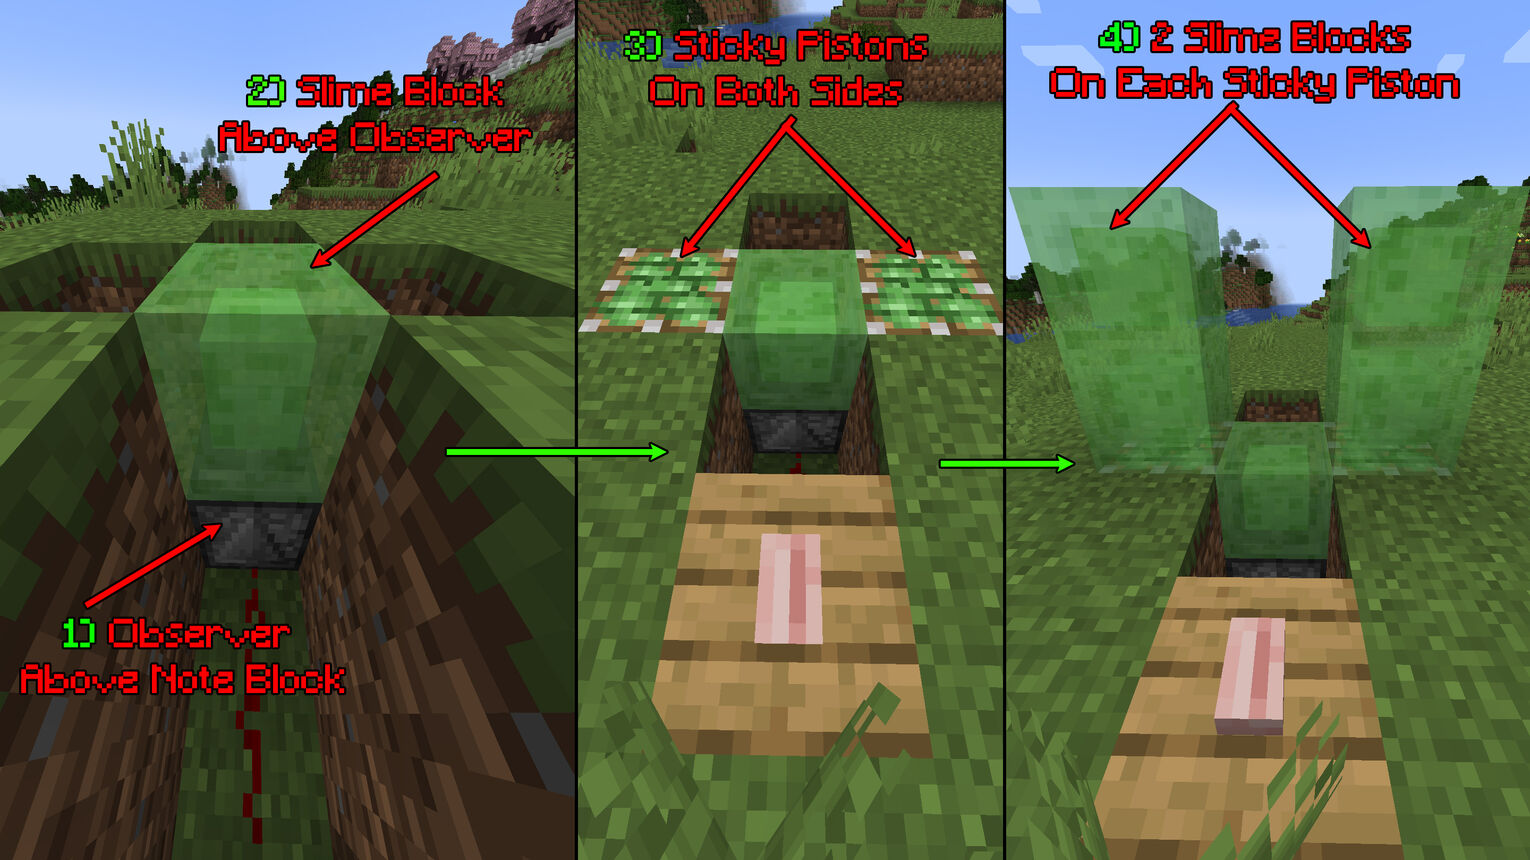
On the left and right sides of the hole, you'll want to place 2 sticky pistons combined with two blocks of slime upward. These slime blocks will stick any block to themselves, so make sure to leave some space around them so they won't destroy your whole house!
Place Sticky Piston and Observer Facing Downward
When you look at the build so far, there should be an empty space in between the slime blocks you faced. In that empty space, place an observer and a sticky piston facing downward. To do that enter the 1-block hole that's left in front of the elevator, crouch, aim at the top section of the slime block, place the observer, and then the sticky piston on the observer.
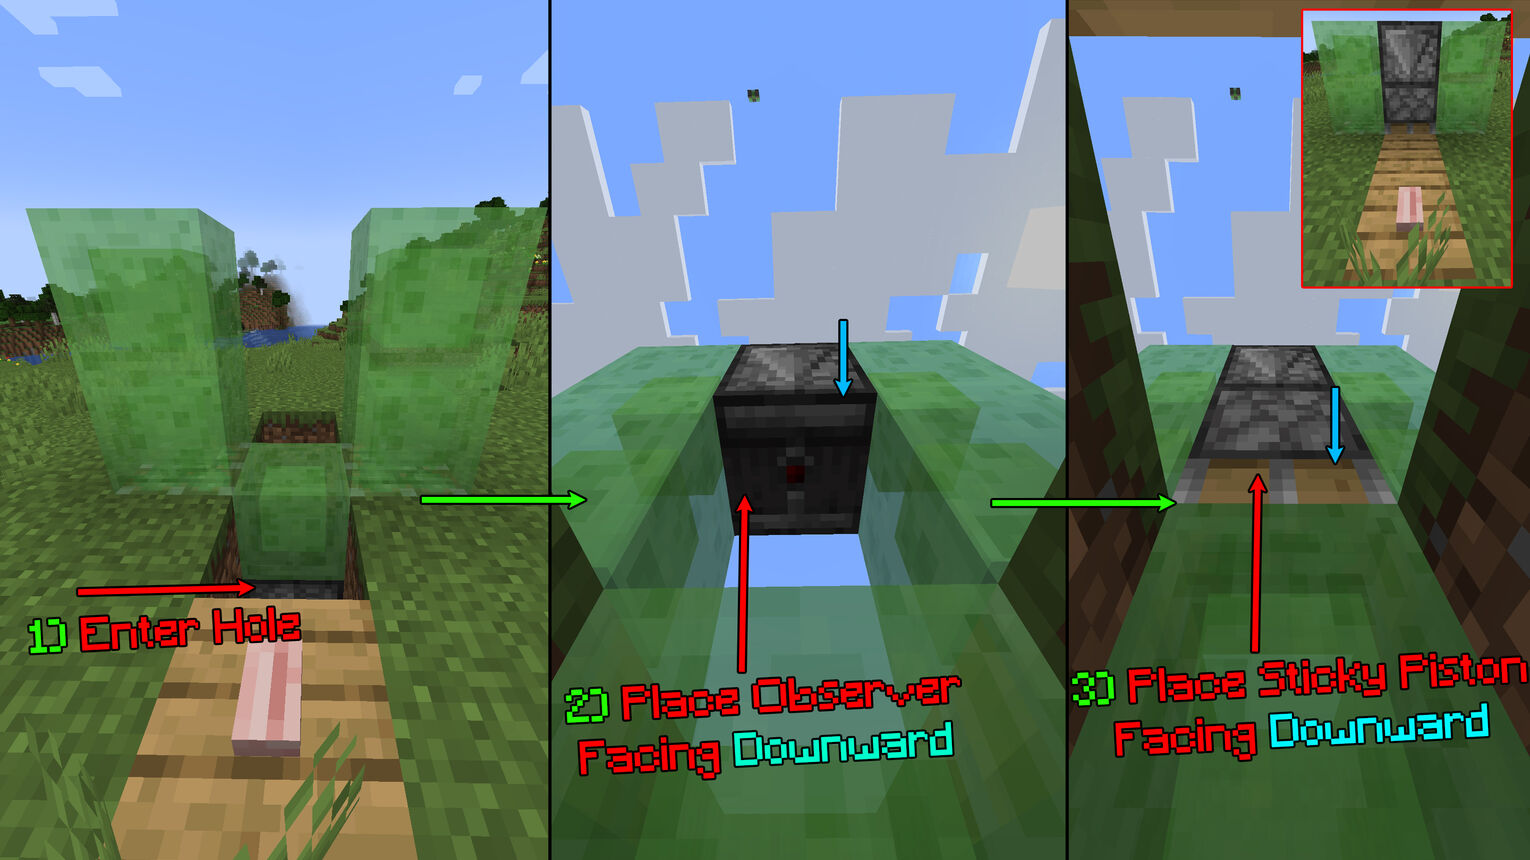
Fill the hole you just entered with a solid block, and congratulations, you've finished building the elevator. If you press the button, the elevator will go upward infinitely! So next we'll want to make the upper section of the elevator.
Build the Top Section of the Elevator
Up high in the air, make a platform for where you'll want the elevator to stop. In the platform, dig a hole where the elevator is located underneath so it can have space when it enters. Then, build 4 blocks high on the platform with a random block.
From the 4-block height you just built, place an obsidian block located directly above the observer.
Add a note block underneath the obsidian, and a solid block in front of the note block. Now place a button on the solid block in front of the note block, and when you press it, the elevator will go down!
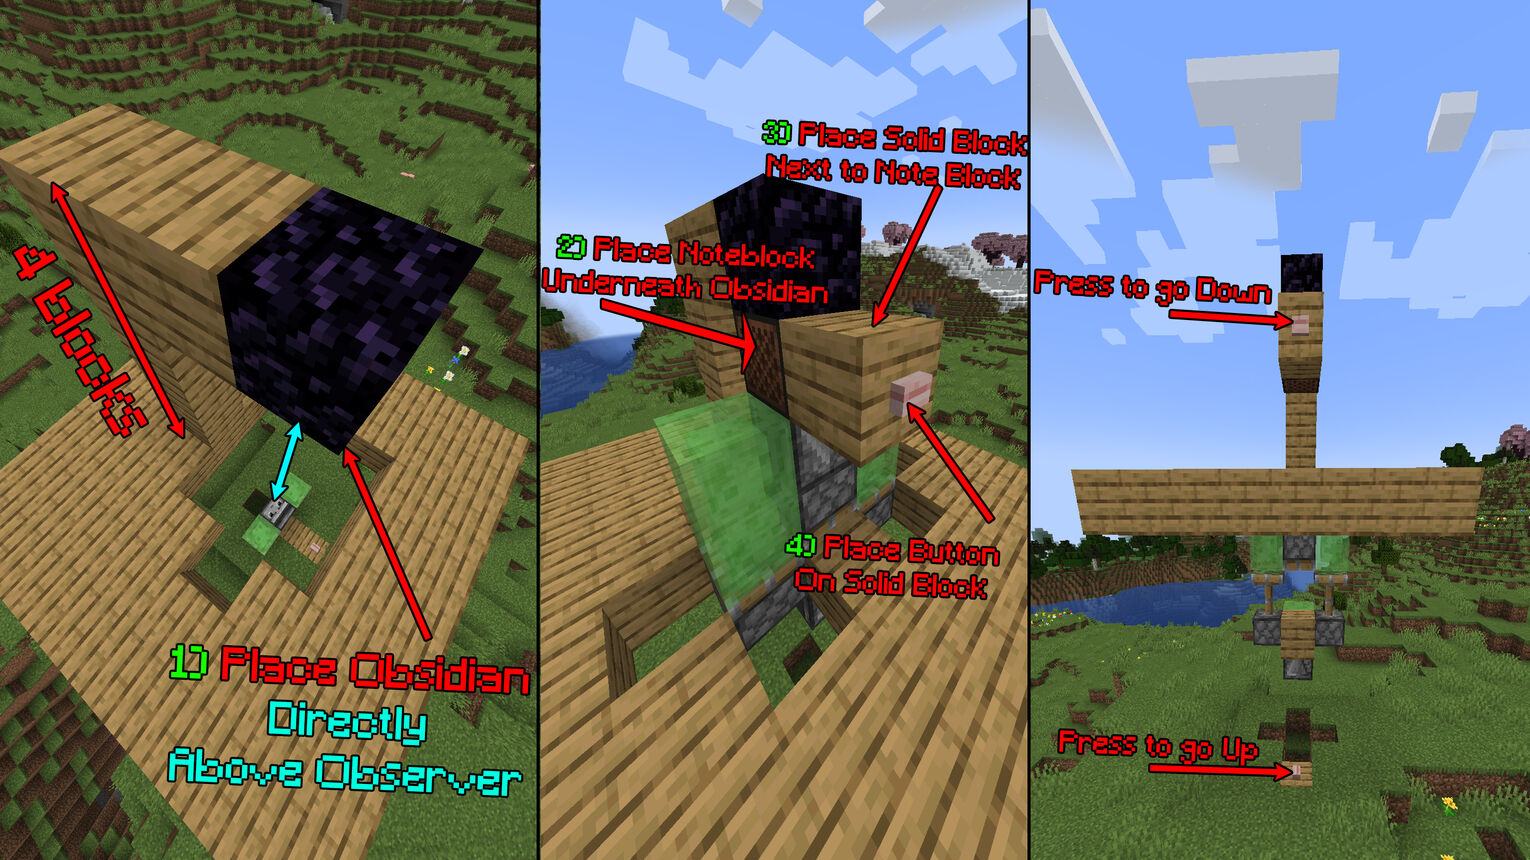
Once you press the button on the bottom, the elevator will go up. And when you press the button on the top, the elevator will go down.
You can decorate the elevator as you wish, and an idea of mine is to cover the empty side of the elevator while going up and down with black-stained glass!
How to Make a Water Elevator in Minecraft: Java and Bedrock
Although the above elevator may not work in the Minecraft Bedrock edition, there is one that works everywhere. And that's the water elevator! Here are the items you'll need to make a water elevator in Minecraft:
- 1 Soul sand block
- 1 Magma block
- 2 Water buckets
- 4 Signs
- Some stacks of kelp
- Some stacks of building blocks of your choice, like glass.
These are even easier items you can get than the previous elevator, so you shouldn't worry about that! With that said, here's how you can make a quick and easy Minecraft water elevator:
- Build 2 narrow corridors facing upward with your building block choice
- Break 2 blocks for the entrance to the water elevator and place 2 signs per corridor on the side walls
- Add a water bucket from the top of the narrow corridors which will make flowing water
- Place kelp up to the highest point of the corridors, and then destroy it to stop each water block from flowing
- In one corridor, break one block off the ground and place soul sand
- In the other corridor, break the ground and place magma blocks
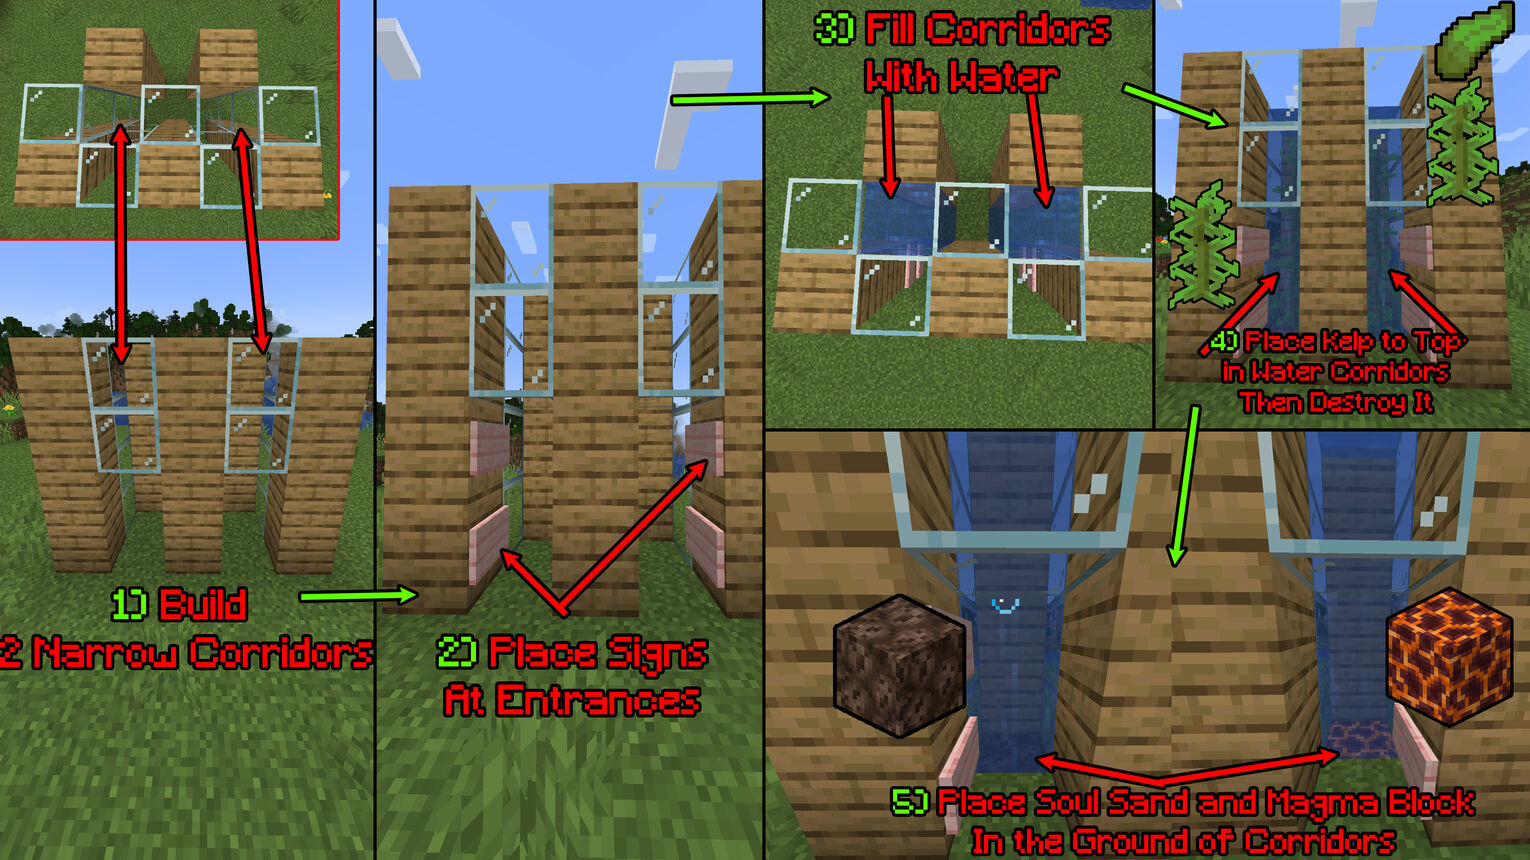
The magma blocks will pull you downward faster so you can descend from the elevator. But be careful in a Survival world since a magma block can damage you.
While the soul sand will be a sort of bubble elevator that will pull you upward very fast. You can use this water elevator to go up and down high places very fast!


.svg)


![How to Make a Splash Potion in Minecraft [Brewing Guide]](https://theglobalgaming.com/assets/images/_generated/thumbnails/2883865/how-to-make-splash-potion-minecraft_03b5a9d7fb07984fa16e839d57c21b54.jpeg)
![Best HUD Mods in Minecraft [Top 10 List]](https://theglobalgaming.com/assets/images/_generated/thumbnails/4077159/best-hud-mods-minecraft_03b5a9d7fb07984fa16e839d57c21b54.jpeg)
![How to Join a LAN World in Minecraft [Java & Bedrock]](https://theglobalgaming.com/assets/images/_generated/thumbnails/4077161/how-to-join-a-lan-world-minecraft_03b5a9d7fb07984fa16e839d57c21b54.jpeg)
